


Studio Diary: June 29, 2024
Studio Diary: June 29, 2024
A glimpse into my current songwriting process

This edition of the studio diary focuses on a recent improvisation I shared over on YouTube. The piece is basically built around the 3-way interplay of
iPad (running Samplr & Patterning 3 in AUM),
Laptop (running Kontakt instruments in Ableton Live), and
Octatrack (acting as a 5-part looper/phrase sampler).
I thought this would be a particularly good video to dissect because it’s a good example of how I tend to start my songwriting process: I typically prefer to focus on a single sample or sound, and try to expand on that singular element through resampling and improvisation.
Here’s the video in question:
Background
Bear with me for a minute while I offer some context for the video I prepared.
I mentioned in a prior post that I entered the new year struggling to overcome a combination of burnout and near-total creative block. I’m happy to say that things appear to be improving and I have a lot more energy for music-making these days. I can’t say for sure why that is, but I’m just going to run with it while it lasts.
The first order of business with this newfound energy is tackling a new album for Gray Acres, an ambient/drone project I’ve maintained with my twin brother Mike since 2018 (or thereabouts). We’ve released music on Sound in Silence, Whitelabrecs, and Archives in years past, but it’s been a while since our last album in 2021 and we’ve both been getting the itch to start something new. I’ve been slowly and methodically chipping away at some new Gray Acres ideas that we’ll shape up later this summer, and as such, I’m finding myself in “exploratory” mode quite often nowadays. I’ll sit down with whatever time I have, hit record, and explore whatever sounds and textures I can create with what’s in front of me.
I’m not much of a planner or deep thinker in the studio. Most of what I do is just messing around and playing with things in search of pleasure and fun sounds. I talk a lot about “play time” when I describe my creative habits to other people, and I’ve worked hard to reduce the amount of “stuff” in my studio in such a way that it maximizes my play time. I recently had an emailed exchange with my friend Dominik about reduction in the studio, and think it’s worth putting here:
It’s about removing obstacles to self-expression. This looks different for any given artist depending on the specific obstacles they face, but for me, this generally means reducing the amount of physical objects that I have to turn on, patch, and otherwise set up before I’m able to capture a sound.
These longform jams and demos typically yield a good number of interesting ideas to work with; there are, of course, many underwhelming concepts that end up on the chopping room floor, but even if I only get a 30-second snippet of fascinating sound that I can sample and massage into a proper arrangement during future studio time, then it’s time well spent. That’s exactly what I was doing with some older audio when I sat down for this session on June 29.
Setup
Devices and Connections
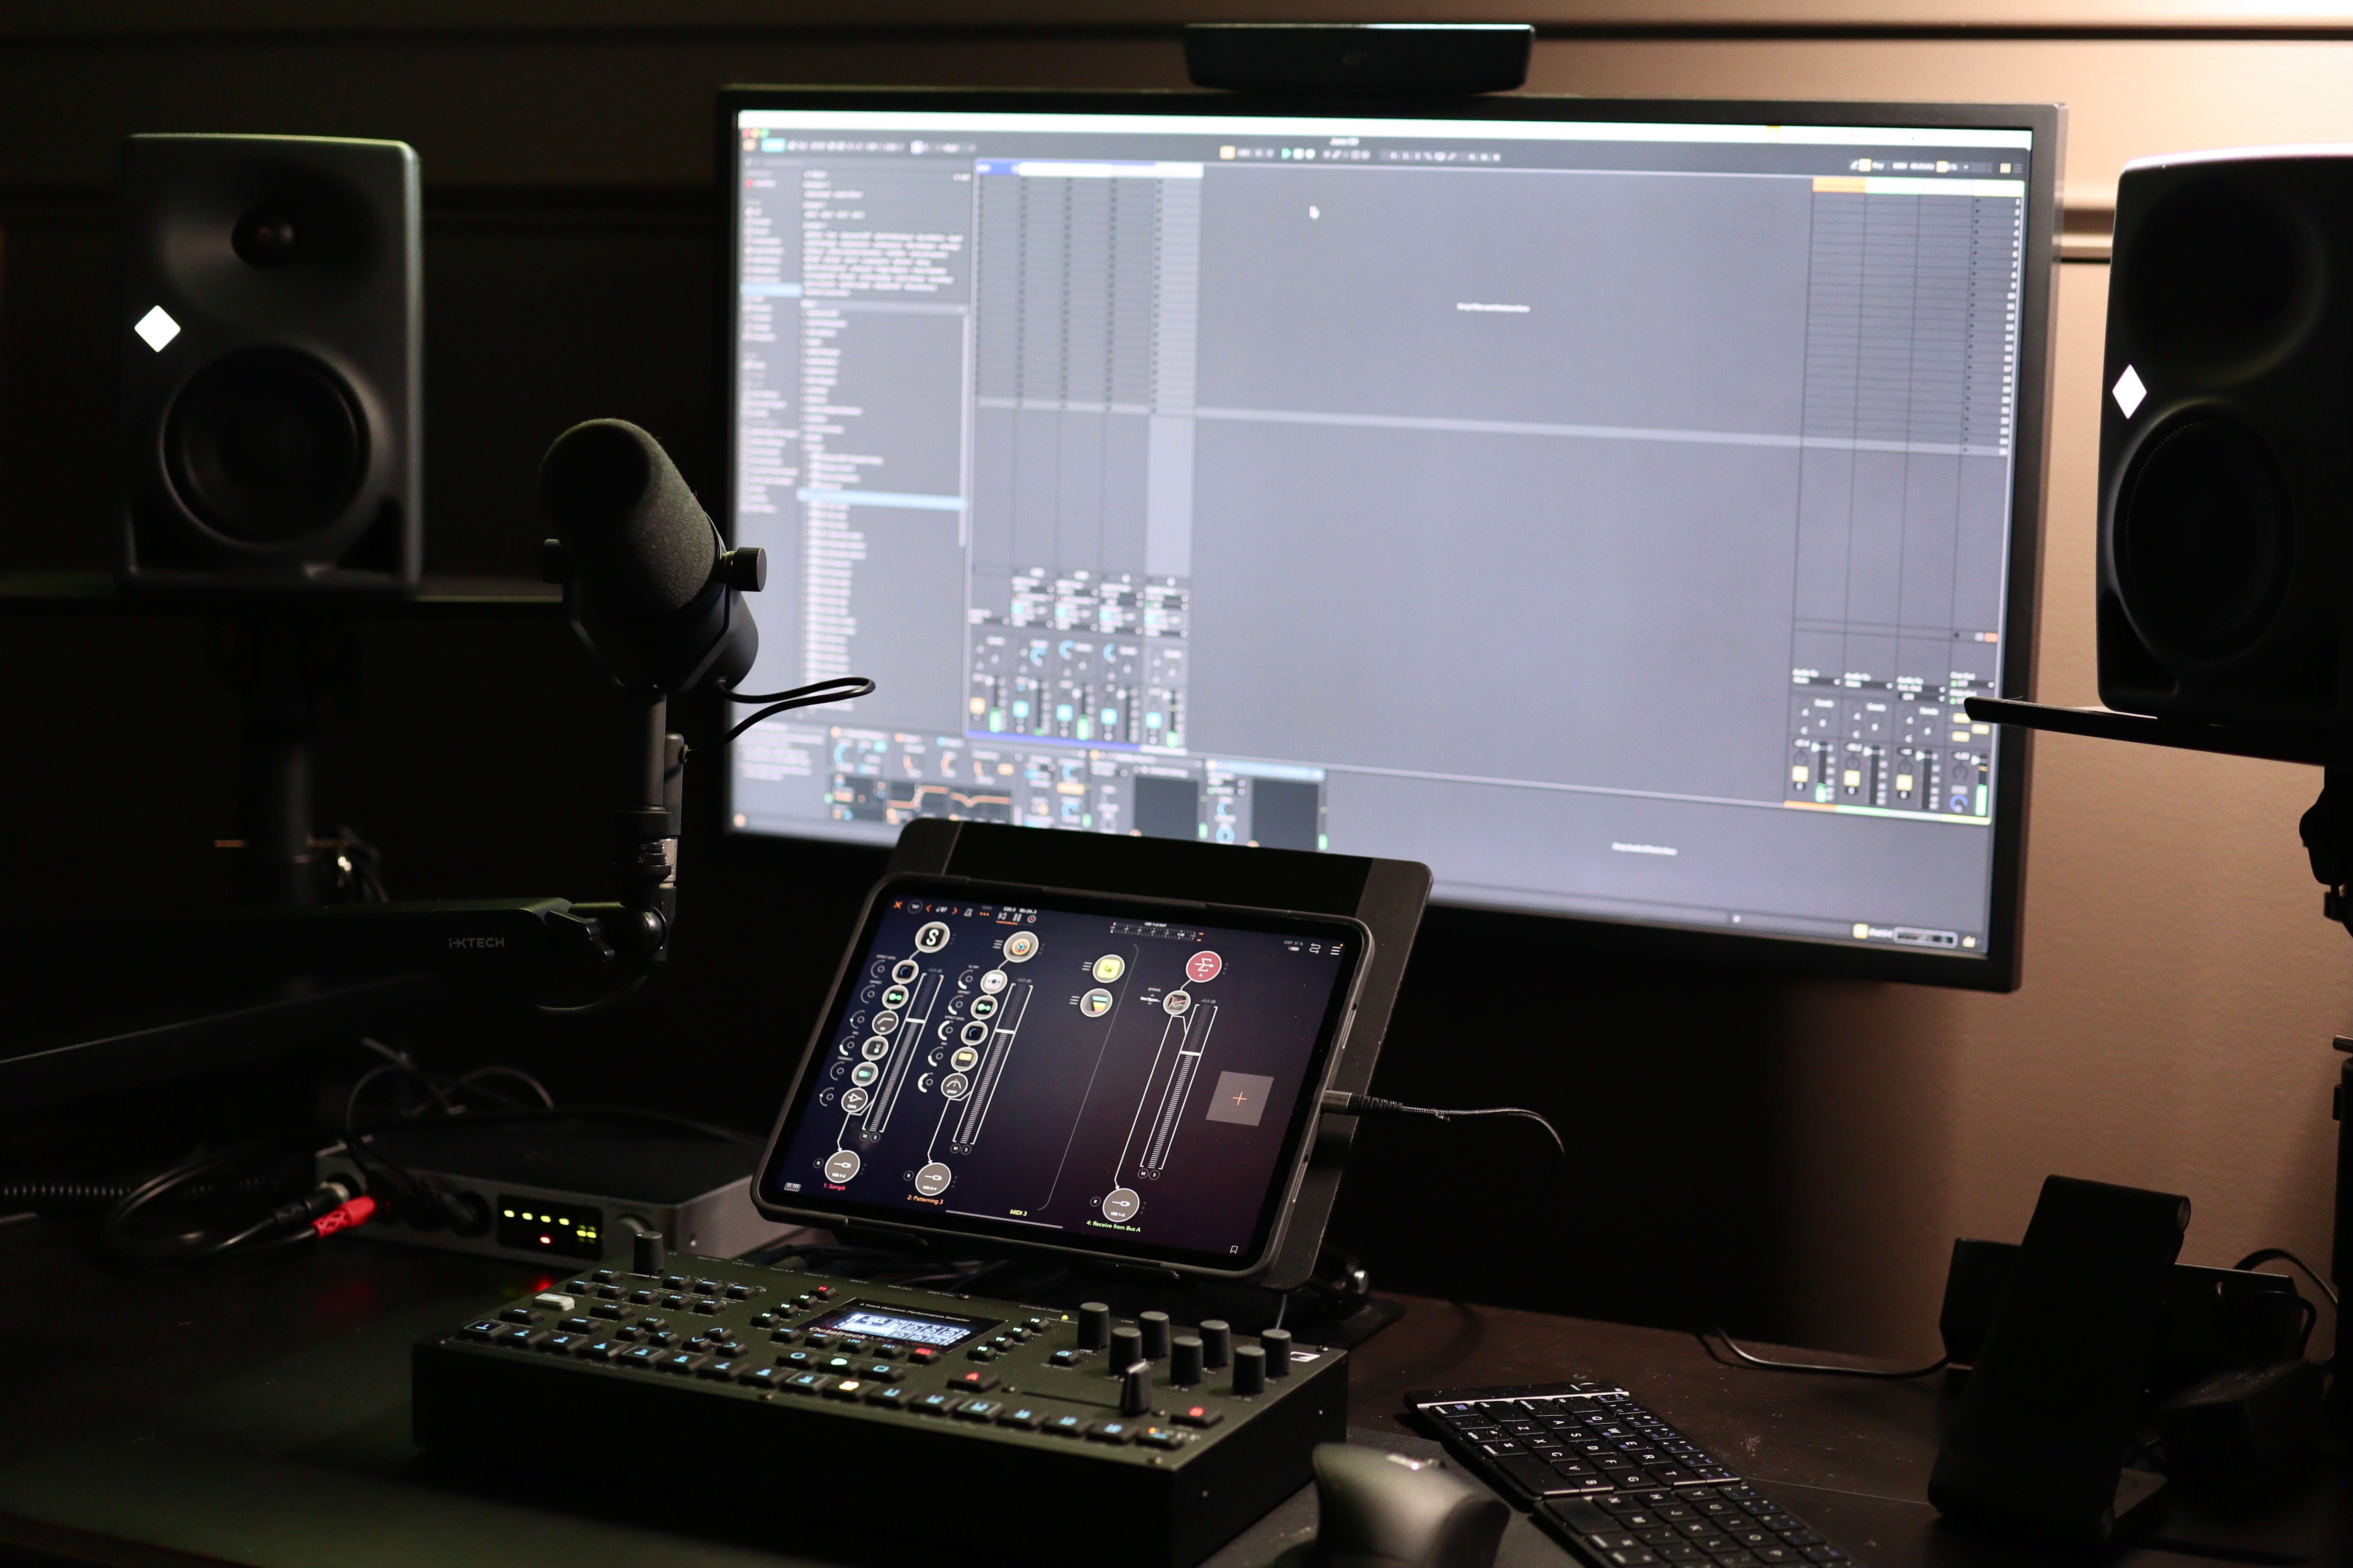
I’ll start by setting the scene - equipment in use, what’s connected to what, how it’s synced, etc…
First and most importantly, the unseen star of the show here is, once again, the iConnectivity Audio 4c interface. It’s long been the central hub of my studio because it allows seamless integration between iPad, Laptop, and hardware, as well as MIDI controllers and peripherals. It is always hooked up and ready to go at a moment’s notice on the corner of my desk. I’ve written about this thing ad nauseam here (one, two, three), and as awesome as it is, I do have some gripes with it: the control software is pretty bad and it glitches fairly often, and the preamps are not great for any sensitive sources like dynamic mics that need a hefty gain boost…but for all it allows you to do, and for the price point it’s sold at, I simply don’t think there’s a better option out there if you’re interested in implementing a hybrid “multi-computing-device” workflow like mine. I constantly get asked about what, if any, alternatives exist to the 4c. As a result, I’ll probably be doing a video soon on the growing list of options available to combine iPad and laptops, including everything from a direct wired connection with the IDAM protocol, to software like NovoNotes SideRack and all the way through to a few new interfaces popping up that allow audio/MIDI pass-through like this one. Stay tuned for that.
Here, the Audio 4c is receiving audio and MIDI from the laptop on USB Port 1, audio and MIDI from the iPad on USB port 2, and audio and MIDI from the Octatrack on analog inputs 1-4 and MIDI DIN ports on the back.
It’s still remarkable to me that they crammed in so much connectivity to this thing. It gives me a weird amount of joy to see it fully loaded:

To keep everything in sync, I use Ableton Link in Live, AUM, and Samplr. Live is also sending clock/transport control to the Octatrack over DIN MIDI.
And finally, for those that care, I’m using a MacBook Pro with M1 Max chip and 64GB RAM (thank you random eBay seller for the astonishing, borderline absurd deal I got on this). The iPad is an 11” Pro model from 2021 with the M1 chip.
By the way, to answer a common question I’ve received recently about the new M4 iPads: no, I don’t think you need anything more than an M1 chip at this point in time, even for the most complex iOS sessions you’ll run. I’m not planning to upgrade unless this one unexpectedly fails.
Ableton Live Session Overview
I’m running Ableton Live 12 Suite on the laptop to record and mix all the audio. My session looks like this:
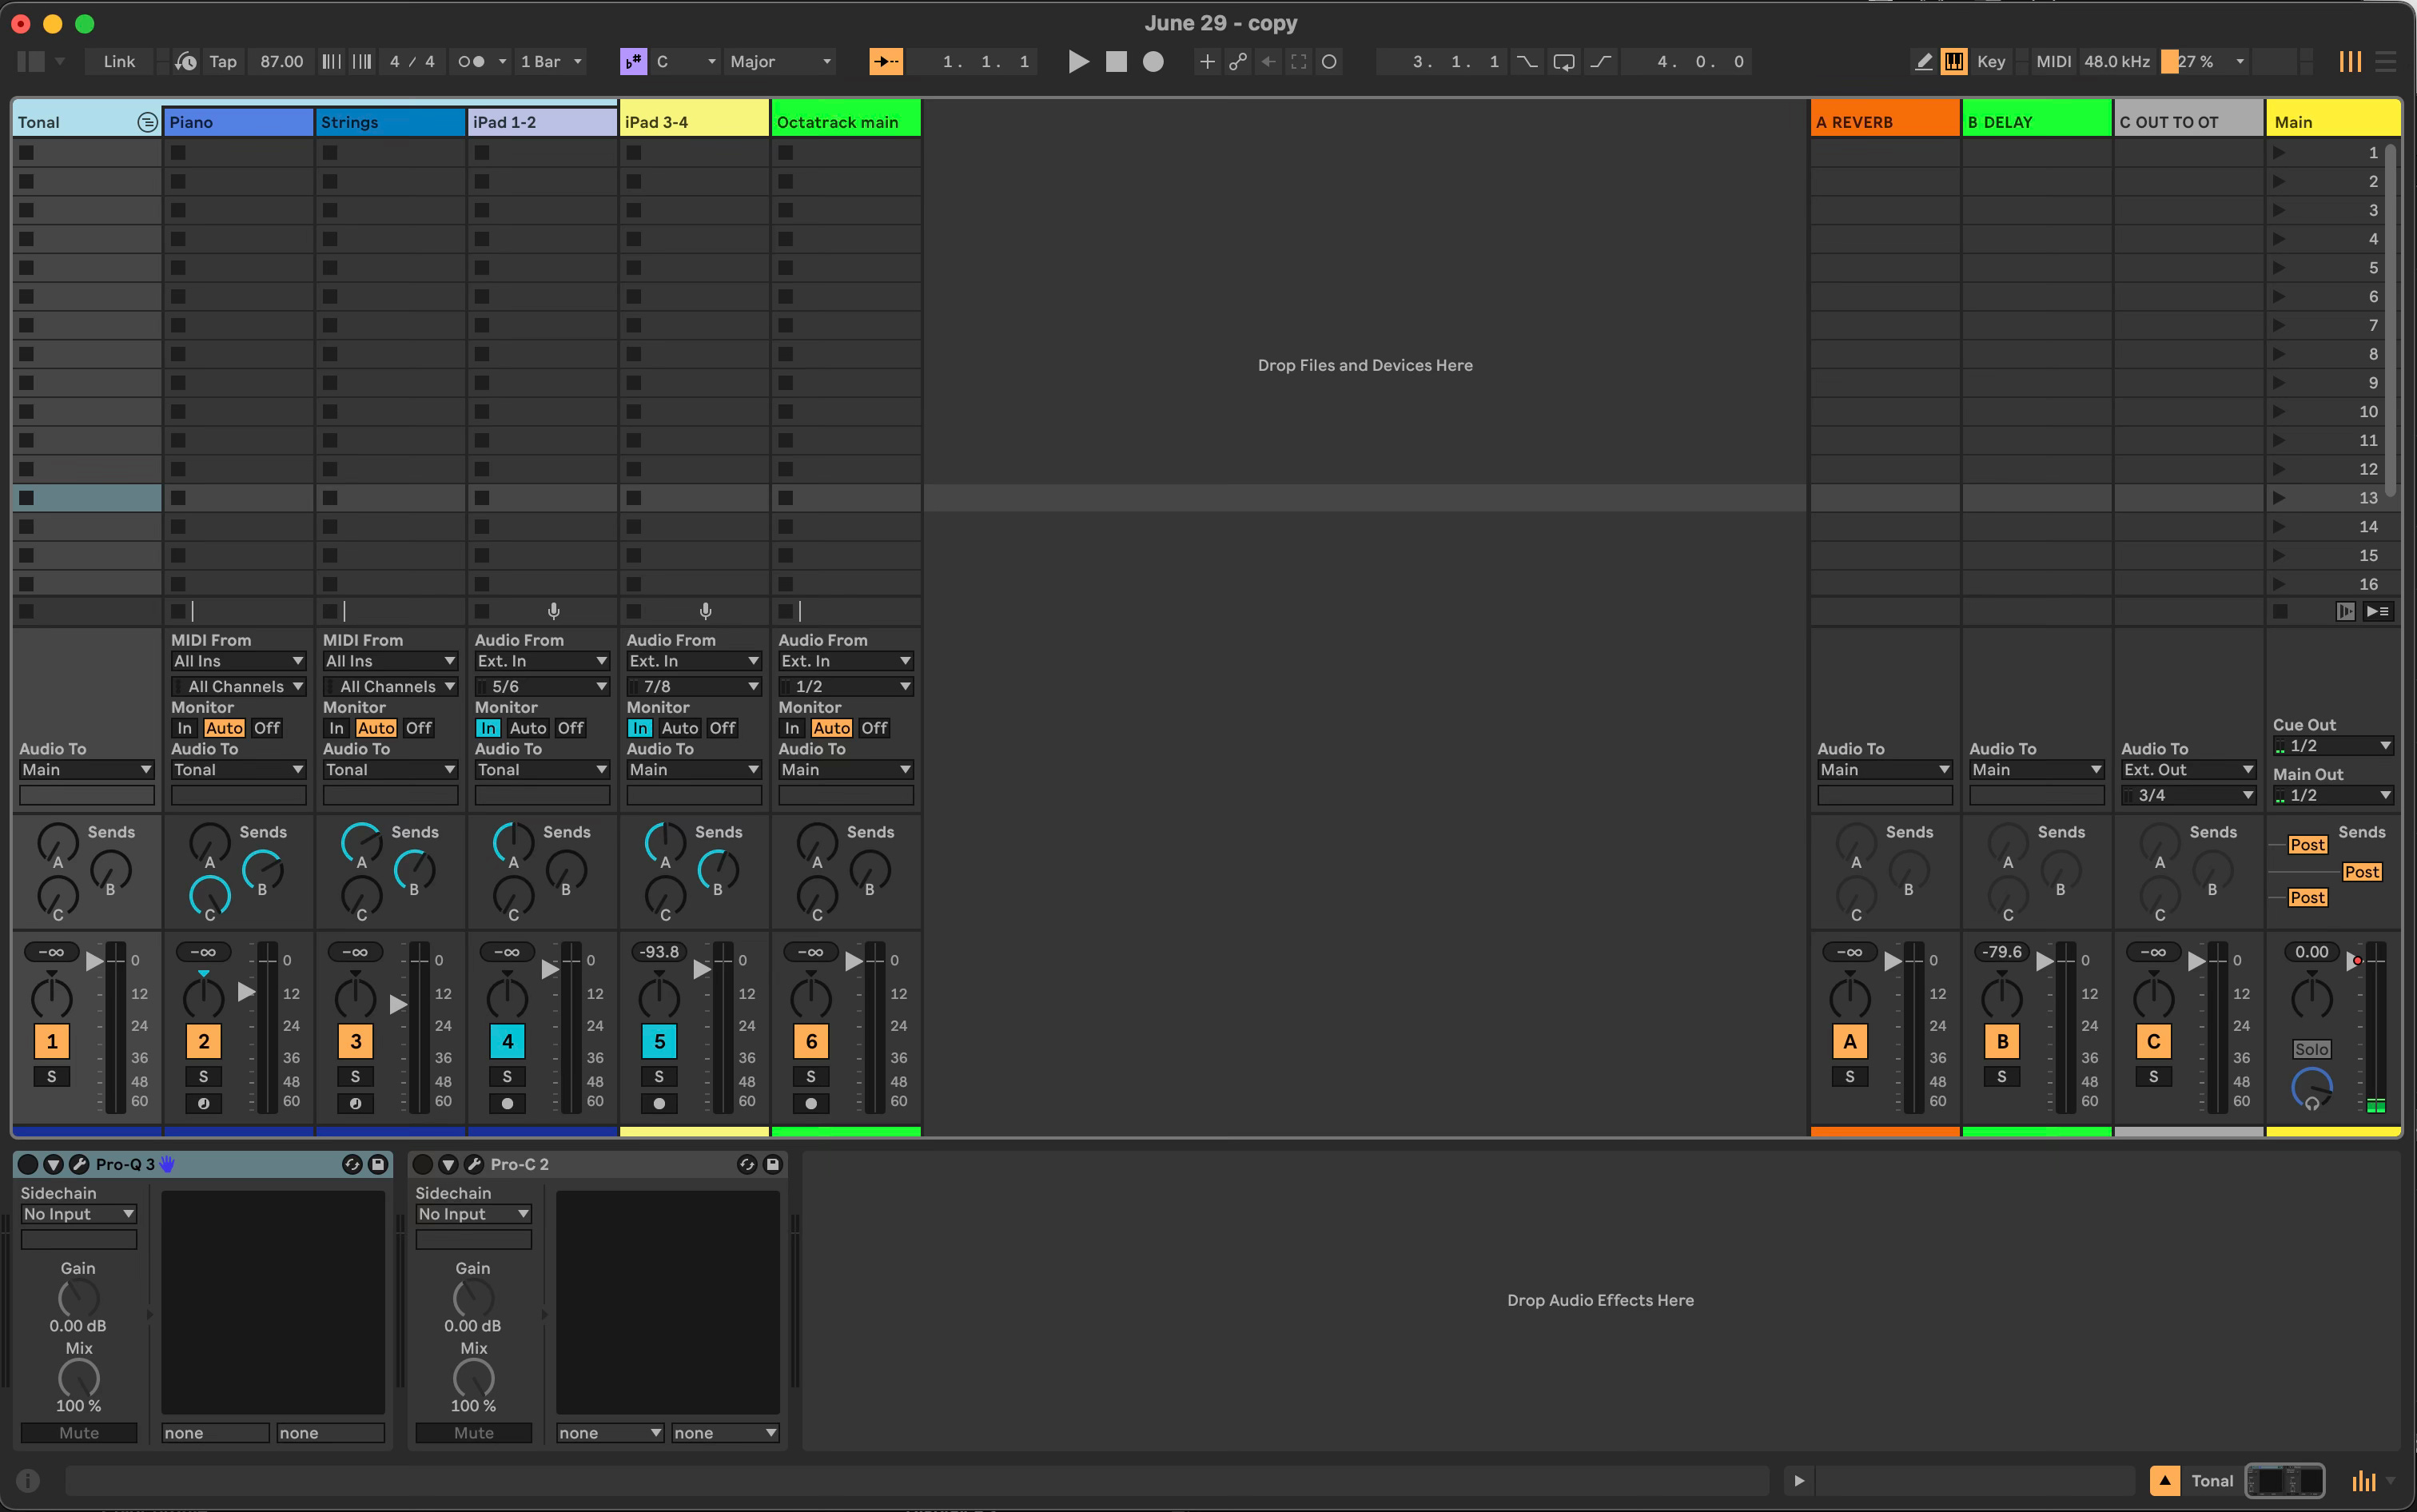
The track labeled “Piano” is running Native Instruments Noire in Kontakt 7, and “Strings” is Slate & Ash Landforms, also in Kontakt 7. I’ll let you hear what they sound like later on.
iPad audio is received on 2 channels, as you can see: input pair 5/6 is the audio from Samplr, and input pair 7/8 is the audio from the Patterning 3 drum machine app.
The Octatrack’s Main outputs go to analog inputs 1/2 on the interface. The Cue outputs go to inputs 3/4, but since I didn’t use them in this session, I don’t have the channel shown in the screenshot.
Send A is Valhalla Vintage reverb, Send B is Valhalla Delay on a Tape setting, and Send C routes audio to outputs 3/4 of the audio interface, which are connected to input A/B of the Octatrack for resampling and processing.
Note that Output 3/4 also sends audio digitally to inputs 7/8 on the iPad. There’s a lot of flexibility here!
AUM Session Overview
I talked about this in a past post covering my live performance setup with iPad + iPhone, but there are a couple considerations I make when I’m deciding between AUM and Loopy Pro as my DAW in an iPad session. I tend to have a slight preference for AUM in most cases, just because of the clean simplicity of the UI. But there are definitely times when I know I want to set up a complex chain of loopers and/or control my Ableton Live session with a custom screen of MIDI controls, and if so, I’ll go for Loopy Pro. In this instance, I wasn’t interested in configuring a looper or control center like that, so I just booted up AUM and got going as quickly as possible.
The session is very straightforward: Samplr (tonal pads and drones) and Patterning 3 (drums) are making all the noise, and I manipulate them over time with a variety of plugin effects on each channel.
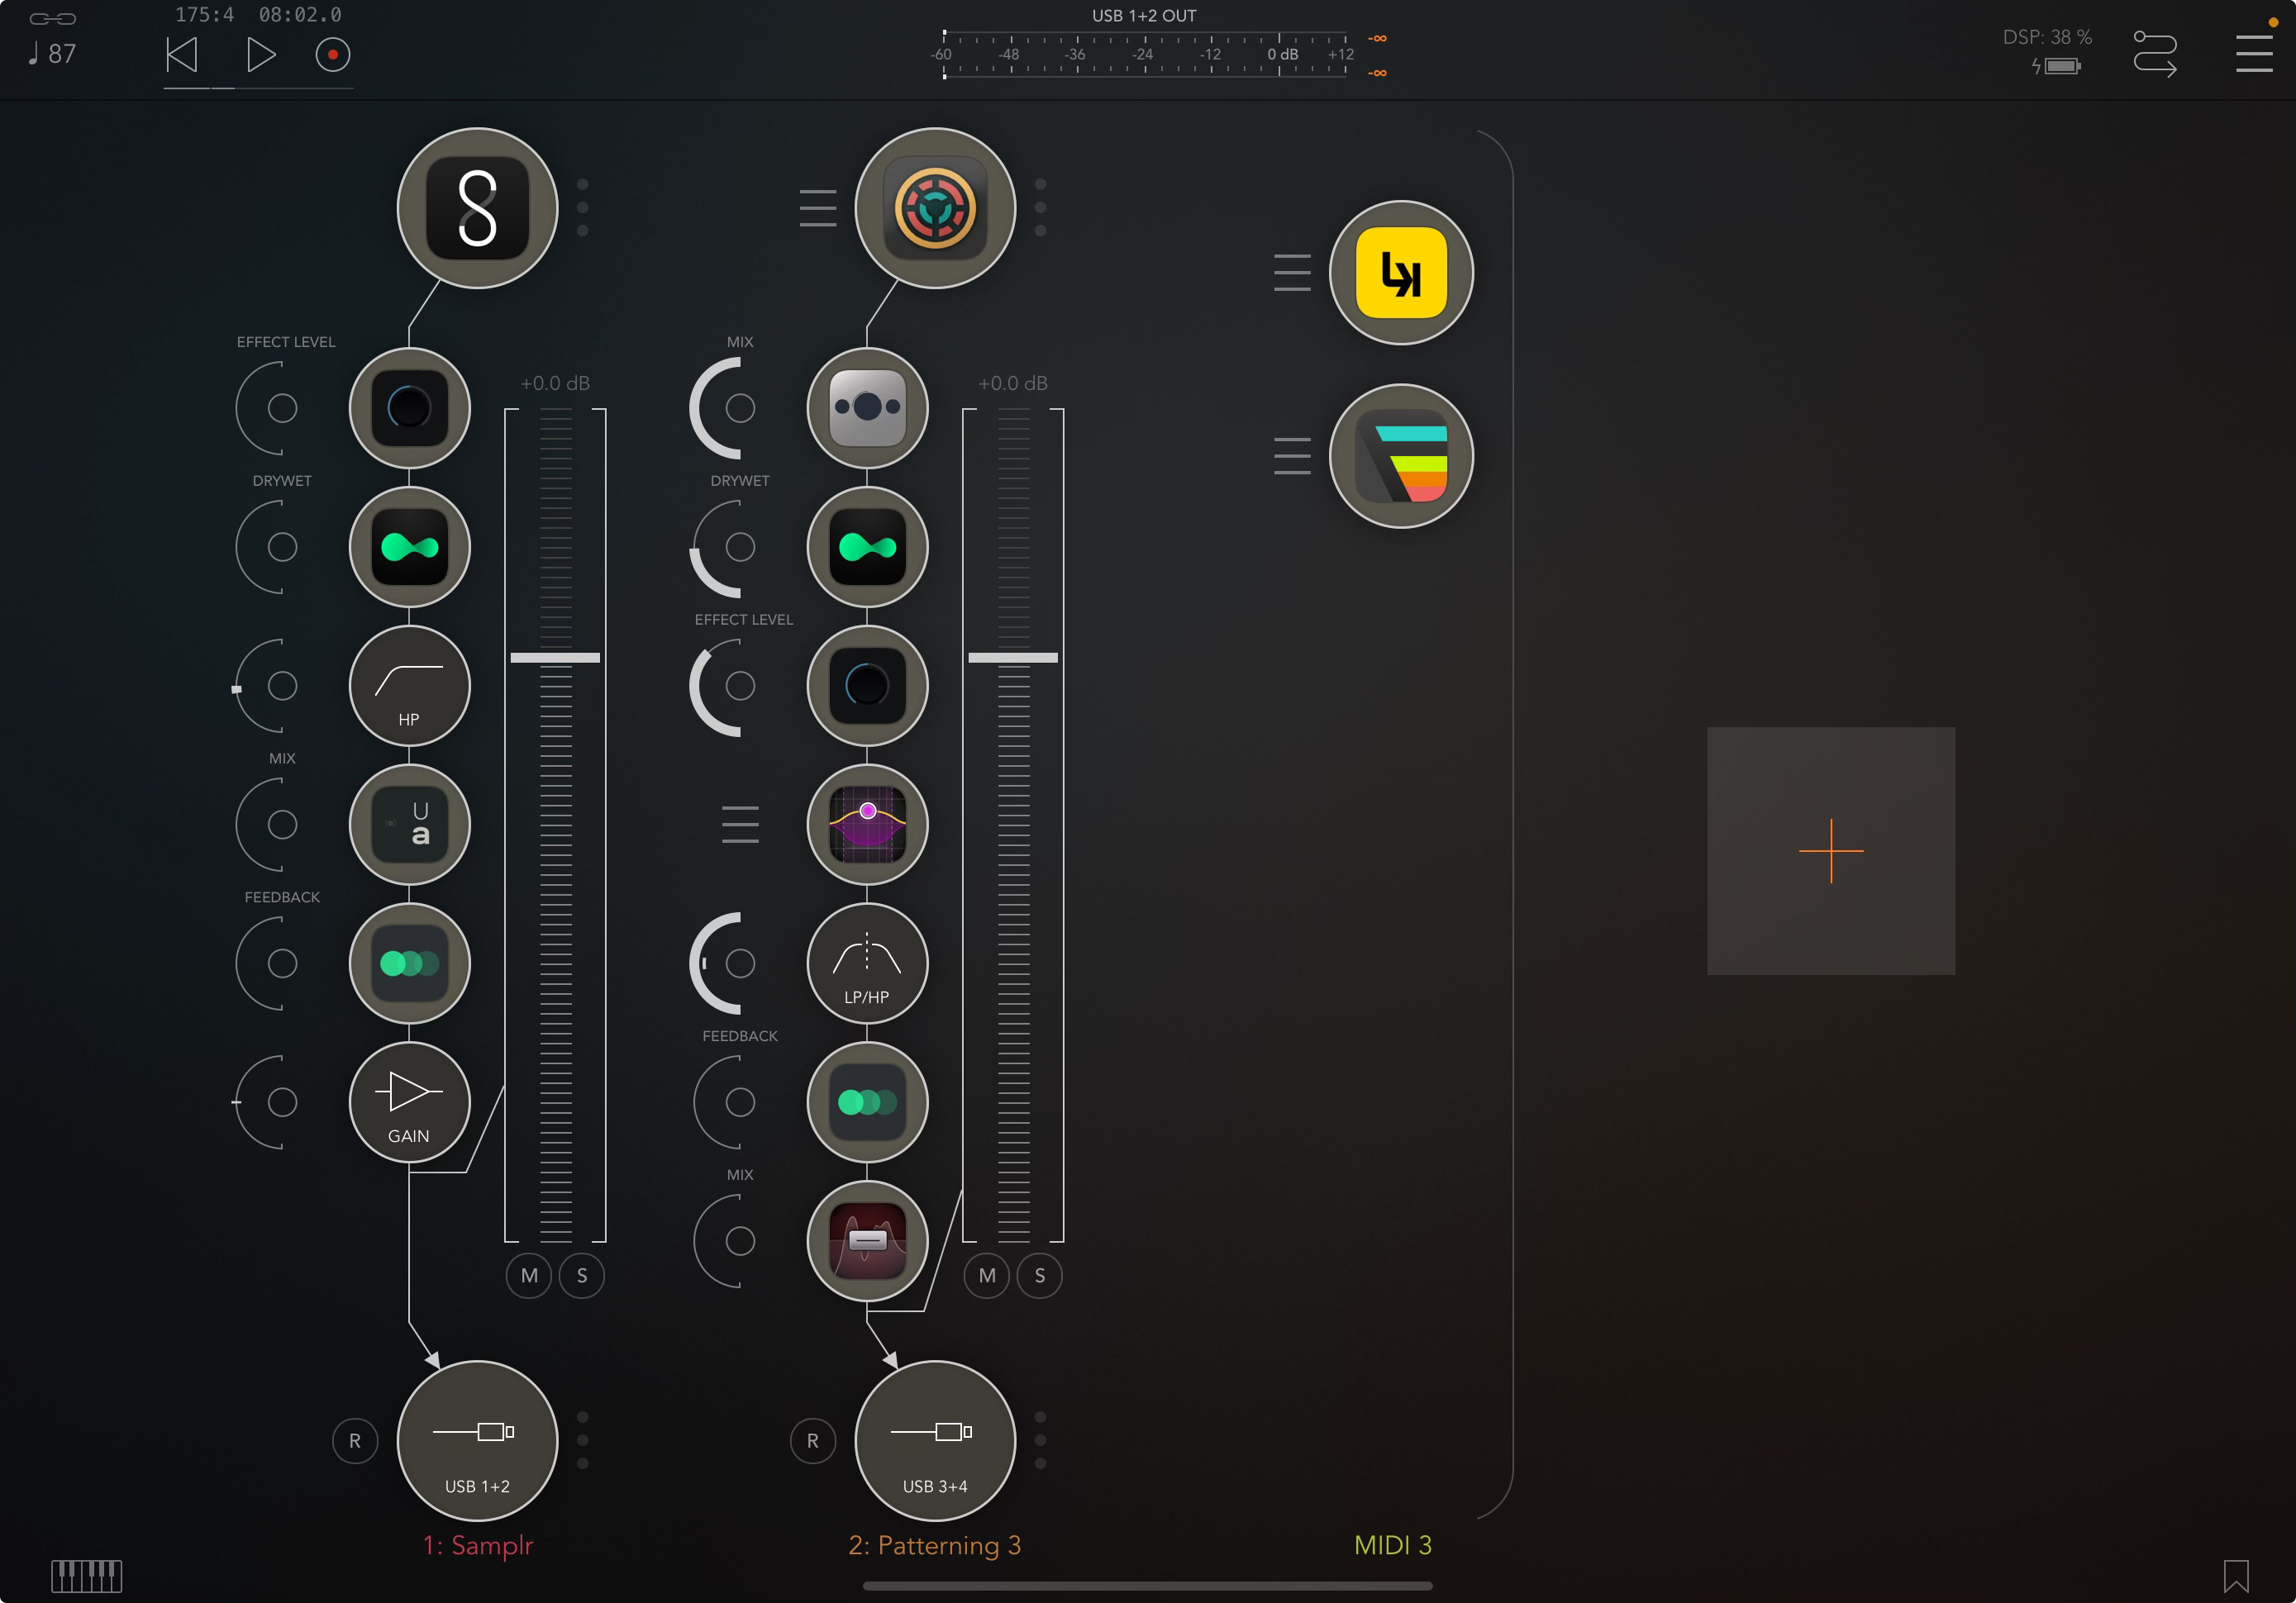
My effects are chosen with the objective of giving myself as many sound-shaping options as possible. I’ll use them to perform variations on a piece for quite a while, adjusting these settings over the course of 15-20 minutes or more, and then revisit the whole recording later to chop it up and select my favorite sections and versions of the sounds for subsequent sampling, arrangement, and mixing.
Octatrack Project Overview
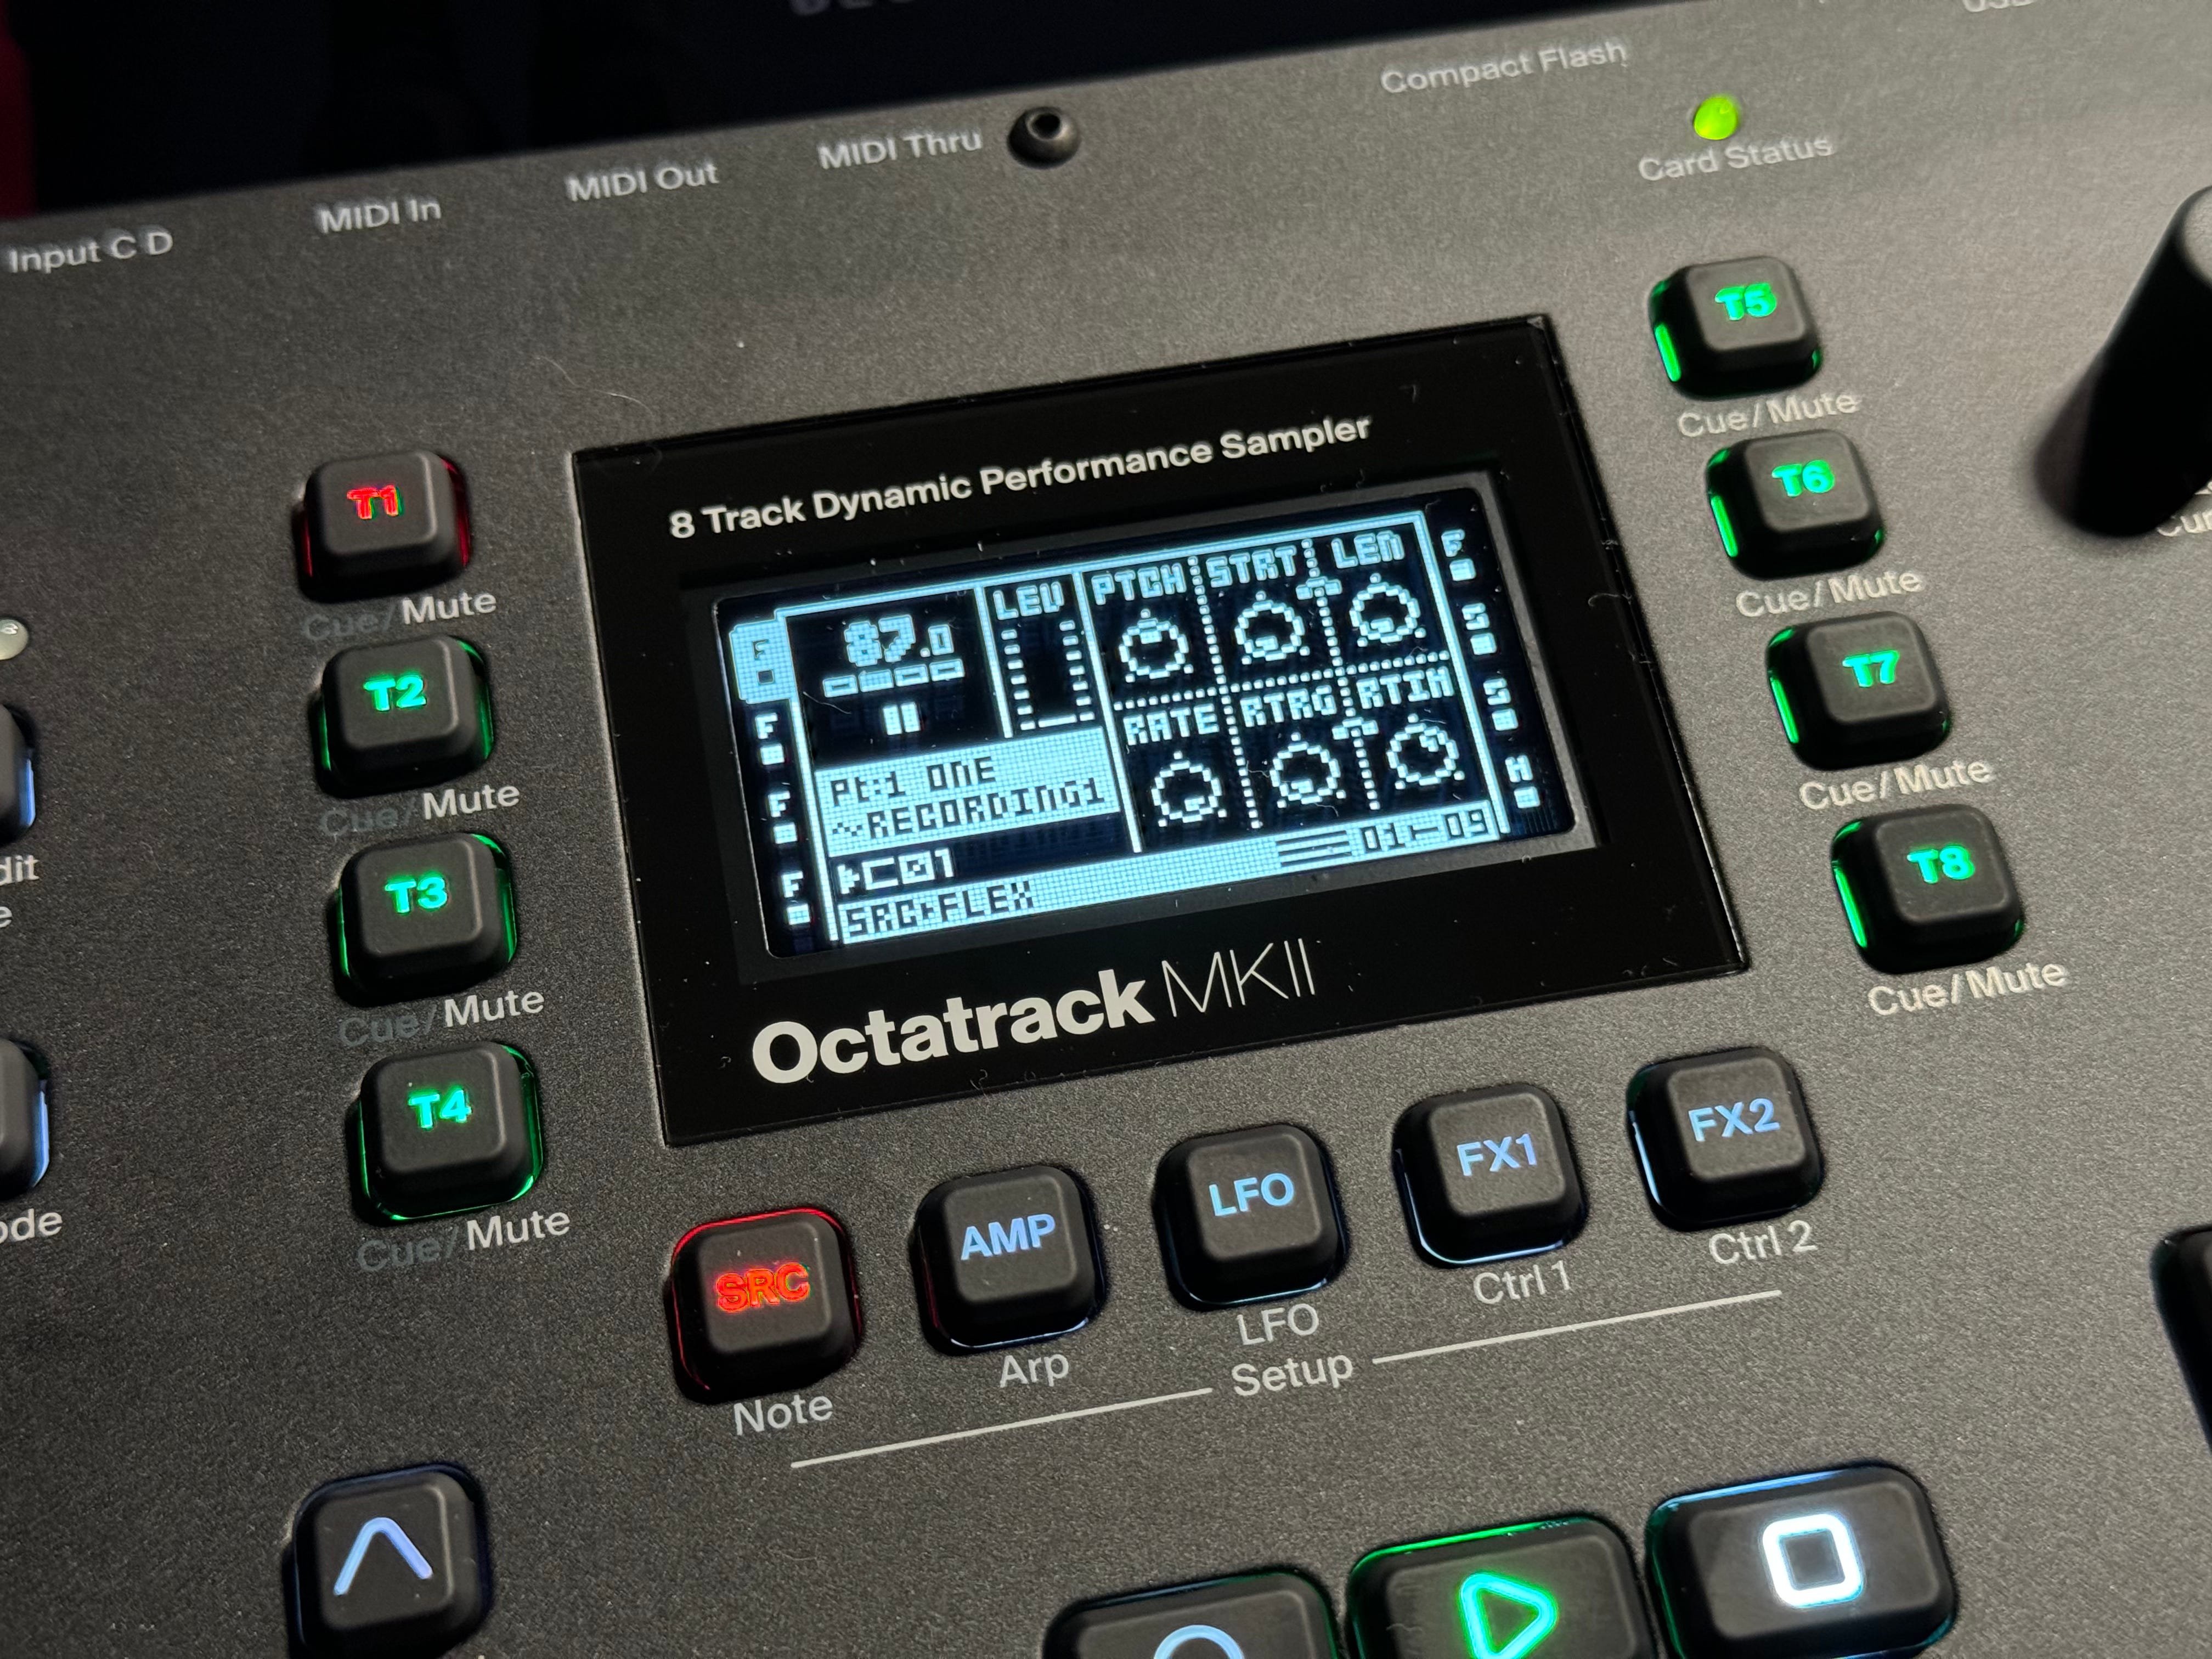
Everyone’s favorite “8 Track Dynamic Performance Sampler” is receiving whatever audio I send it through Send C, as mentioned above. It’s running here with 5 flex machines to sample and process this audio:
Track 1: Flex Machine sampling input A/B. FX1: Filter; FX2: Lo Fi
Track 2: Flex Machine sampling input A/B. FX1: Filter; FX2: Delay
Track 3: Flex Machine sampling input A/B. FX1: Filter; FX2: Delay
Track 4: Flex Machine sampling Main Output. FX1: Filter; FX2: Lo Fi
Track 5: Flex Machine sampling input A/B. FX1: Filter; FX2: Delay.
This track is specifically set up with 1/8th note trigs on the sequencer so I can use the slice grid to play back rhythmic slices of audio. I’ll demonstrate this in just a bit.
Track 6: unused
Track 7: unused
Track 8: Master. FX1: DJ EQ; FX2: Compressor
Performance Breakdown
Intro and Main Drone
I think if you were to survey the general population and ask how they think most “ambient” music is made, they’d (rightly) assume that most music like this starts with a synthesizer or some type of digital sound source. The funny thing about my music is that I tend to avoid starting with traditional “synthesis,” and I don’t find it particularly enjoyable to program or spend time with most synths.
Don’t get me wrong, my music is loaded with synth parts and synthetic pads. But over time, I’ve found the most enjoyment and satisfaction in a sample-based process, and so I start almost every idea with a sampled sound. In particular, I lean a lot on piano for my music…and I mean, a LOT. Honestly, I get self-conscious about this at times, because I’d say that roughly 50% of my very first song-writing steps are just variations on mangling a sampled piano into abstract forms. I find the instrument to be an ideal launching pad to work from. I love stretching out the decaying trails of sustained piano, plumbing the depths of overtones and resonance after the initial attack of the hammer strike. I’ve been doing this for years, and I’m still not tired of it.
I had a prepared piano part from a prior “brainstorm jam” that was loaded into Samplr, and that ended up as the primary droning sound you hear at the start of the piece. I think I’ve even shared this very same sound in a prior studio diary post here…but anyway, the original piece was creatively titled “random piano loop.wav” and here’s what that part sounds like in isolation. Fair warning, it’s not that interesting…it’s just me randomly noodling on piano for 4 minutes.
I’ve gone back to this source many times over the last few months, mostly because there are a wide variety of overtones and intervals to pick from and make into more interesting drones. I found a particularly pleasant section with exactly the overtone I wanted to work with, so I trimmed the sample accordingly and loaded this sound into Samplr (shout out to the AudioShare app for being the most effective, most enjoyable sample manager and editor I’ve ever used):
I loaded 3 instances of this in Samplr so that I could play it back at various pitches: 1 octave down, no change, and 5 semitones up. I didn’t end up using the 5 semitone shift in the video, so just ignore that for now.
I can’t say it enough, but the motion-recording feature that Samplr offers (similar to what’s available in Borderlands Granular, too, by the way) is a fantastic way to create interesting dynamics in a static drone like this. It’s effectively the iPad equivalent of a recorded automation lane in Live or other DAW. This really helped bring the drone to life; I recorded myself nudging the playback volume up and down with my fingers, and it helped add some gentle movement and variation.
Here’s how it sounds in isolation. I’m using the same gentle high-pass filter I had active in the video, but for this clip I applied some additional gain so you can hear it more clearly:
Time for Video Demos Instead of Text!
At this point, I think it’s easier and more effective to give you voiceovers of the next several steps I took, rather than type it all out. There are some nuances that I think are important to capture and I think a wall of text may flatten them.
My voice is in super rough shape due to sickness right now. Sorry for the gravelly and nasally tones throughout!
1. Processing the drone with AUM effects and Octatrack
I started the performance by processing and expanding upon the original drone from Samplr using a variety of effects in AUM. I re-sampled it 5 times over with the Octatrack, applied some heavy filtering and processing with the onboard effects, and then mixed those layers together to create a noisy layer. I also added a pulsing, rhythmic feel using glitch effects, gating effects, and the slice grid in Octatrack.
Plugins and instruments I cover in the video:
AUM - in the world of iPad DAWs, two stand out for me: AUM and Loopy Pro. I use them interchangeably, depending on the need, but because of its clean and efficient layout, I may slightly prefer AUM.
Samplr - one of the all-time great apps for iPad, and my go-to for quick and easy sampling…especially in a live performance. Check out my interview with Marcos Alonso, the developer, here!
Audio Damage Replicant 3 - a highly customizable glitch and stutter effect that adds rhythmic feel (or flat-out chaos) to whatever you throw it on.
Audiomodern Gatelab - a step-sequenced gate effect with adjustable blend and randomization; it’s a great way to add subtle volume fluctuations, glitching, and movement.
AUM HP Filter - the stock high pass filter that comes with AUM. Very handy for quick and easy tone shaping and cutting out muddy low mids.
Unfiltered Audio lo-fi-af - the most versatile lo-fi effect offering everything from digital artifacts, bitrate reduction, tape effects, speaker emulation, etc.
Imaginando K7D - simply designed, great-sounding tape delay. Like most delays, I love to ride the feedback knob and selectively introduce self-oscillating delay trails as an additional bed of sound underneath a drone.
Elektron Octatrack Mk2 - set up here as an outboard processor, receiving audio from Ableton Live and the iPad to manipulate. Not sure I have anything new to say about this, but it’s an endlessly inspiring tool for me. It’s the only bit of hardware I own now. I talked at length about this device on the Object Worship podcast, in case you’d like to hear me gush even more. I also detailed my thoughts and main use case in a Studio Diary post last year: check it out here.
2. Clocked instruments: drums plus sequenced piano and strings
Eventually, I mixed in some more overtly “clocked” elements tied to the BPM I set, including sequenced drums in Patterning 3 on iPad as well as piano and strings in Kontakt driven by the Fugue Machine MIDI sequencer.
Plugins and instruments I cover in this video:
Olympia Noise Co. Patterning 3 - absolutely fabulous drum machine for iPad and iPhone that comes very close to the “per step” sequencing control of the Elektron machines. The new version 3 is an upgrade over the 2nd for many reasons, but my favorite is the fact that it’s AuV3 format and you can load multi-output instances directly in AUM and other DAWs. I talk about it quite a lot in the video, but one thing I forgot to mention that I think is pretty cool: you can output your patterns as audio clips/loops or as .als files so they’re immediately transferrable and workable in Ableton Live. An essential tool for me.
FabFilter Pro-MB - multiband compression can feel complicated and esoteric at times, but FabFilter does an amazing job at simplifying the process with MB. I’m using it here to control excessive low mid resonance from the kick drum, as well as high end harshness from the hi hats.
AUM LP/HP Filter - again, a simple-to-use and imminently useful tone-shaping tool that I place in almost every session I start.
FabFilter Saturn 2 Distortion - there are plenty of options for distortion and saturation out there, but perhaps none more flexible and fun than Saturn. I use it on all kinds of sources, but it really shines on drums, where I like to use it as a tape deck simulator for subtle high pass filtering and top-end “sizzle.”
Alexandernaut Fugue Machine - I talk about this all the time here on Sound Methods, but it’s a beautifully designed MIDI sequencer featuring 4 playheads triggering notes at varying octaves, pitches, rates, start points, etc. so that they overlap and merge in unpredictable ways. This is how I’m controlling the piano and string parts in Ableton Live.
Native Instruments Noire - Hands down, my favorite and most-used piano library. Recorded in partnership with Nils Frahm at the Funkhaus studio in Berlin, it sounds absolutely phenomenal. I have it set as a simple felted piano with its “Particles” engine adding subtle background arpeggiation.
Slate & Ash Landforms - these guys are making some of the most beautiful Kontakt instruments I’ve ever used. I’ll let you explore their offerings, but Landforms might be my favorite for its highly customizable orchestral sounds that veer into synth-like territory. Great for sound design and experimental soundscapes.
3. Gluing it all together with mixing and processing in Live
Finally, I glued it all together with basic mixing, dynamics processing, and other utility effects in Live.
Plugins and instruments I cover in this video:
Ableton Live 12 Suite - my preferred DAW by miles and miles. You know what this is already.
FabFilter Pro-Q3, Pro-C 2 - FabFilter is everywhere in my sessions. PRO-Q3 is exceptional for notching out trouble spots and Pro-C is a wonderfully subtle and tasteful master bus compression device.
Oeksound Soothe 2 - my secret weapon for taming harsh frequencies in a mix. Easy to overdo, but when you dial it in right, it makes a world of difference.
iZotope Ozone 10 - I love using Ozone for the imaging tool, and making sure things stay in-phase. I also use it to boost overall loudness when I’m posting sounds to YouTube and whatnot.
Wavesfactory Trackspacer - another hugely helpful plugin, which reacts to side chained audio you feed it to carve out space in a given frequency band. I use this to make sure the drums and iPad Samplr drones don’t interfere with the low end and midrange on the piano/strings and do ugly things like throw off the phase and add mud.
Soundtoys Tremolator - When I have multiple software instruments being sequenced that could potentially be tiring to listen to for a while, like strings and upper register piano, I like to throw this on multiple tracks and set a slow ramp speed at 50-80% depth so their volumes gently fall up and down in sync with the master clock - but never fully disappear.. I’ll vary the tempo divisions slightly, so that tracks weave in and out of each other at slightly different speeds.
Conclusion
There you have it. If you have any questions, feel free to reach out. Just as a reminder, I do offer 1:1 sessions if you’re interested in diving deep into any of these concepts.
Thanks for following along!
Sound Methods is a reader-supported publication. I put significant time and effort into preparing these posts and podcasts, so if you enjoy them, please consider becoming a free or paid subscriber, OR spreading the word about this page. Your support means a lot to me, and I don’t take it for granted!
Another extremely informative and in-depth explanation of your workflows, tools, and methods - it's extremely helpful. Thanks Andrew!