


Show and tell: my live performance setup
How I use the iPad and iPhone together on stage for a portable, powerful performance rig

EDIT June 24, 2025 – I’ve opened the paywall on this post, too. I’ll continue to unlock older posts like this over time, making more of the archive freely accessible. If you’ve enjoyed reading these or have benefitted from the information shared and are in a position to support the project, paid subscriptions go a long way towards covering the costs and time involved. Thank you for your support!
Today’s post is all about how I approach a live performance with my band Hotel Neon. I thought this would be especially relevant because coming up on Saturday, December 9, we’ll be performing at the Gatherings Concert Series here in Philadelphia. Joining us will be Lowercase Noises and Slow Meadow from Albuquerque and Houston, respectively, in what will be a great follow up to our tour together last year.
If you’re in the area and available, please do stop by - it’s free to attend in person. For those not in the Philly area, there will also be a live stream on YouTube. Check the event page for details: http://www.thegatherings.org/142gather.html


Video demo:
I’ve prepared a somewhat lengthy video about this topic in which I play through one of the songs in our setlist and demonstrate the template I’ll be performing with. You can check it out on YouTube for a visual companion to this post.
The gear: iPad, iPhone, and interface
Those who are familiar with my process will know that I use a revolving door of Laptop, iPad, and Octatrack to make my music. For this show, I’m using the simplest of all setups: just the iPad, with my phone as a MIDI controller on the side.
This setup is all about a couple key things:
Have as much fun as possible, with room for improvisation.
I don’t want to stand in front of people and launch clips or backing tracks all night. I’d like to “perform” my own loops and transform samples in creative ways. We never play a set the same way and we never go into a song following a defined path…I have to be able to respond to dynamic changes and new ideas from my bandmates.
Use the most portable and efficient layout of gear to play the set.
I hate to check bags, so I’ve put in place a “carry on only” rule for fly dates. I also want to minimize stress at the venue; playing shows can be hard enough even without gear failures at soundcheck or floundering around looking for the source of a signal interruption. I want my stuff to be portable and simple to use, period.
Maximize playability.
Effects and software instruments I use will ideally be “playable,” meaning that they are engaging and fun to use. This is why I gravitate to the iPad so much; touch/gestural control of sound is inherently more fun than, and a welcome relief from, the linear “point-and-click” nature of the studio.
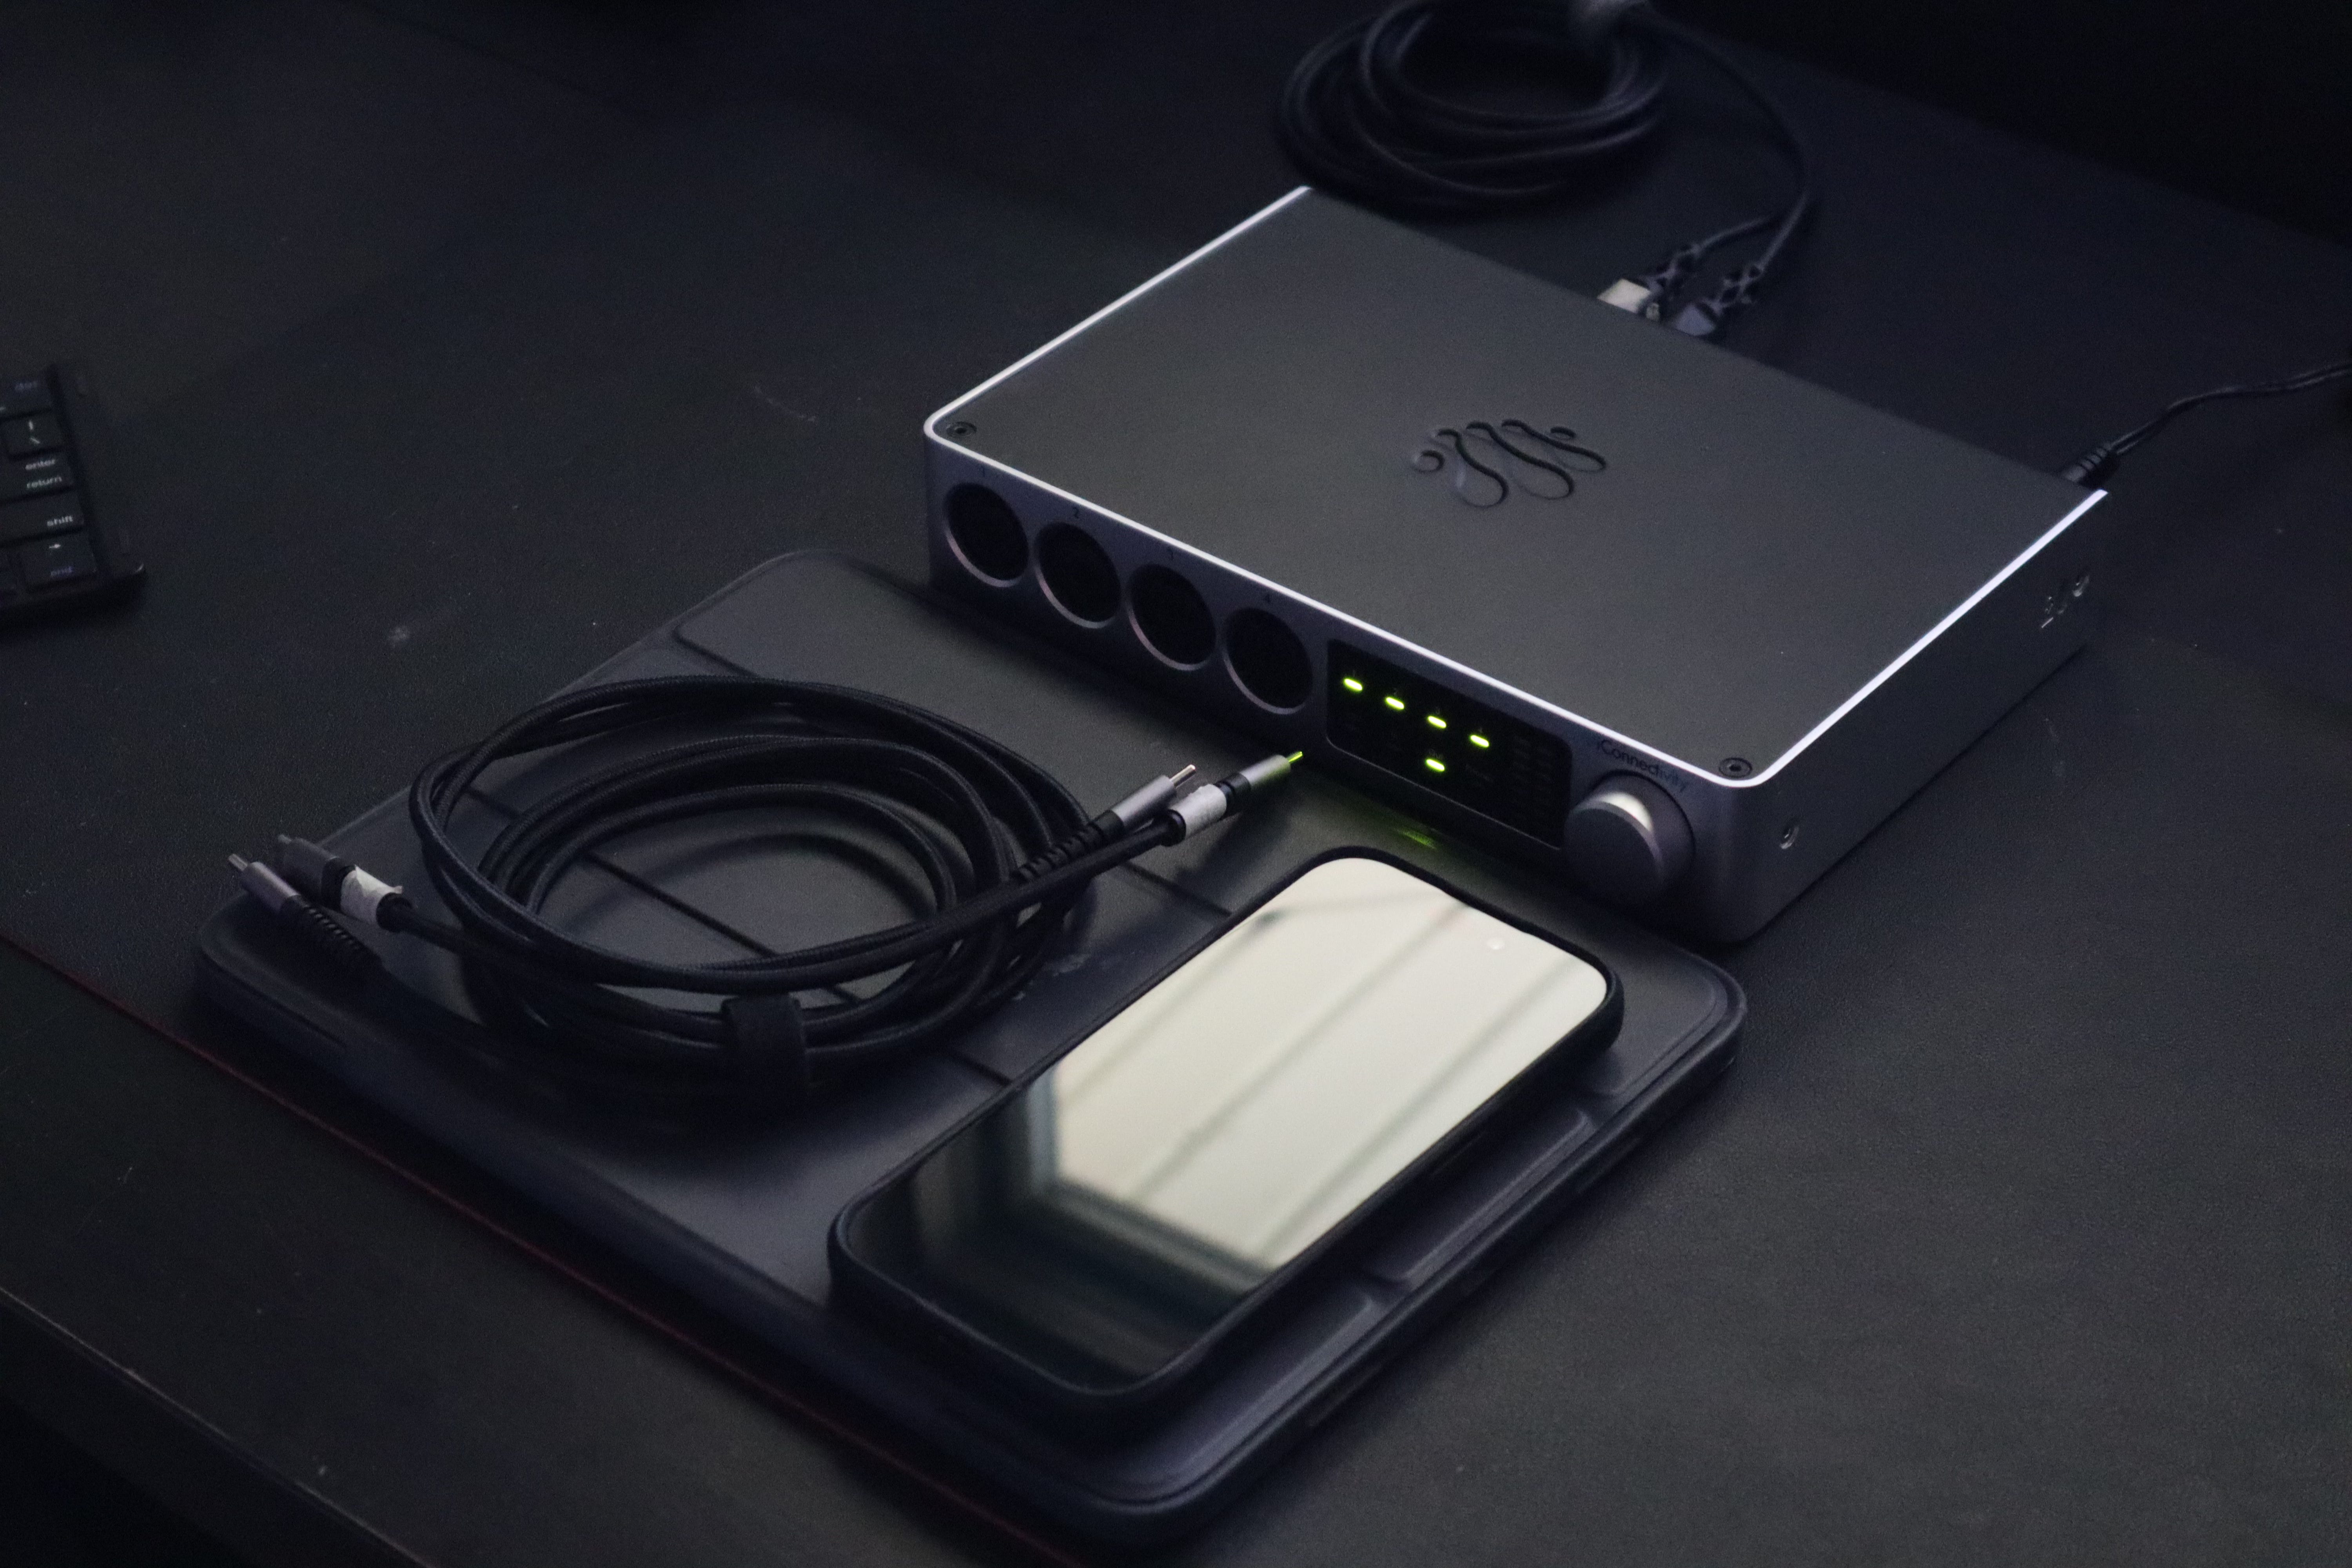
Audio interface: iConnectivity Audio 4c
Long-time readers will know that I have a special affinity for the iConnectivity Audio 4c interface, and that I use it to connect and integrate my iPad with my laptop in the studio.
The headline features are amazing but I won’t rehash them here. I have prepared a few posts in the past about it; if you’re not already familiar with them, it may be useful to read them to understand what I’m referring to with the iConnectivity hardware and my philosophy behind all this. (See those here and here)
Instead, I’ll highlight the things I love the most for live performances:
Design. I very much appreciate the slim geometry of this interface! The single, low profile button on the front is the only protruding piece anywhere. It’s very easy to slide it into a small case when traveling. It’s also a hefty, sturdy piece of metal, and very confidence-inspiring when tossed about.


Self-contained charger and USB Hub. Typically, using an audio interface with an iPad means that you’ll need a healthy charge on the iPad prior to the show, or potentially a power adapter plus USB hub…especially when using MIDI controllers. But not so with the Audio 4c, because the USB2 port charges the connected device while also processing audio and MIDI, which means my iPad is fully juiced for the duration of the show without any extra adapters. It’s so nice - indescribably nice - to not turn anything off after sound check out of fear of battery drain, to not worry about powered USB hubs, and to forget about the battery meter in the top right of the iPad status bar. It can stay connected and powered on all night with no risk.
USB Audio and MIDI. Because audio and MIDI is sent between iPad and iPhone through USB and bluetooth, it eliminates excess cable connections. Replicating this would normally require two interfaces, two output cable pairs, two DIN MIDI pairs and so on…but here, I don’t need anything more than 2 USB-C cables (for iPad and iPhone) plus the 2 balanced TRS cables I use to send to our on-stage mixer. Fewer cables also means fewer points of failure to identify and correct in the event of an on-stage disaster (and yes, it has happened before! Nothing like hot-swapping a USB cable mid-set).
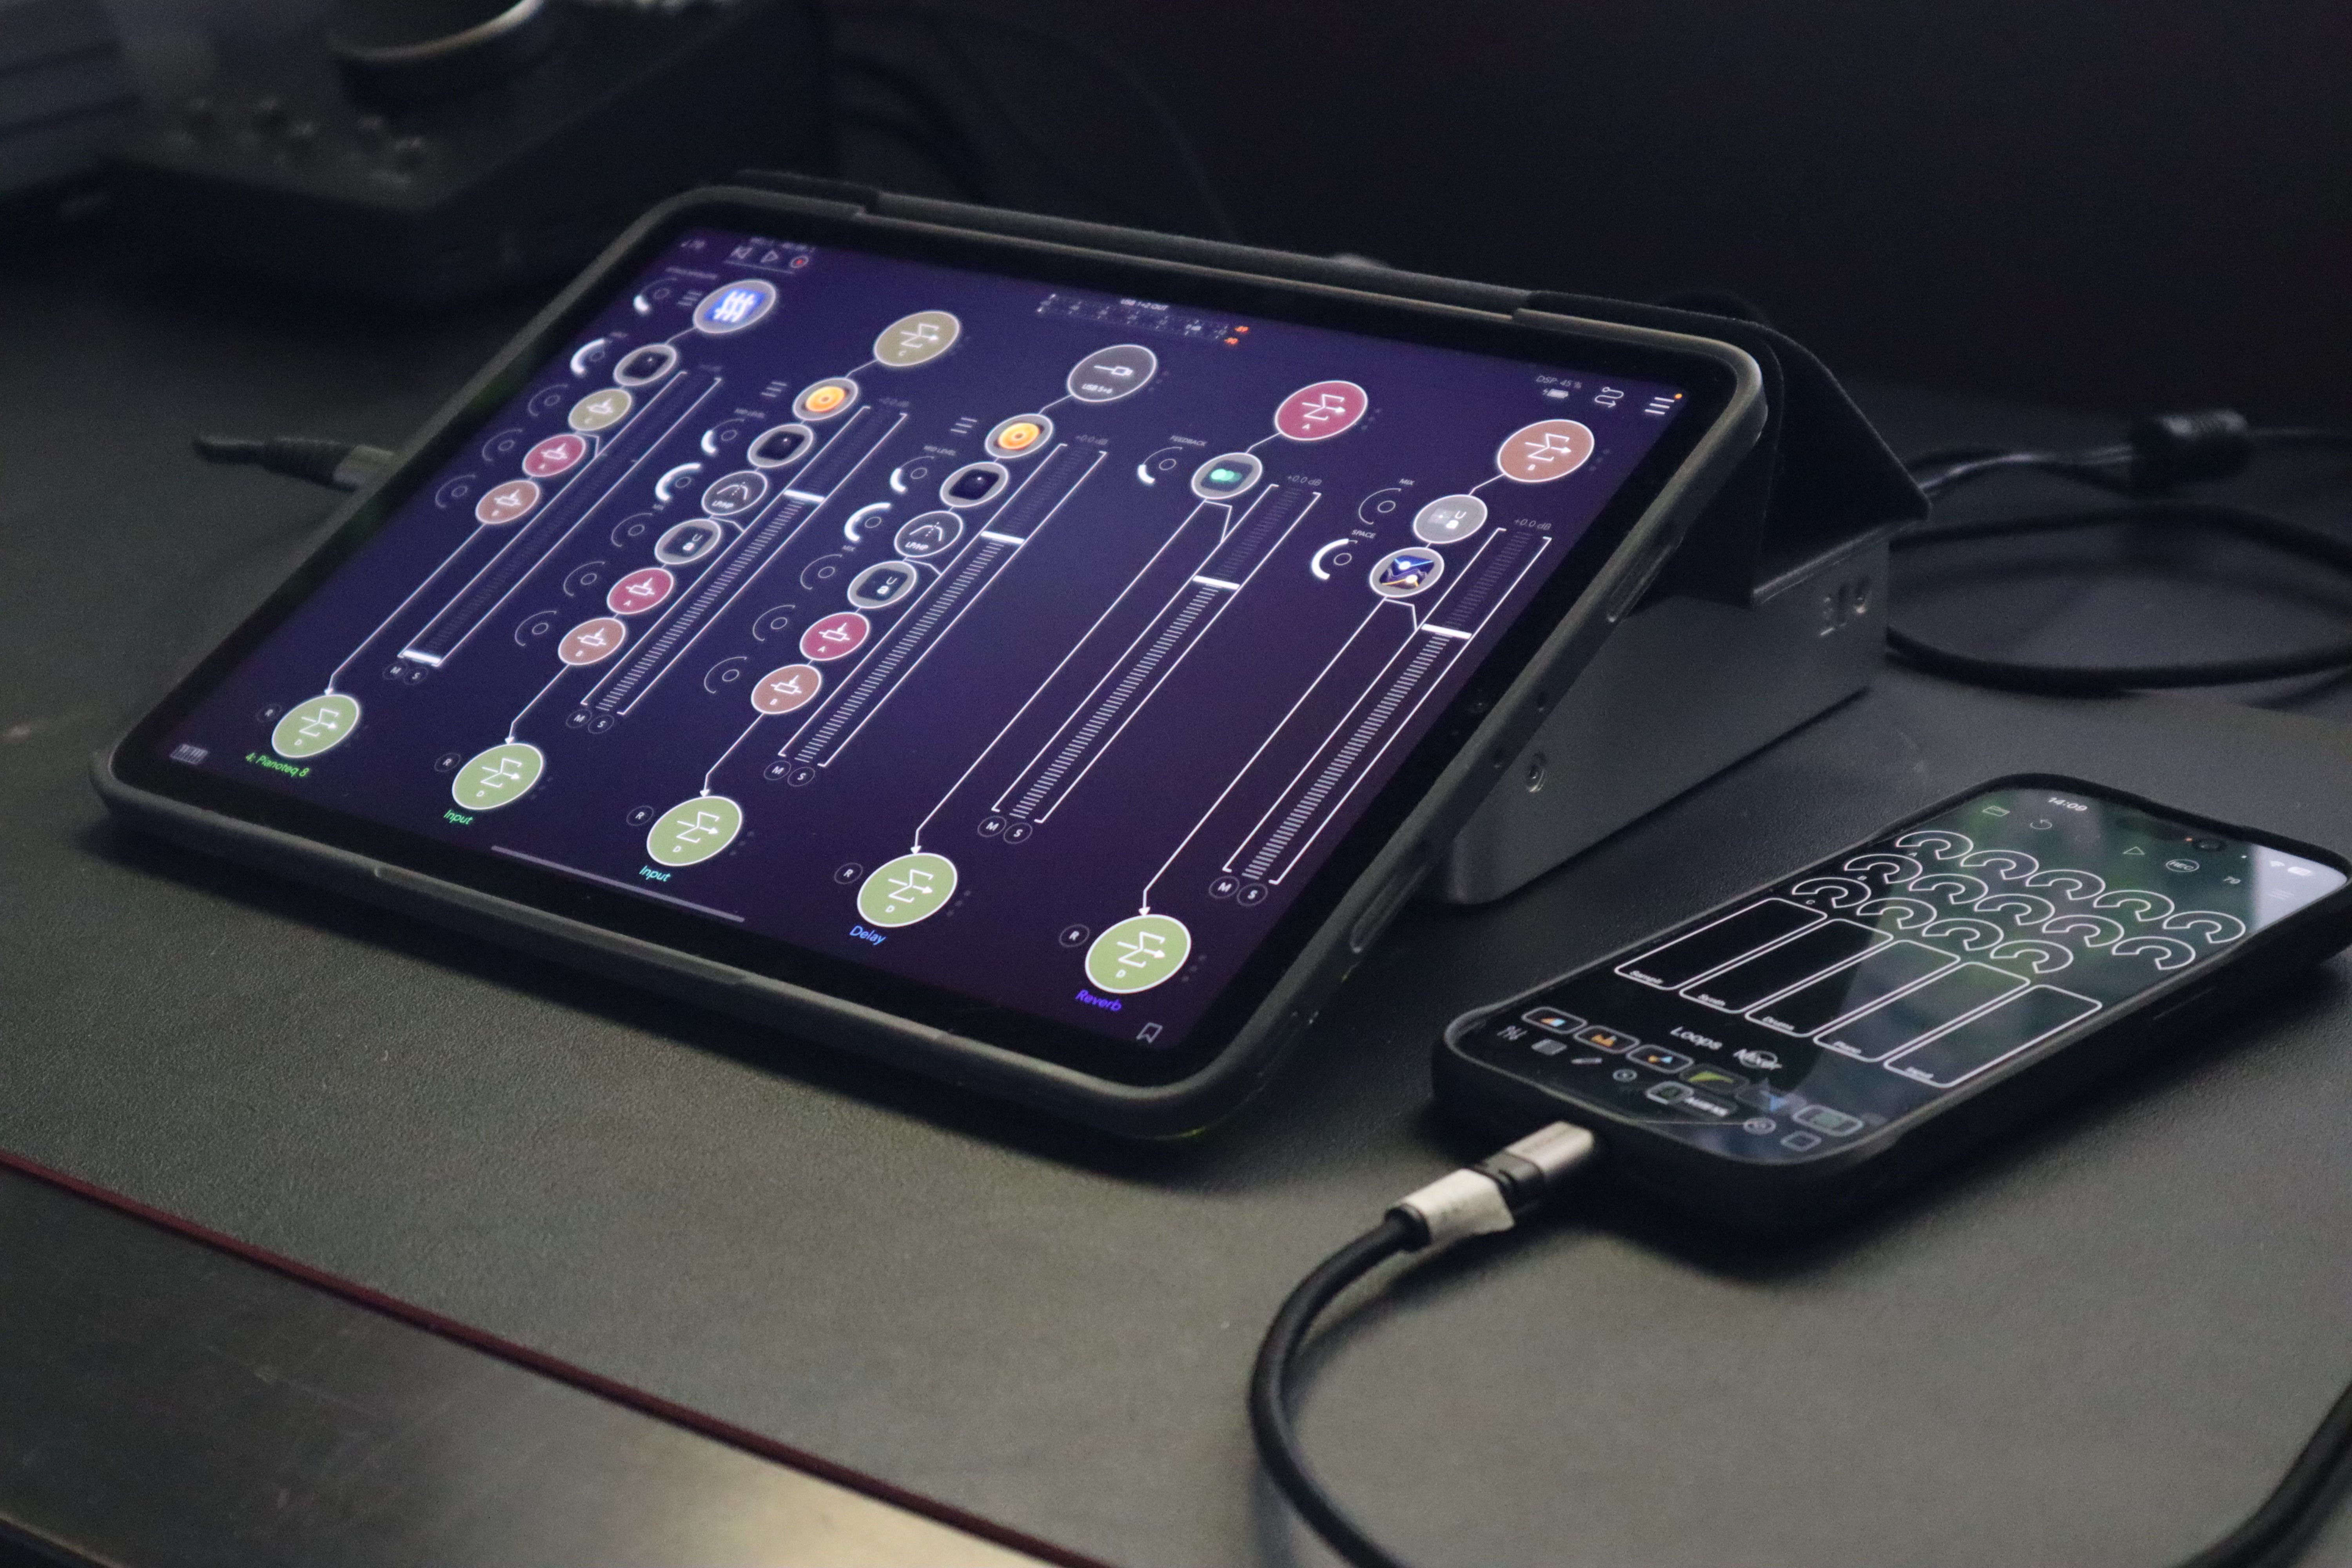
The iPad
The crux of the setup is, of course, the iPad connected to the Audio 4c interface on Port 2 (for those asking: I use a 3rd Gen iPad Pro 11” from 2021).
I’ve configured the Auracle software to run the interface on “Play USB 2” mode, so that audio from iPad is the only sound source that leaves the main outputs of the interface. This is all configurable, of course, but I find it easiest to just work with the factory default presets in Auracle and not worry about breaking anything that can’t be easily reset.
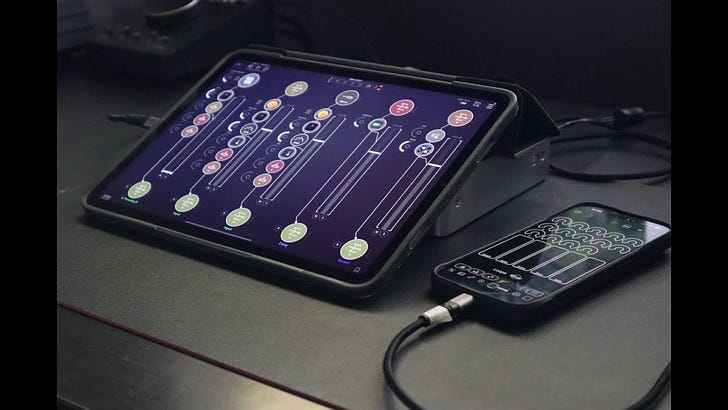
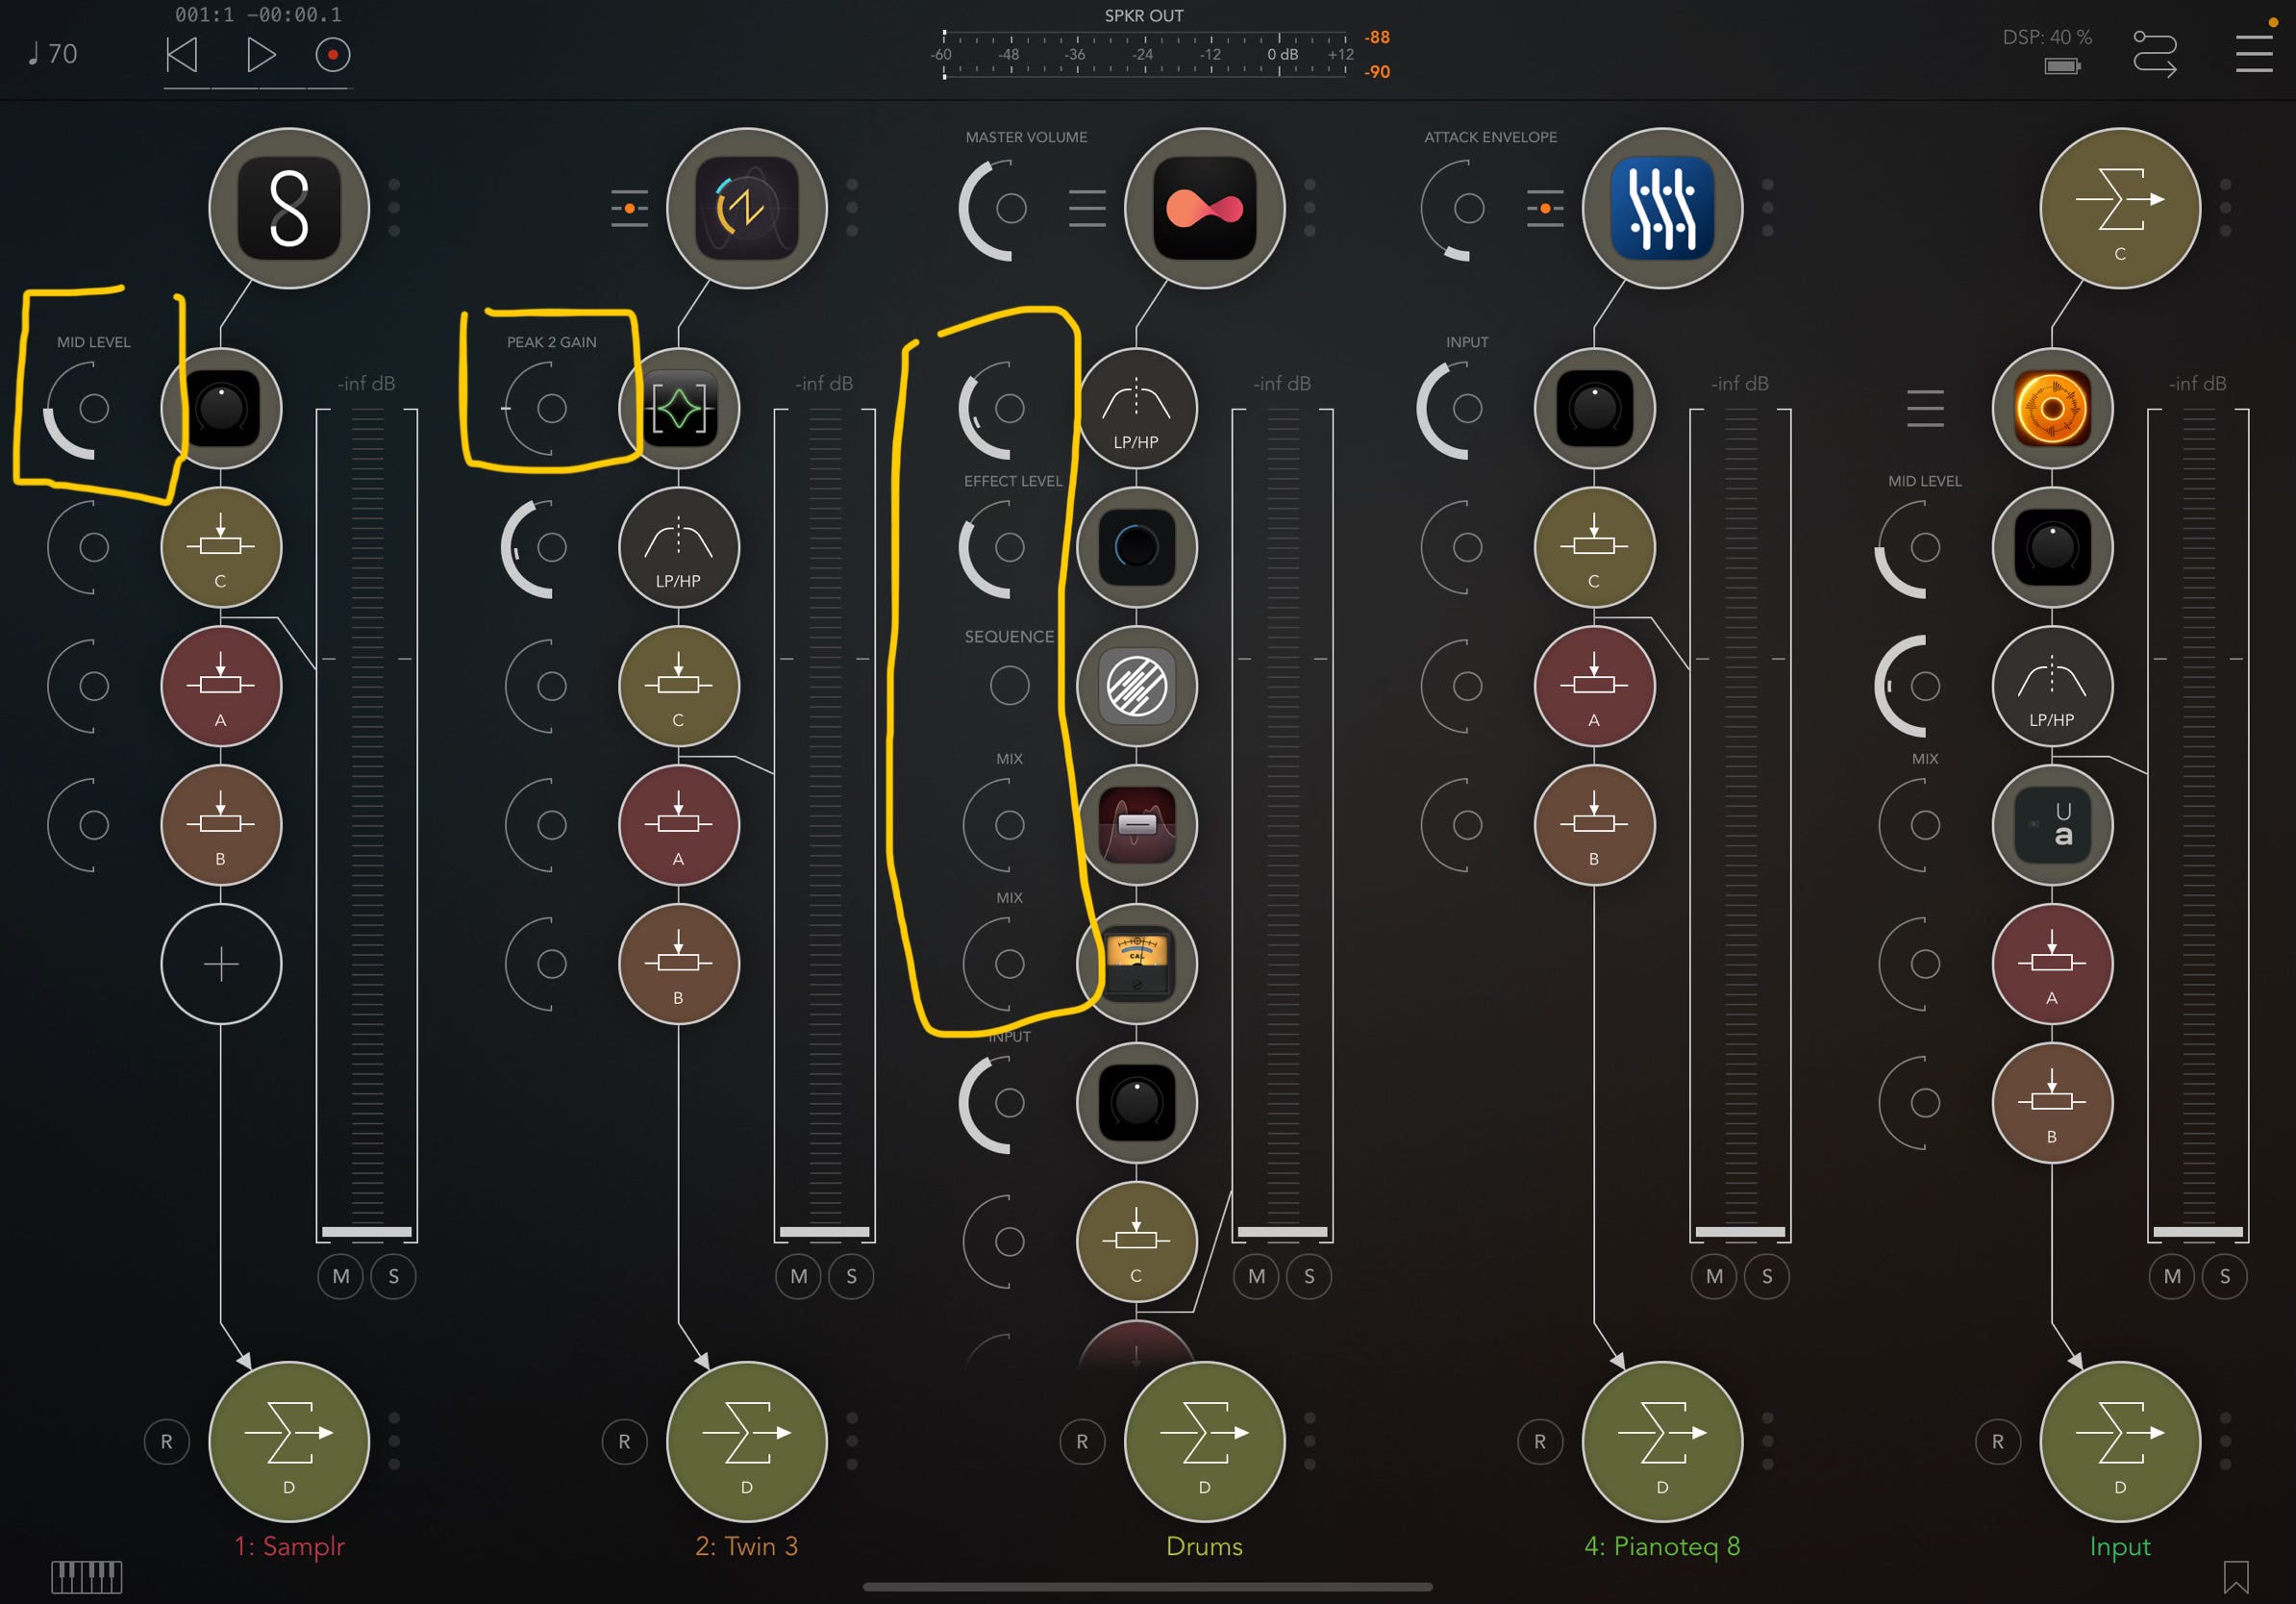
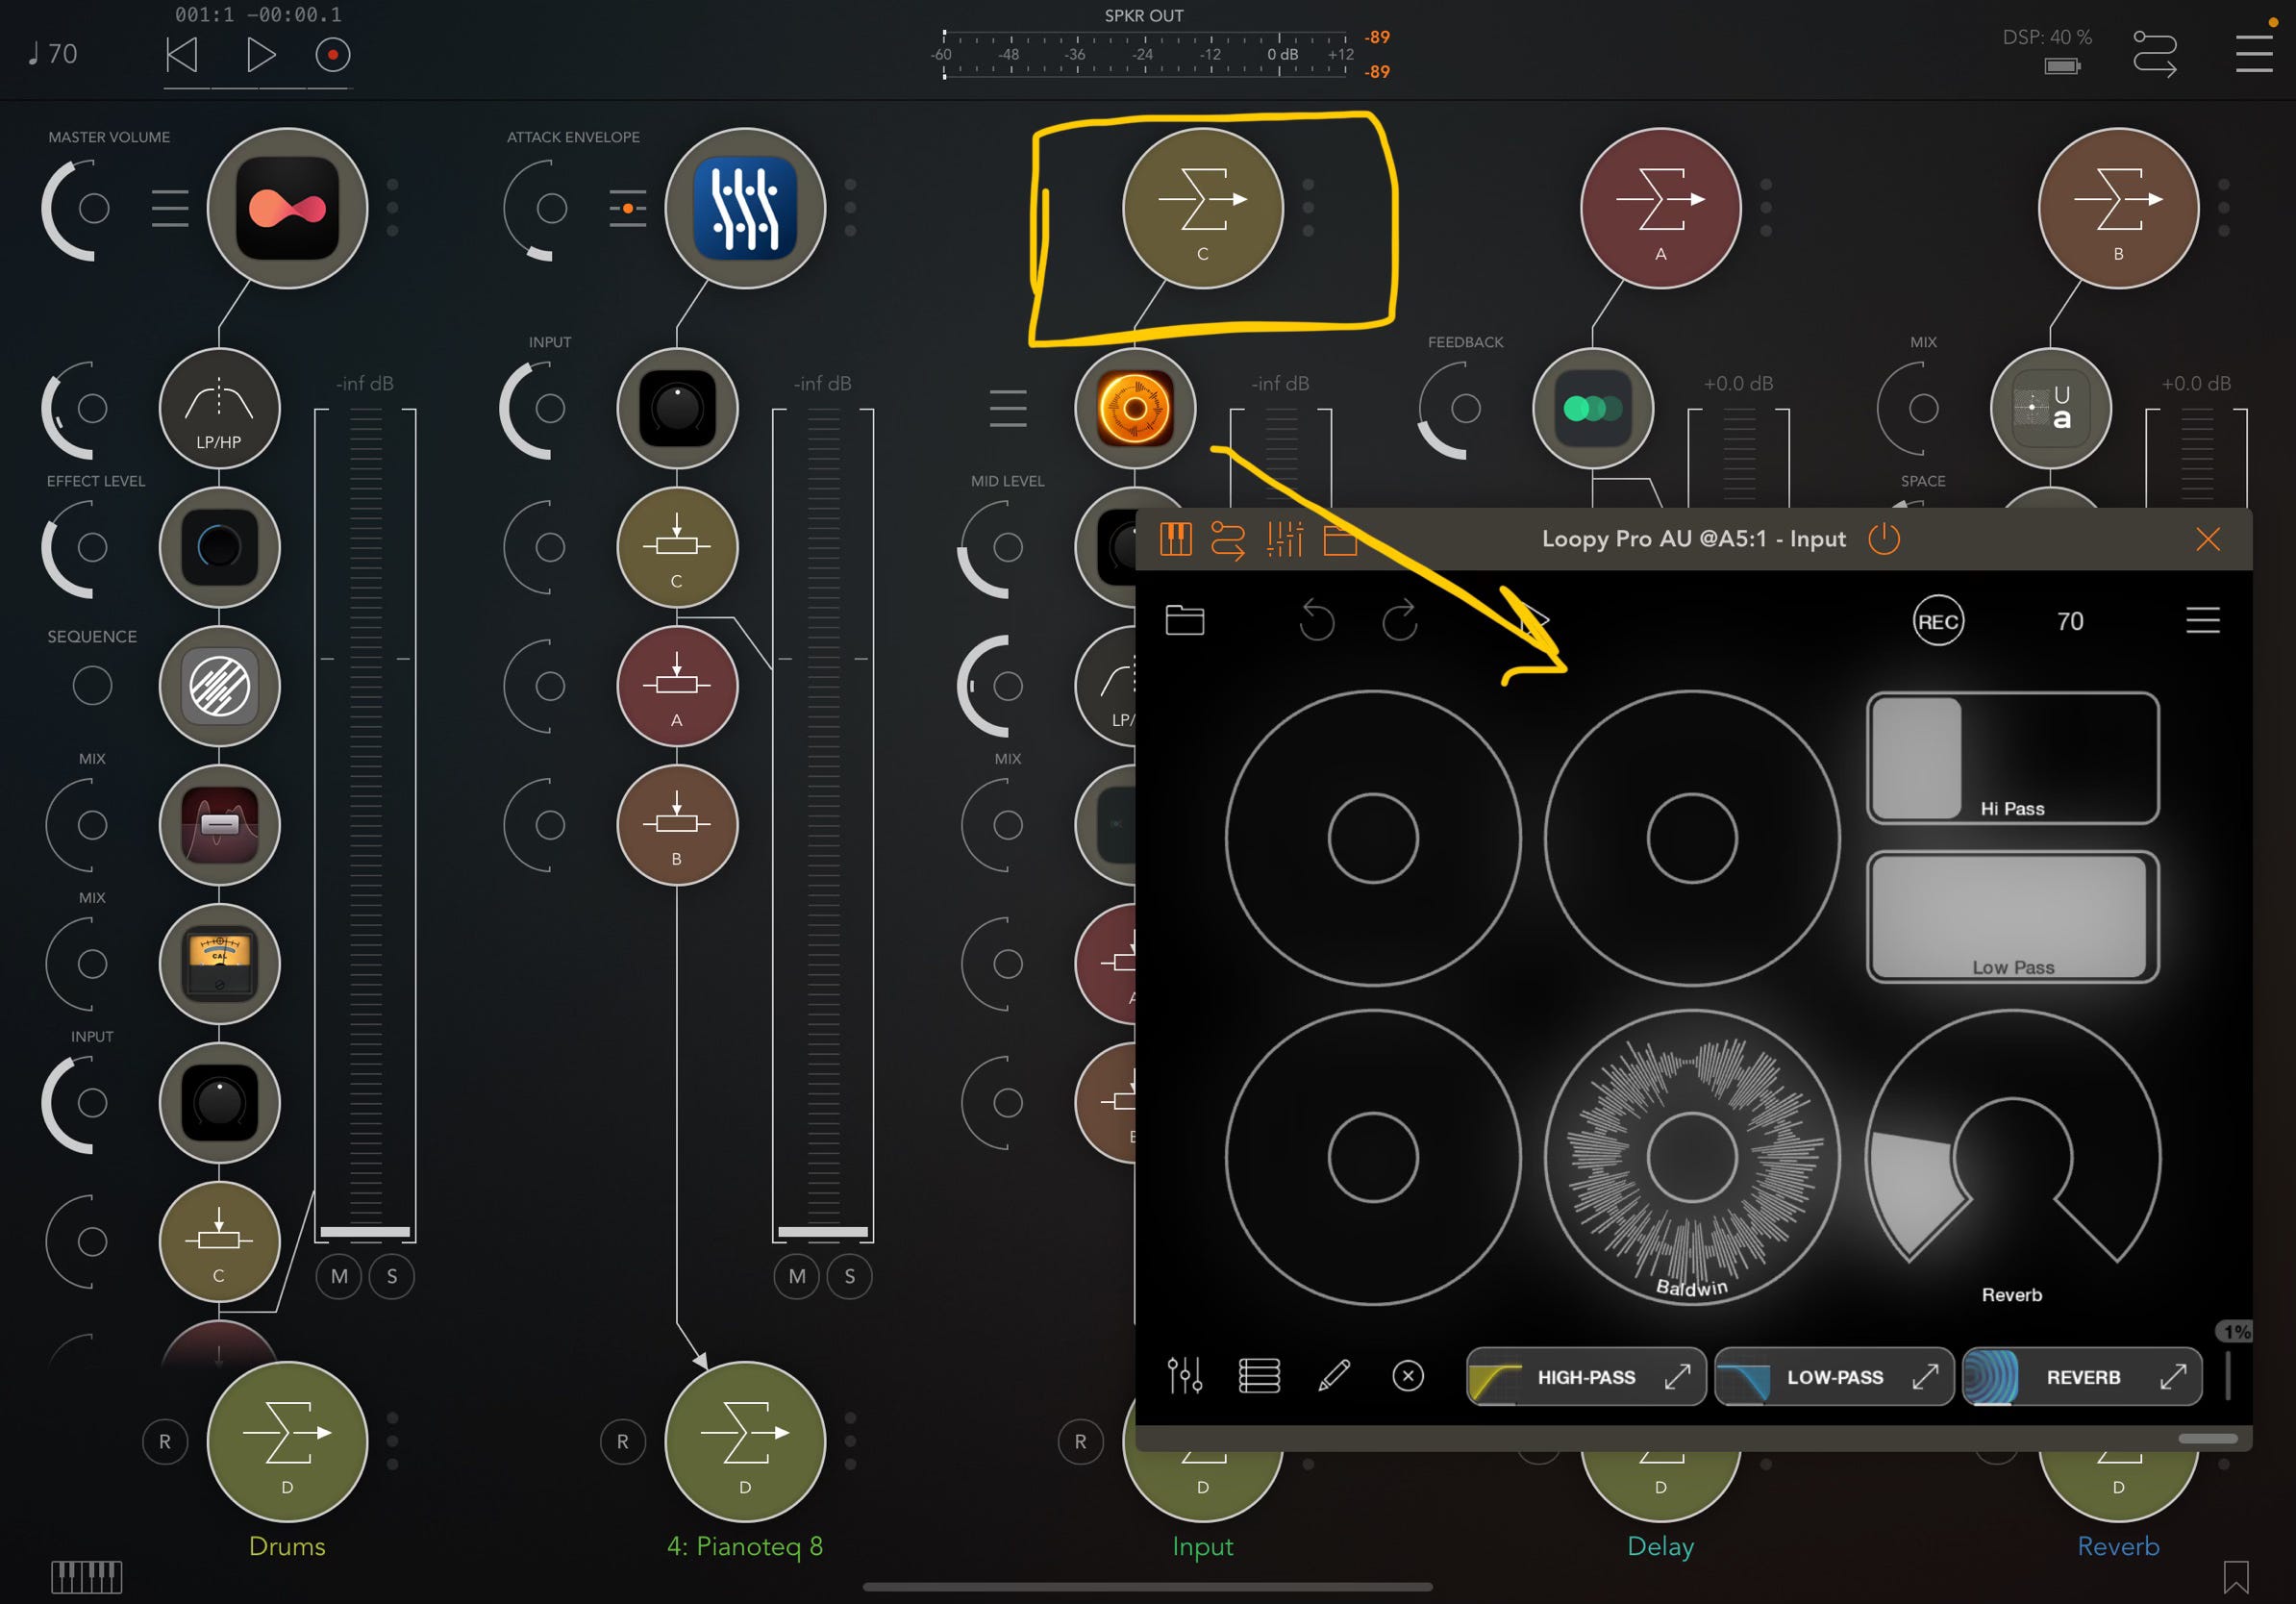
DAW/Host: My iPad DAW of choice when on stage is AUM. I prefer having the mixer tools front-and-center and prioritized, and the ability to quickly and easily add preferred parameters to control directly next to the AUv3 instance on a channel (see screenshot below) makes it a super smooth experience to mix audio live and “play” my effects. I still find AUM’s UI and layout to be the ultimate iOS performance mixer.
Instruments: For my work with Hotel Neon, I have 4 main sources of audio ready: playable samples in Samplr, a MiniMoog-style synth pad in FabFilter Twin 3, several percussion patterns in Audiomodern Playbeat, and an upright piano in Modartt Pianoteq. All of this is geared toward CPU optimization: Twin 3 runs more smoothly than Moog Model D, and Pianoteq is a synthesis engine under the hood - it runs much more smoothly than a large sample library. Playbeat and Samplr are quite efficient, too. A session with all of these instruments and effects typically maxes out at 45-50% DSP on the AUM meter.
Sends/returns: There are 3 mix buses available on every instrument channel:
-A is delay (Imaginando K7D tape delay), with readily available feedback control. I ride that fader constantly to generate runaway oscillations and walls of noise.
-B is reverb (FabFilter Pro-R 2 and Unfiltered Audio Silo), and
-C is a looper with an AUv3 instance of Loopy Pro with lo fi effect (courtesy of Unfiltered Audio’s LO FI AF).
I have A & B set up Post-fader, but C is pre-fader. I love using pre-fader send/return buses like variations of effects chains. Each send can have drastically different effects chains loaded on the return channel, and by sending pre-fader audio to each of them, I can blend in various amounts of each effected signal independent of the original track’s volume fader.
Why use AUM instead of Loopy Pro?
Of course, Loopy Pro is a formidable DAW and control surface itself - one I use interchangeably with AUM most days. But it is first and foremost a looper. The mixer view is a little too compact for my taste, and I frequently “fat finger” the send dials and channel volumes. Additionally, I’d prefer to not have to click in and out of the mixing & looping views to make things more legible.
If the ergonomics were better for my fingers, I’d seriously consider making the switch to Loopy Pro for everything. But for now, I leave Loopy Pro to studio work and sound design rather than the stage.
With that said, I do have a Loopy Pro session set up to mimic the layout and function of my AUM template, just in case I’m ever feeling adventurous. It looks like this:


MIDI control and assignments
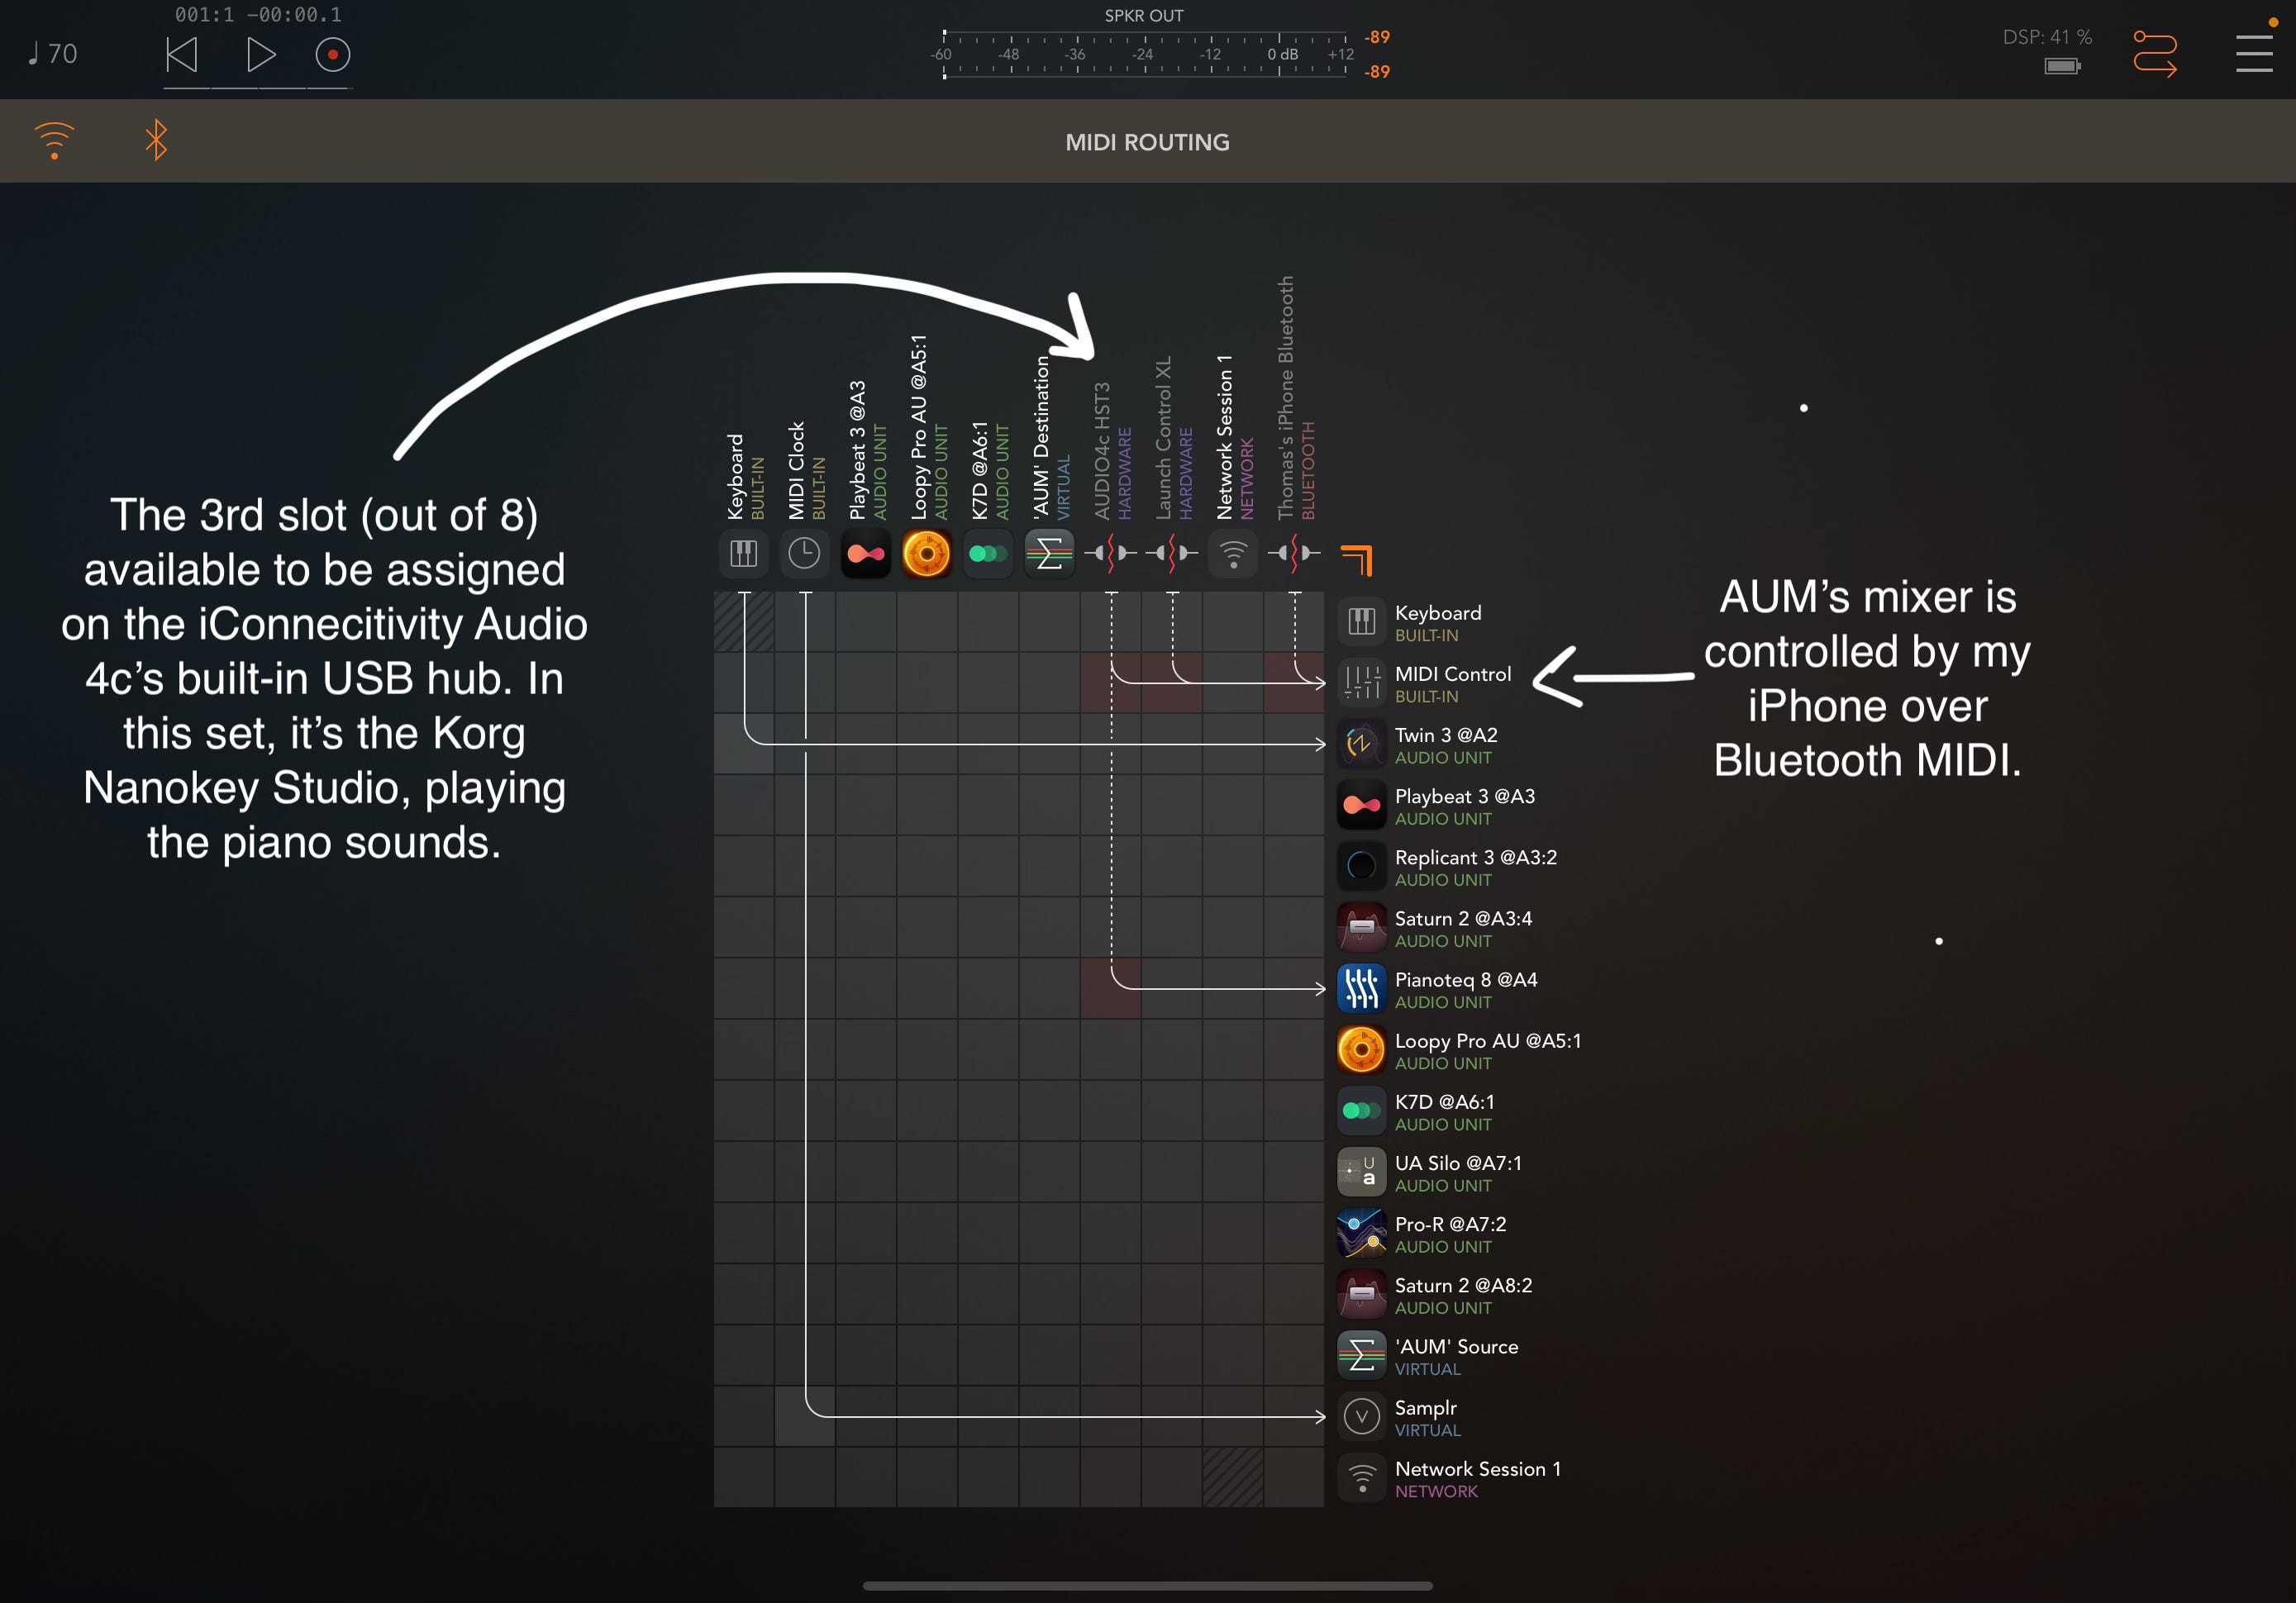
In the pursuit of portability and simplification, I’ve foregone some of my usual external tools for MIDI control and sequencing in this set, such as the Octatrack and Ableton Live. I’m instead relying on the built-in AUM keyboard for playing the Twin 3 synth, a Korg Nanokey Studio to play Pianoteq, and my iPhone as the main MIDI controller over AUM’s mixer.
The routing looks like this:
The great thing about Loopy Pro on iPhone is that it’s a piece of cake to establish additional knobs, faders and control surfaces for additional assignment. More on that below.
The iPhone: 4-track looper & MIDI controller
Speaking of Loopy Pro, one place where I do prefer to use it over AUM is on my iPhone 15 Pro running next to the iPad. The ability to create infinite pages of custom layouts of MIDI-mappable widgets is fantastic, and it turns any phone or tablet into a very effective MIDI controller, effects rack, looper, synthesizer, or whatever else you want it to be.
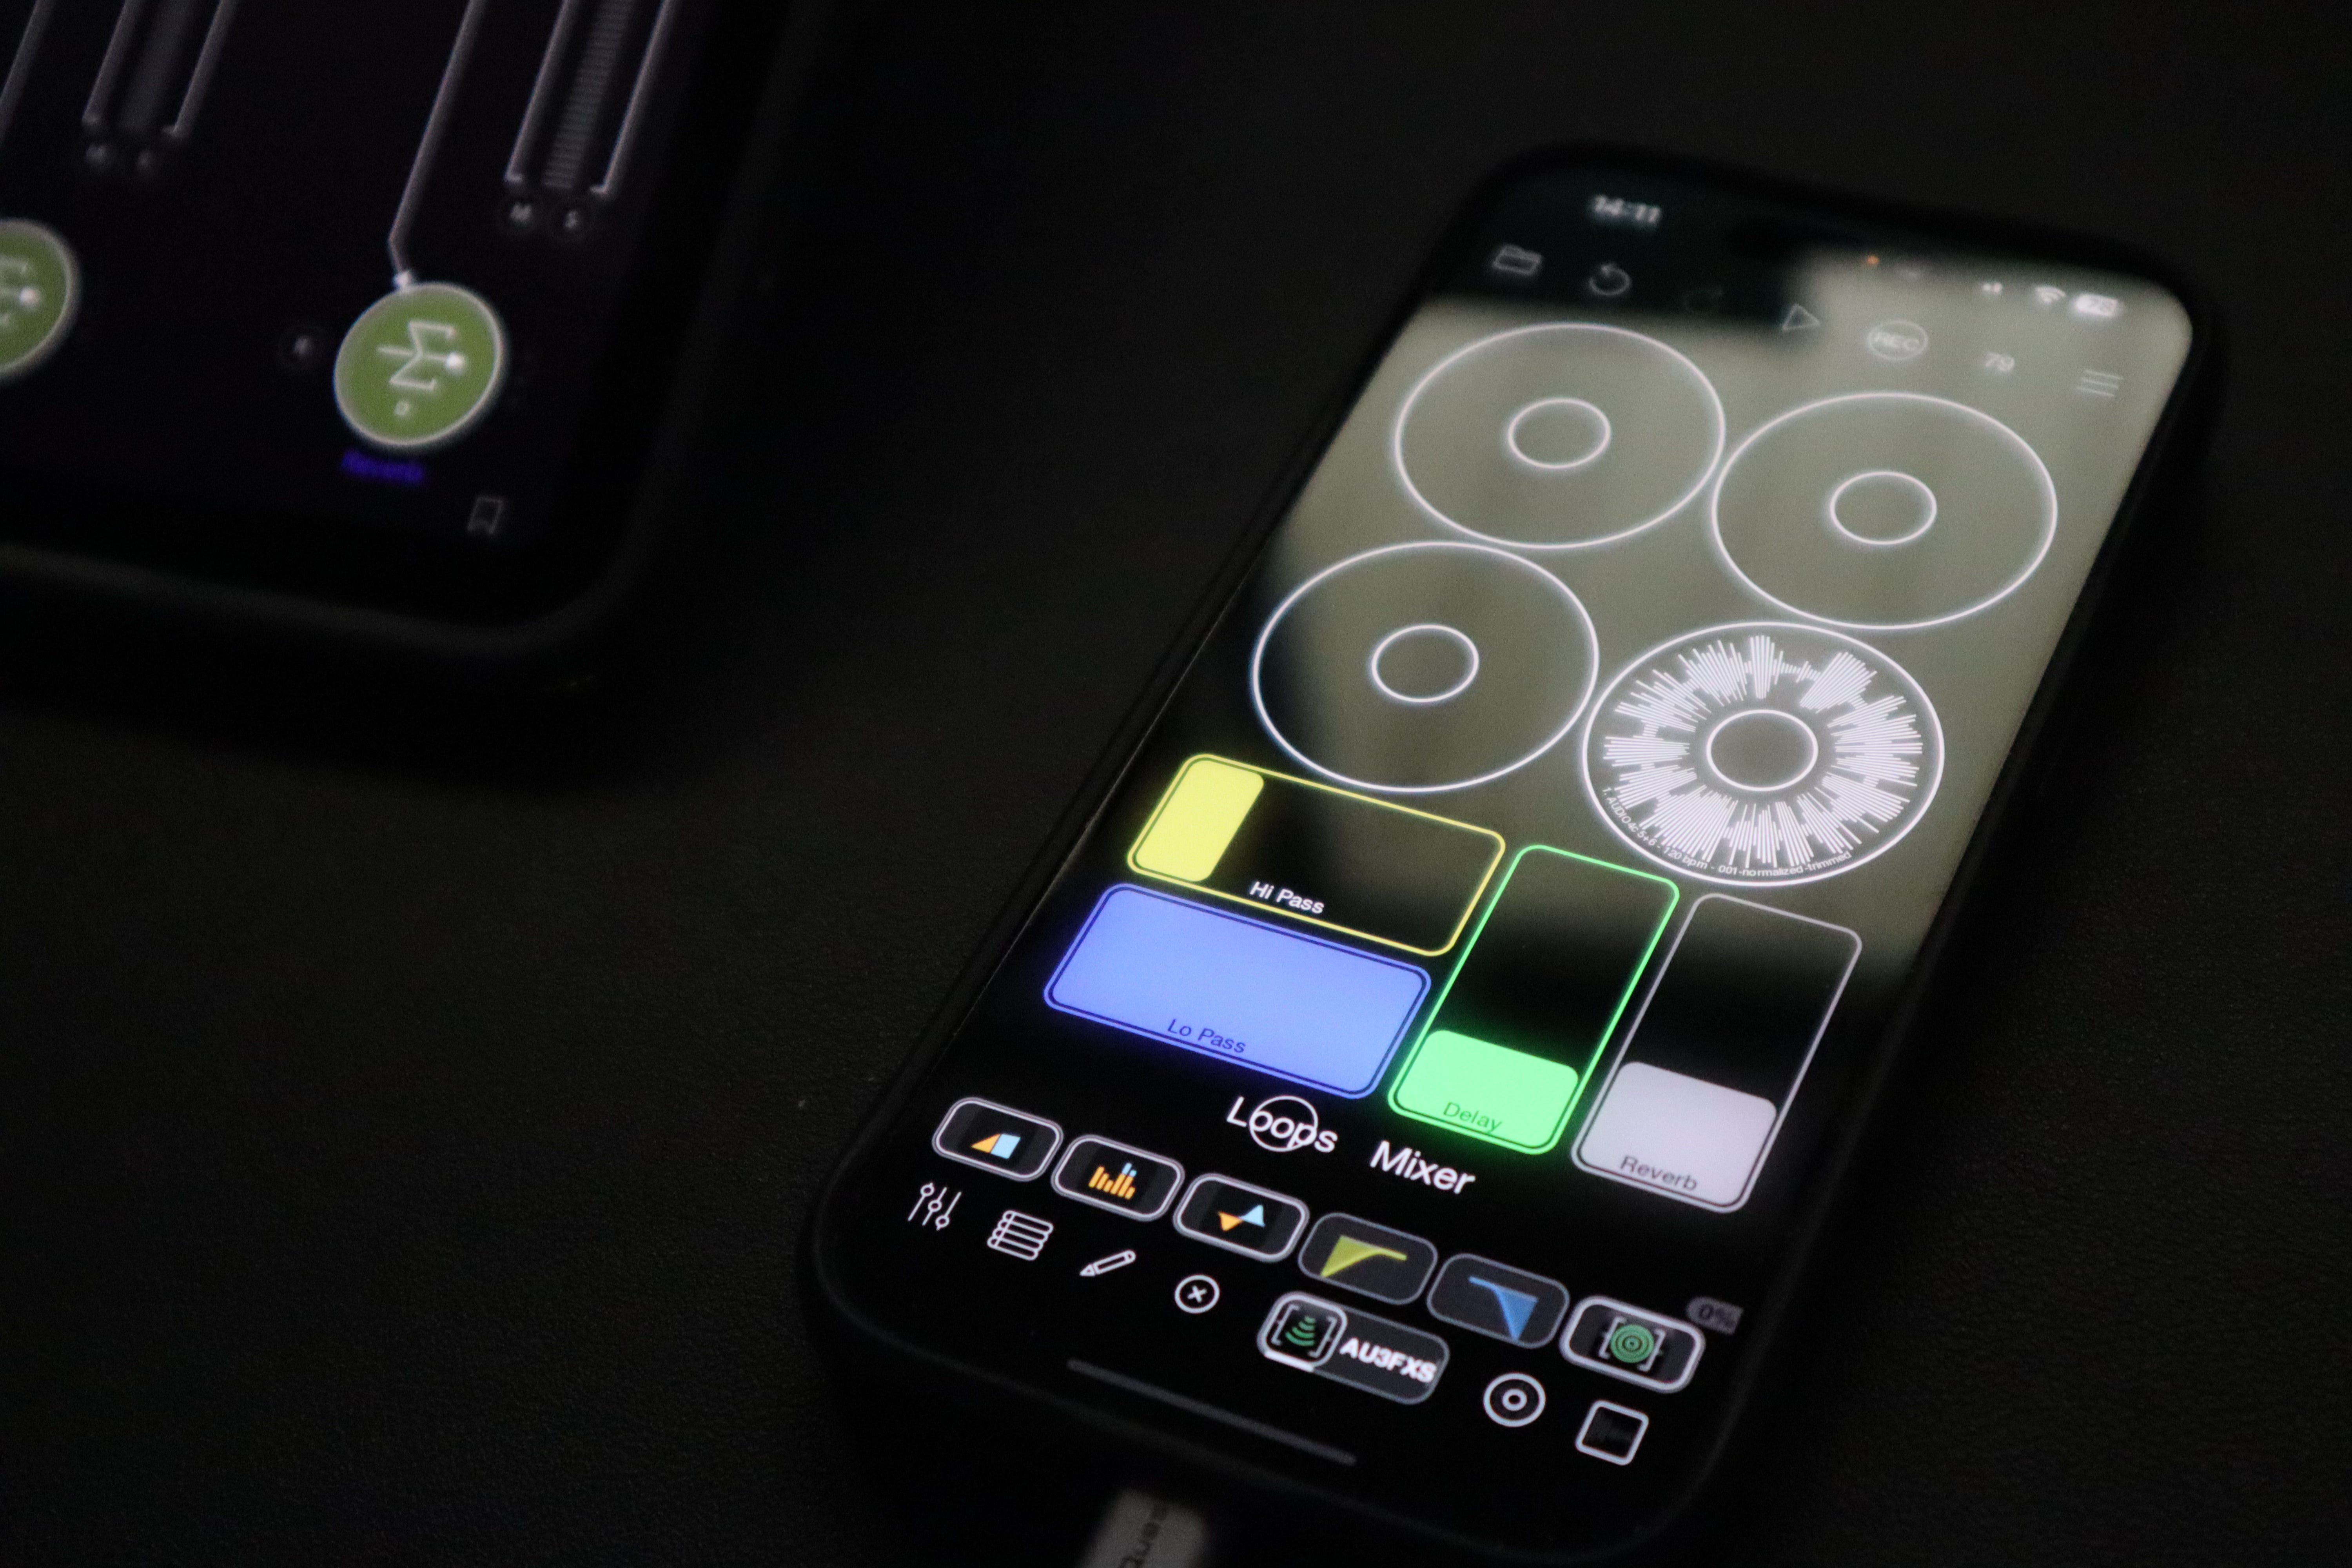
In this case, I’m using it as a dual-purpose tool: Page 1 is a looper that receives audio from my iPad over USB, and Page 2 is a MIDI controller that controls AUM’s mixer.
Looper:
Audio routing: When my phone is connected to the USB1 port of the iConnectivity interface, it receives any iPad audio I send to output 1/2 and 3/4 on input 5/6 and 7/8, respectively. I can capture, loop, and process this audio to my heart’s content. I’m not locked in to just 4 loops, either - I can edit the layouts and add as many clips as I want with just a click, even while the transport is running and loops are playing back.
Loop effects: On each looping clip, I have basic controls set up for high- and low-pass filters, as well as delay and reverb for spaciousness. I use Kymatica’s Dub and Space for these, respectively, because of how efficiently they run. I also really appreciate the fact that their UIs re-size themselves perfectly to fit an iPhone screen; most iPad apps don’t appear any different on iPhone and are unworkable because of tiny text. Check it out below to see what I mean:


The output of the loopers is sent through Toneboosters effects: Compressor, Barricade (limiter), and EQ. I really believe Toneboosters is making some of the best apps on iOS these days. They rival FabFilter for quality, at a fraction of the price and with improved CPU. Running a few of these on an iPhone would make for a seriously impressive and portable channel strip or end-of-chain “polisher” for almost any piece of hardware.
Even though it’s not likely that I will use this iPhone looper setup for this particular show since there are already a lot of other sounds happening, it’s nice to have the option if I feel the urge.
Mixer:
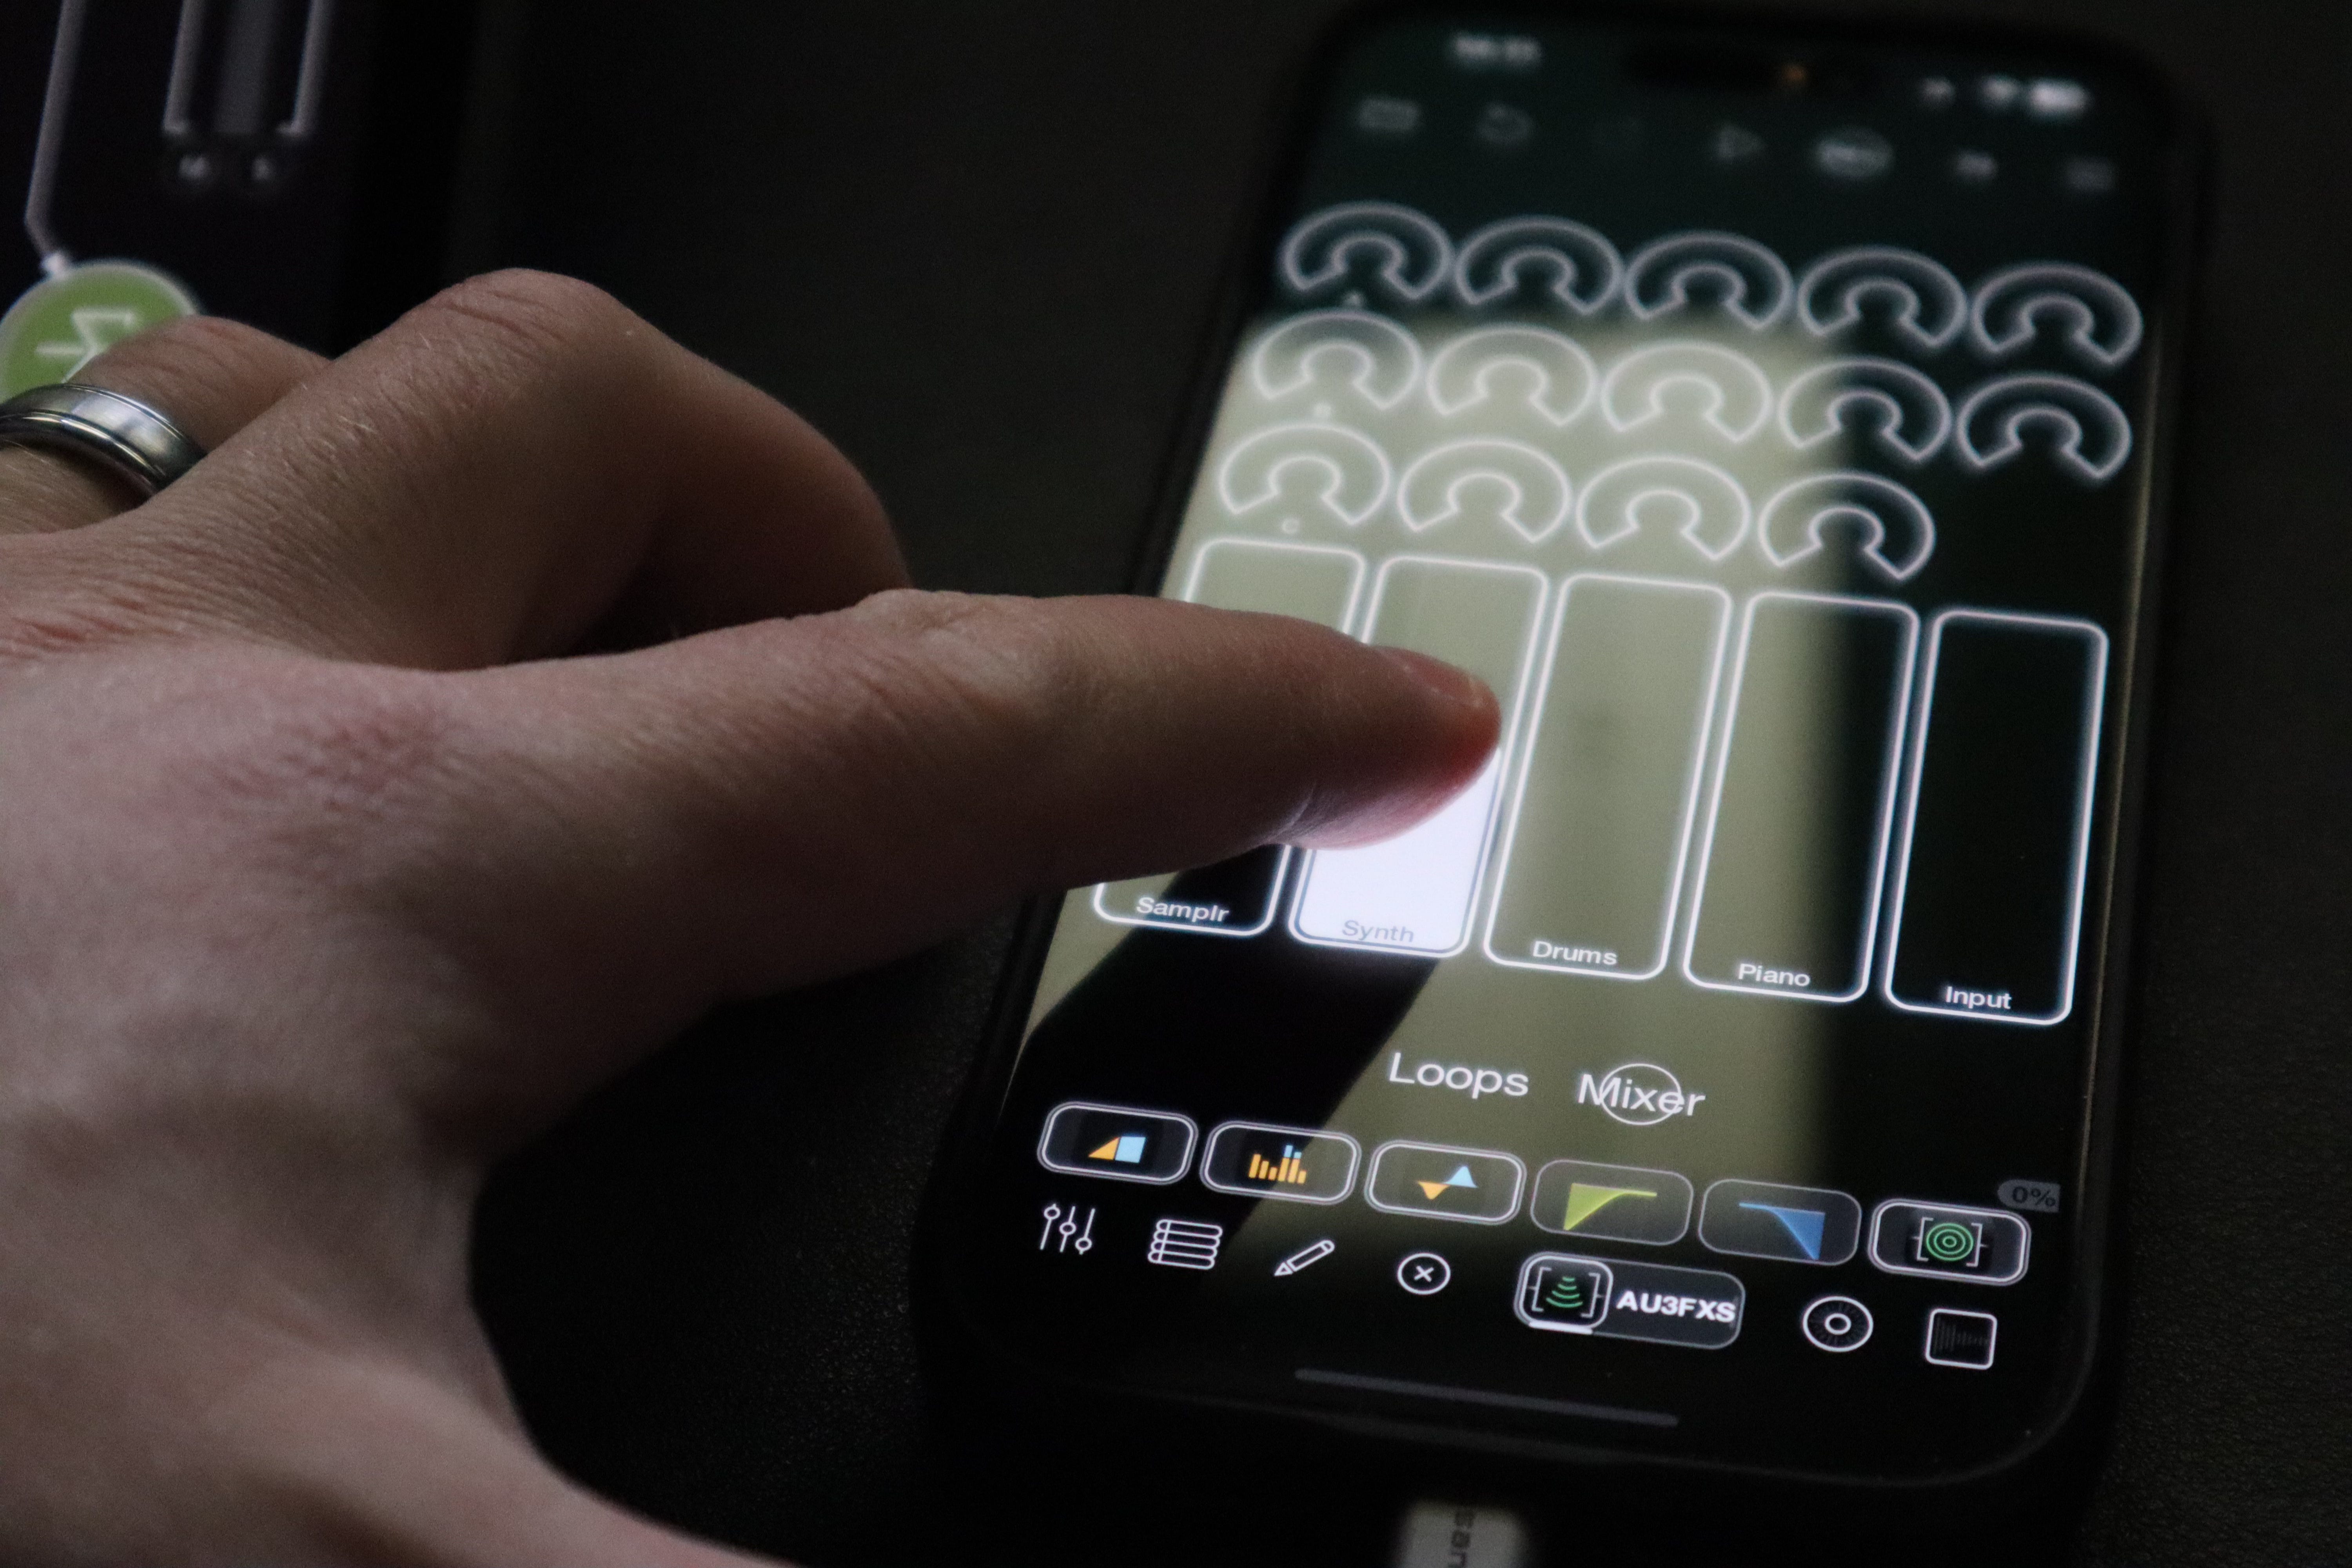
Page 2 features a miniature version of the AUM mixer channels I showed previously. I love having this available because of how much time I spend in Samplr and inside other AUv3 effect windows: since I’m not always able to access the mixer in AUM, it’s good to have a second control surface always available for that task.
Each channel volume and its 3 send levels are always available to me here, and can control AUM over bluetooth or USB MIDI.
Alternate setups
This is by no means the only way I perform. Many variations of this setup exist:
iPad and iPhone with Launch Control XL, for more tangible mixing feedback
iPad and Octatrack, with iPhone or LCXL as controllers, when I want to use the Elektron sequencer
iPad and laptop, with iPhone or LCXL as controllers, when I need to play VSTs or Kontakt instruments in Ableton Live
iPad, laptop, and Octatrack together, when I want the most options available
etc. etc. etc…


Closing
Thanks for reading along this far. I hope this was useful and gave you some ideas about how to integrate the iPad into your own setup.
If you have any questions, please reach out any time.
And if you’re in Philly, would love to see you at our next show on December 9th!
Love this peek into your work flow and I appreciate all the effort you put into demystifying the process. As someone who recently acquired an iPad, I find this very useful indeed.
There is such a plethora of different music production apps, it's difficult for me to know where to begin, short of shamelessly copying your work flow. How was it for you when you were getting started in the iPad ecosystem? Did you try to create a practical work flow from day 1, or did you spend time experimenting with individual apps until you had a better sense of where the pieces fit?
This is wonderful thank you so much for sharing Andrew. I haven’t watched the video yet but I’m adding that to watch next! I really tried hard to love music making on iOS but could never really get fully into it. I don’t think I gave it enough time to go into the detail that you’ve gone into with your setup and that backfired and made me feel that iOS music making just wasn’t for me. I’ll save this article in case I ever decide to buy another iPad and give it another shot! Ableton Live all the way for me. I just resonate with using a laptop for sure. I really did enjoy the Borderlands granulator on iPad though! That was hands down my favourite 🙏