


The studio in your pocket
Using an iPhone 12 mini as a legitimate instrument

If you spent any amount of time watching TV in the 1990s, especially in the mid-Atlantic USA, there’s a strong chance that you saw advertisements for the Saiontz & Kirk law group that loudly and assertively proclaimed to anyone seeking representation for worker’s comp claims: “IF YOU HAVE A PHONE, YOU HAVE A LAWYER!”
Well, I’m here to make a cringey dad joke alternative for anyone seeking help managing Gear Acquisition Syndrome and/or desiring healthier uses of screen time with their phone: “IF YOU HAVE A PHONE, YOU HAVE A STUDIO!”
The idea
One of my first posts on this Substack page was a breakdown of how I used the Elektron Octatrack in a live setting (you can read that post here). I described how I load up the lefthand tracks with samples to then re-sample and manipulate. This machine has so deeply informed the way I approach a live performance that I start there as a baseline: what are the essential elements I need to play (i.e. critical samples or sounds), and how do I take them to creative new places in as fun and engaging a way as possible (i.e. how do I most effectively re-sample and transform these critical samples and sounds)?
I’ve also talked about the benefits of the Loopy Pro app in previous posts here. It is an incredible do-it-all looper/sampler/effects processor/DAW/mixer available for iPhone and iPad (and soon, according to the developer, desktop). I can’t say enough good things about it. It’s eliminated so much gear temptation in the last 1-2 years and saved me from unnecessary purchases. You can build whatever you want to build with it, as long as your device’s CPU can keep up.
(Whenever I think about dropping some cash on the new “thing” that starts flooding my feeds and I start seeing the synchronized synthfluencer demo video drops on YouTube, my first instinct is to try to build a replica of that thing in AUM, Loopy, or Ableton.)
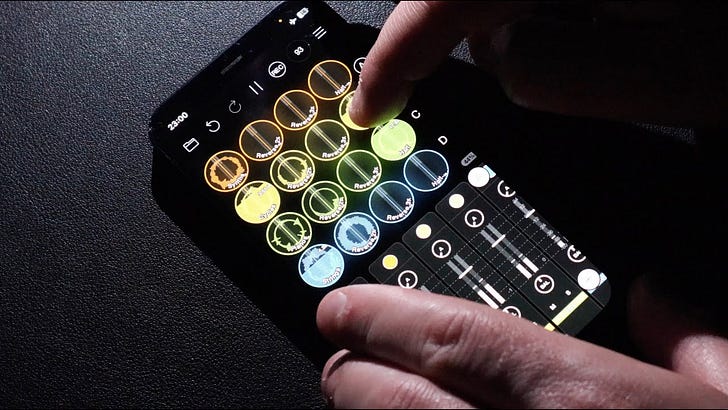
So naturally, I’ve been thinking about how to merge the two and take advantage of their best qualities. I’m building new and better performance templates with Loopy Pro in order to get even closer to what I do with the Octatrack, at least in a live performance setting. On my morning train commutes to work this week, I started building a template in Loopy Pro on my iPhone 12 Mini that re-creates the Octatrack template I use, with 4 pre-loaded samples on the left to mix, effect, re-sample and otherwise perform with. I’m in the process of adding some basic effects and controls that I find most useful, just to see what was possible on my smallest device.
The outcome is here as a live, uncut, unplanned performance with 4 recent samples I recorded in Ableton Live. I’ll break down the essential elements of this performance in today’s note.
The template in detail
You can see bits and pieces in the video, but here’s how the session is organized and what’s available to play with at any given time.
Mixer channels
Loopy Pro has a mixer section always available at the bottom of the screen. You can tuck it away into a collapsed view, but when expanded all the way you can access sections for pre- and post-fader effects.
I have channels for drums, the 4 clips, a bus (just in case), and a master channel. There’s a low- and high-pass filter, Imaginando K7D delay, and Eventide Blackhole reverb ready to go on each clip color. On the Patterning 2 drum channel, I have a slightly different setup for glitchy stuttering effects: filters, delay, GlitchCore, and Replicant 2.


You’ll notice that I have 2 slots for external bluetooth MIDI connections - a Korg Nanostudio and a second iPhone’s keyboard. The original session also had a Moog synth available to play with this keyboards, but it ended up being too crowded a mix and the CPU was starting to clip (more on that later). I decided to leave that out for now.
A quick note here: You can configure any AU effect to be pre- or post fader in AUM, too, simply by holding your finger on the effect icon and making your choice. I definitely find Loopy’s method of having this visibly divided to be way easier to manage, and is a little more intuitive for performance purposes.
The advantage of a post-fader effect is that for time-based and spatial processing effects like delays and reverb, you can adjust volumes independent of the decay of the effect: sounds will fade much more naturally.

The clips
In this session, the four clips (Orange, Yellow, Green and Blue) take center stage and serve as the main workgroups for each of the 4 samples I’m using. These are the equivalent of the static tracks I use on Octatrack: core samples, followed by filtering and effects.
You can see that I have them configured so that the sample audio is only routed to other clips within that color group. The additional 3 loopers past the first channel are only receiving audio from the first in the chain and all audio stays within the same color lane.
All of the loopers are set to play back audio at different rates: first is reverse at 2x speed/one octave up, second is reverse at 3x speed/two octaves up, and third is forward at half speed/one octave down. All of them have micro fades to avoid clips and pops at the start of the loops and are not set to time stretch or quantize, for maximum free/asynchronous looping fun of the original source samples.


The samples used
This track features 4 samples, 80 seconds each, from a demo I was working on last week: a synth drone from Samplr on the iPad, a piano loop processed in Slate & Ash Cycles, the raw piano loop itself, and a violin/cello loop from Slate & Ash Landforms.
The golden rule of sampling that I try to follow for live performance is “garbage in, garbage out.” I prepare my samples with enough space and variation to avoid a muddy mix, with dynamic loud/soft moments that result in happy accidents. Working with material that’s flat, uninteresting or poorly mixed to begin with will only get harder to balance in the context of a performance like this…but of course, I recommend trying to sample anything and everything you personally find interesting. Even a half second of sound can be transformed.
Here they are in isolation:
Synth (orange clip):
Processed piano (yellow clip):
Raw piano (green clip):
Strings (blue clip):
The effect control grid
Loopy Pro allows you to create as many pages as you want in a session and load them up with the circular clips for looping and playback, as well as MIDI widgets, which can be thought of as effect parameter controls: there are buttons, sliders, dials, X-Y pads, text labels and even a clip slicer control, all resizable and free to move wherever you want them. There are more widget types to come according to the development roadmap.
Not only can you create the MIDI control surface of your dreams (this app made me sell my Ableton Push 2 and Korg nanokontrol fader board a few years ago), you can set up on-screen control of AU plugin effects without opening up the UI window of the effect. This is especially useful on small screens like an iPhone 12 mini.
On Page B, I’ve got a 4x4 grid of effects controls for each of the clips. Delay mix and feedback, Reverb mix, and filter cutoffs are all accessible for the samples and their re-sampled loops - much easier to manage than toggling these effects on/off by hand and working with tiny sliders in the UI. They’re all color coded and arranged by clip groups. Throughout the performance I toggle back and forth between the clip page (to adjust volumes) and the control page to adjust effect parameters over time.


There are so many subtle touches in Loopy that make it convenient to manage a session like this. One of the best is the text labeling of any widget you create. Not only can you map out an entire customized controller, you can label it with on-screen text and resize it to fit (you can even assign midi controls to these text boxes). This is a small thing, but it definitely beats the manual method I used to deploy of writing on tape, notepads, and post-it notes, frantically trying to remember what effects you’ve mapped to your MIDI controller on a dark stage.
Real talk: CPU overloads
This was a very, very fun exercise. As you might imagine, I get a certain thrill out of minimizing and shrinking everything about my gear footprint, so it was an inspiring exercise to think about what’s possible with the phone in my pocket.
With that said, the chances I’d rely on a setup like this in a live performance are slim to none. Throughout the preparation for this improv and setting up the template, I continually found that my iPhone was heating up to crazy levels, sometimes clipping audio altogether due to the temperature overloads. I had wanted to include a Moog Model D synth for some bass arps complementing the drums, and did have it set up to be controlled by a bluetooth keyboard, but it was simply too much to deal with on top of the clips and effects present here. I could simplify the session even further and reduce sampling rates/buffer sizes, but I’d also be running the risk of just “pressing play” at that point and letting the samples play back without any performance (not to open up a debate on what constitutes a “performance,” but I do want to be engaged and active as a performer).
So, all that to say: it’s not all sunshine and rainbows. There are real limitations and you need to be careful about how you’re allocating CPU resources on a tiny device like this. You also need to be cognizant of how much you’re filling up the screen. I fat-fingered quite a few controls while setting this up, and while performing…some UI windows are simply unusable at this size.
I have no concerns about my iPad’s ability to handle this, but for now, I’m thinking that my phone will be primarily responsible for simple MIDI widget control of other devices if I need it to be. I’m sure that as tech progresses and Apple releases new and upgraded phone chips that start to approach M-series capability in tablets and Macs, the potential will be huge.
Question re: Octatrack and Loopy Pro. Hey Andrew, based in part on viewing some of your videos (like the one above) where you demo and provide a strong recommendation for LoopyPro, I've recently taken the plunge into the app, and have really been enjoying and impressed by its capabilities. I know you obviously really like the Octatrack as well. Given that I don't own an Octatrack myself, and realistically don't have the budget to get one anytime soon, I'm wondering whether you feel that LoopyPro could potentially serve much the same purpose as Octatrack for an iOS musician on a budget? I gather that Octatrack's functionality is probably more advanced (and, to be honest, I understand only a tiny bit of what it does); neverthless, if Octatrack essentially enables you to load up samples to which you can set playback length, speed, pitch, add an LFO, and add up to two effects (including a filter), I know that in at least a very basic way, I can do that also in Loopy Pro. Anyways, I was wondering if you could comment on all that; i.e. Loopy Pro as budget alternative to Ocatrack. Or am I dreaming in technicolor? :-) Thanks, Frank
Another super-awesome presentation Andrew - thank you! I had just recently purchased Loopy Pro for my iPad but haven't had time yet to "read the user manual" so it was personally timely for me to see you dive into it with a hands-on demo. I just want to also reiterate how very much I appreciate the meticulous detail and thoroughness (including screen grabs) you put into these presentations and posts - together, they really serve as a kind of "course offering" on this topic.