

Studio diary: June 4, 2023
Tools for carving rhythms out of texture

Today’s note will focus on the techniques behind my latest studio diary entry on YouTube, a jam from June 4, 2023 (subscribe to see these videos as soon as they’re released!). This one was made entirely on the iPad with extensive looping and re-sampling of a modeled Rhodes electric piano from Apesoft called Electric Vintage.
The ideas aren’t fully fleshed out - it’s very much an improvised jam session that I didn’t plan, and there are lots of things I’d change in a proper studio recording - but I thought this would be a particularly useful video to dissect and explore since it features so many of my favorite tools and apps on my iPad. It was a fun exercise to transform a blurry, reverberant mess into something that grows more stark, choppy, and rhythmic over time.
I’ll break down all the pieces involved in 6 steps below.
Step 1: the source sound
As mentioned, the primary instrument in this video is a Rhodes electric piano, generated by an app called Electric Vintage by Apesoft. You may know them for the dozens of other wild and cryptic apps they make, like iDensity (granular synthesis) and Dedalus (audio-mangling and out-of-control delay), but I think this is one of the true gems of their catalog. I’ve been using it since day 1 or 2 of my iPad music journey.
A note about Rhodes piano sounds
The sound itself is a modeled 1976 Rhodes Mark 1, which is probably the most obvious source of my love for this app: I have a real-life 1976 MK1 in my studio and I know these tones like the back of my hand. I made a whole album out of it in 2018 by close-mic’ing the insides of the instrument and processing the raw sounds of the mechanics.


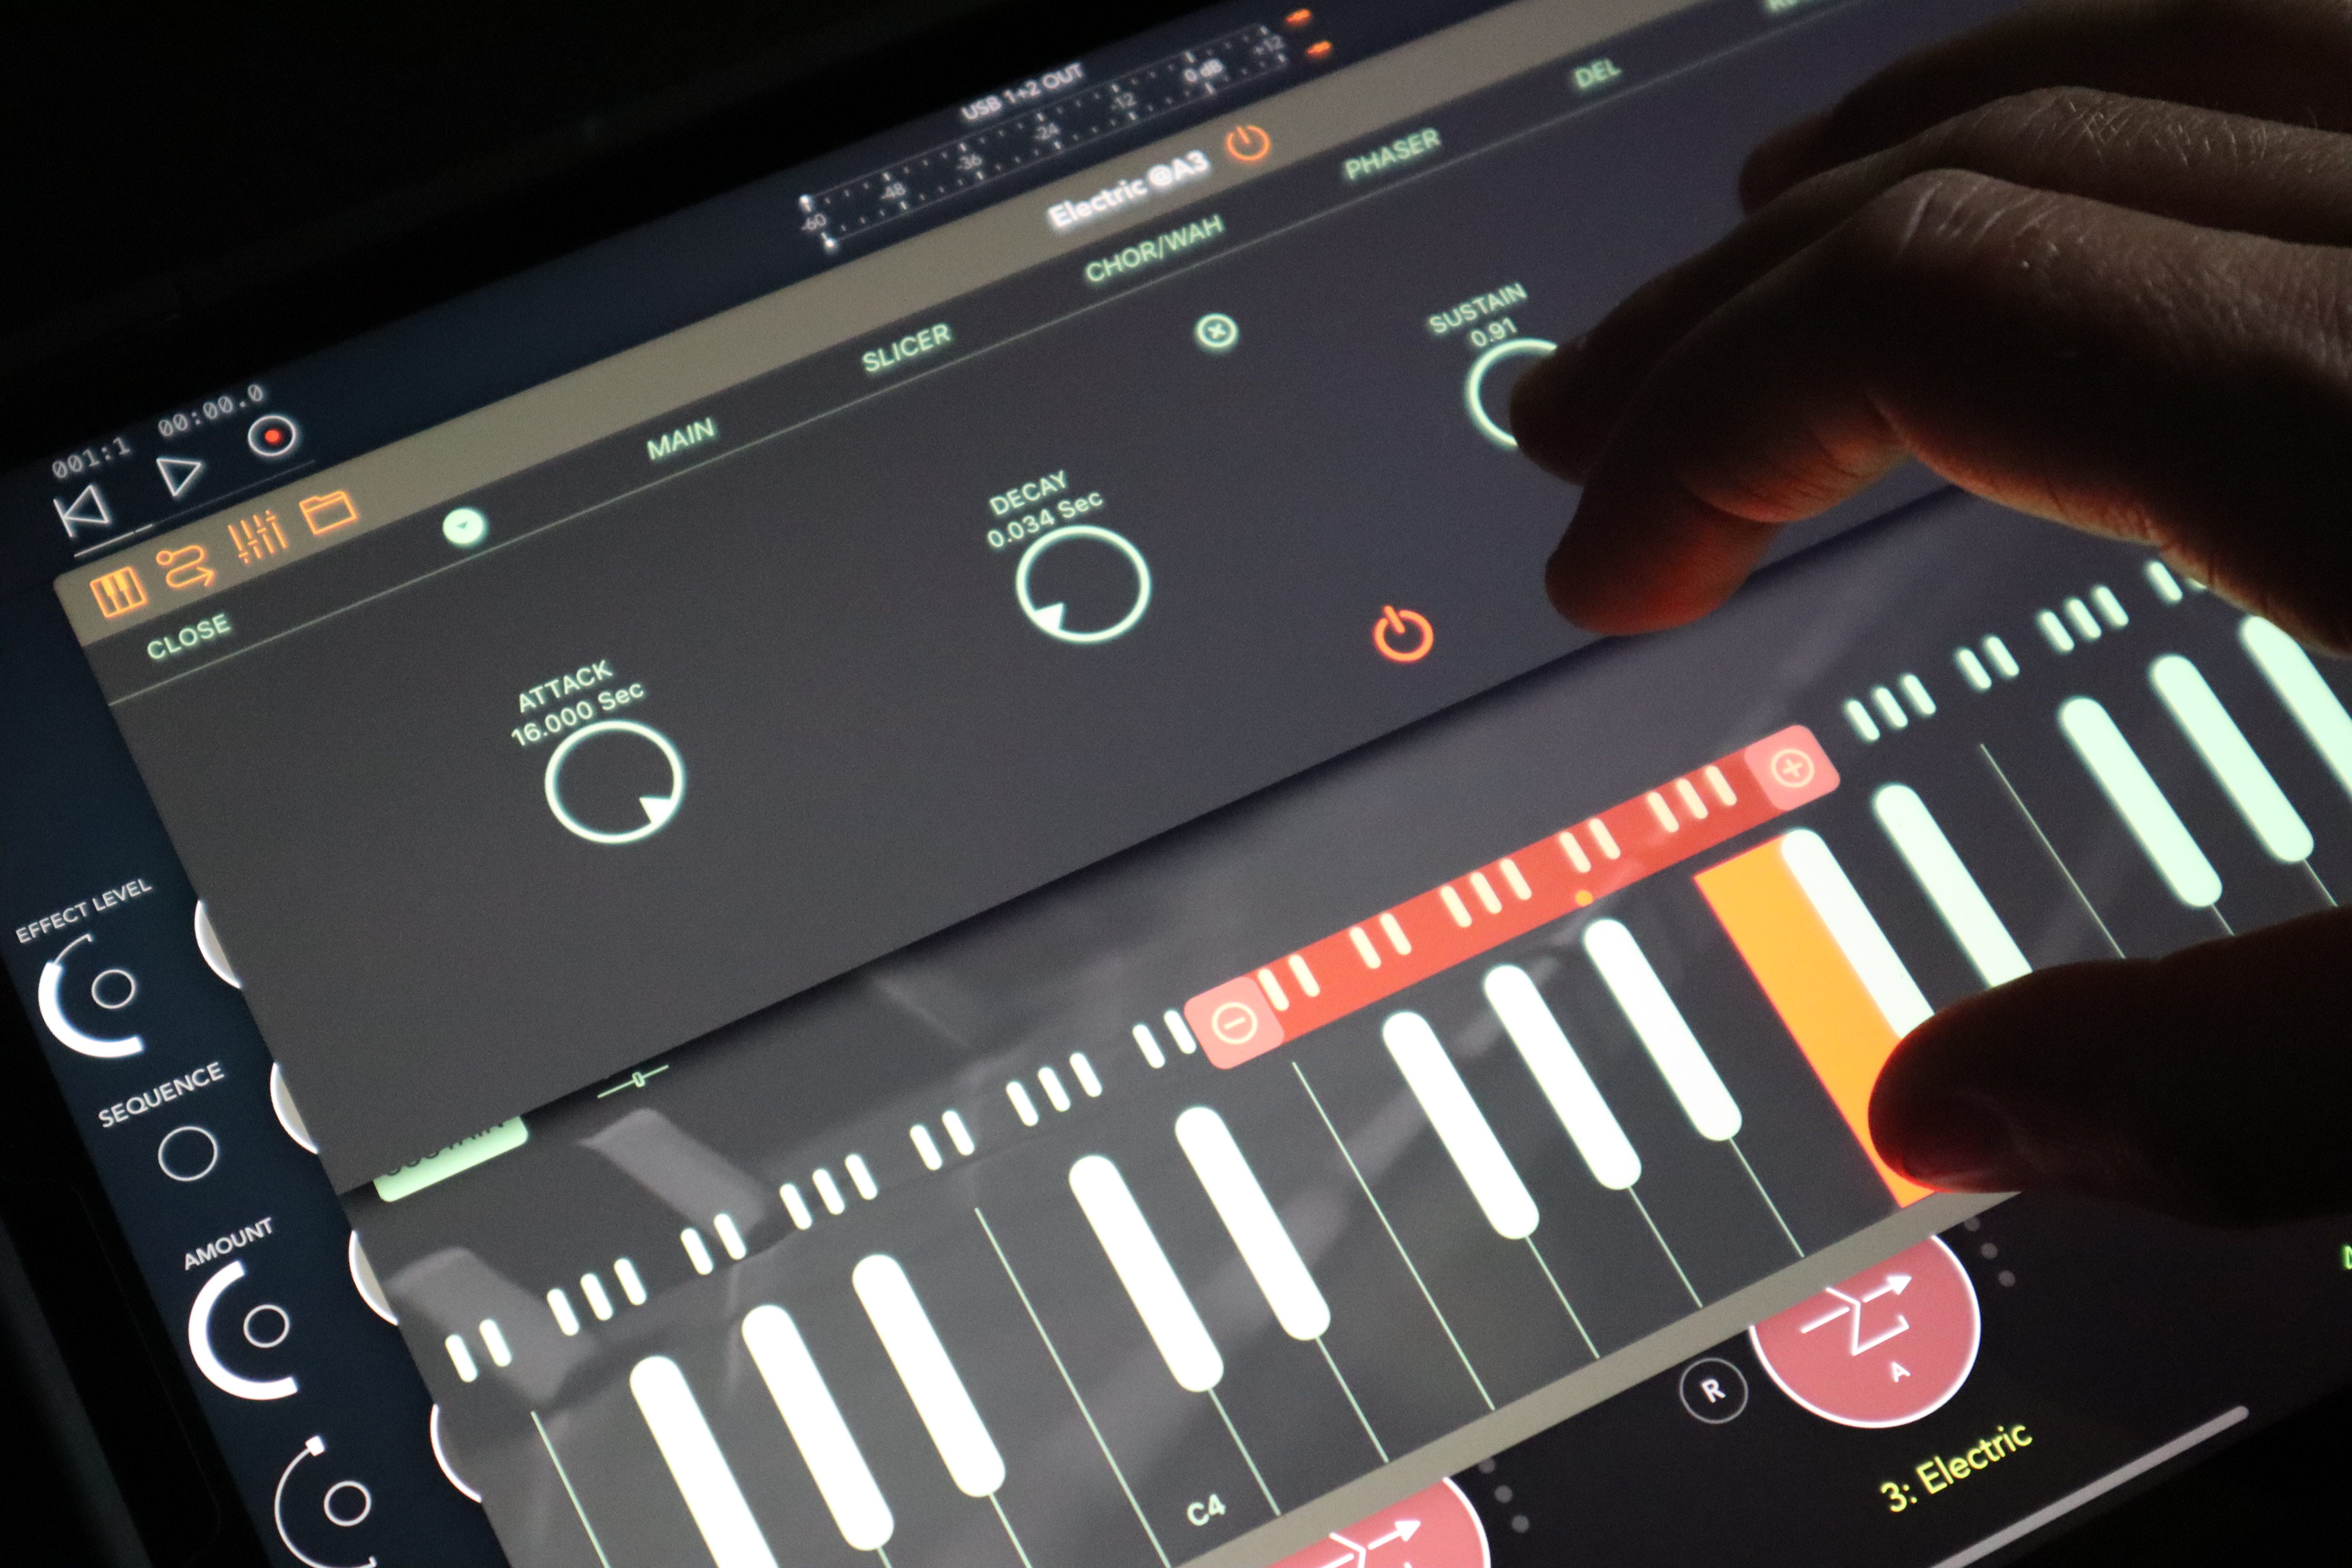
One of my favorite sounds in the world is the resonant overtone of a struck tine in these electric piano instruments. The pure, glassy, sine-like tone makes for beautiful pads and atmospheres when re-sampled and processed, and so the first thing I look for in any electric piano library is ADSR control in order to extend the attack time, elongate the release, and create synth-like sounds to sample. Not only does Electric Vintage give you ADSR control to an extreme, multi-second long degree, but there are legitimately useful and CPU-efficient effects built in, such as a “slicer,” reverb, delay, distortion, etc…all kinds of opportunities to shape the sound you want beyond a basic (but beautiful) electric piano.
In this session, I have a pair of sequencers from Audiomodern, called Riffer and Chordjam, playing the Rhodes in the background. Riffer plays randomly generated quarter-note melodies in D minor into Chordjam, which responds with a randomly generated chord in the same key. Chordjam allows control of velocity, range, timing, octave in order to shape the sound you want, and I use this app all the time when sketching out new ideas. It consistently leads me to chord progressions and chord shapes/voicings I wouldn’t have thought of on my own. It is a great “idea generator” and the MVP of most early ideas I start.
In practice, it sounds like this. Riffer feeds Chordjam, which plays the piano:
Step 2: pads and atmospheres with Samplr
Anyone familiar with my process will already know that I’m a huge fan of Samplr. It’s the app that got me into the iPad ecosystem to begin with, and still my most often-used instrument on any given day. It’s a masterclass in what touchscreen music-making tools can be, and I still maintain to anyone on the fence about iPadOS music tools that it’s worth picking up a used iPad to use this app. I don’t know if I could play a live set without it anymore.
In this session, I’ve pre-recorded a few WAV files of 2-3 single, held notes of the Rhodes. I recorded the sounds in AUM, then loaded those sounds into Samplr directly using Audioshare copy/paste.
Brief tangent: because Samplr is only available as an Inter-App Audio (IAA) device right now, rather than the newly emerging standard of AUv3, it has to be loaded on its own track with the standalone app running in the background in order to be used in a DAW like AUM or Loopy Pro. The developer has hinted that the conversion to AUv3 is a huge undertaking and will eventually be done, but it’s unknown when this will happen in reality. This would presumably allow you to insert the instrument in-line on a track, like any other AUv3 plugin effect, and then sample audio directly from whatever channel you’ve placed it on…a big workflow upgrade compared to loading audio from Audioshare or sampling from an external source through an interface. It would also allow for it to run on desktop Mac devices. Here’s to hoping this is possible someday soon!
Here’s what that looks and sounds like:
Step 3: creating space and blurred textures
The Rhodes and the Samplr tracks on their own are OK, but there are a few tricks I’ve deployed to make them much more expansive and spacious using Loopy Pro, Phonolyth Velvet Machine, and K-Devices Magma.
Loopy Pro
Loopy Pro is a standout piece of music-making software, and quickly moving toward the “single most all-around useful app” award in my book. Not only is it a traditional DAW with mixer and arranger views, it’s a completely customizable MIDI control surface, an unlimited-track looper, effects processor with ability to load apps and plugins like any other host, and…perhaps most amazingly…can be run as a standalone app or as an AUv3 within other apps like AUM, with full feature set and capability ready to deploy!
So, that’s exactly what I’m doing here: it’s setup on the same channel as the Rhodes piano, so that I can loop and re-pitch those sounds as the sequencers play it. In this case, I’ve recorded 3 loops beforehand: 2 at normal pitch, and one an octave lower, so that I can layer those in with the live audio of the Rhodes playing. I prefer to run Loopy Pro this way, as an AUv3 within AUM, since I prefer the larger screen real estate that AUM provides for the faders. My fat fingers have trouble with the small faders when Loopy has multiple clips running. I do use Loopy Pro almost as often as AUM, though, especially if I’m creating MIDI-mapped widgets to control my Ableton Live sessions.
This is an immensely powerful app with unbelievable possibility, and it would take me multiple days to explain half of its capability and possible use cases. The developer and community around it are extremely passionate, responsive, and invested in its success, so I’d encourage you to explore the communities, forums, manuals, feature development roadmap, and other info available on the website to learn more and get inspired: https://loopypro.com/communities/
Phonolyth Velvet Machine
Phonolyth Velvet Machine is a self-described “Sound texture generator/blur/non-linear reverb.” I’m not sure I can do better than that efficient description, but essentially, think of it as a tool that stretches and smears incoming audio using an envelope control. Sounds “bloom” into huge clouds of sound gradually and smoothly (like velvet), with more control than a traditional reverb. When fully wet at extreme settings, it’s like listening to distant audio coming from the other end of a mile-long tunnel. I use this device as alternative to traditional reverb, when I want things to sound unrecognizable from their original source, and when “realism” doesn’t matter - this isn’t a pure reverb, but a sound design tool.
In this session, I have an instance of Velvet Machine loaded on the master track so that I can start the piece with a fully wet mix, and gradually reduce the level of the effect when “tangible” elements like the percussion are introduced. I also have an instance loaded directly on the Rhodes channel, so that I can blur that specific element at any point in time independent of the rest of the mix.
Here’s an example, first featuring a drone in Samplr, then pivoting over to the Rhodes.
As you can see, it’s imminently useful for turning any sound into a pool of blurred texture.
K-Devices Magma
Finally, Magma by K-Devices adds some pitch-shifting reverb to the mix. While the descriptions and functions on this one don’t make a lot of intuitive sense at first glance, you can quickly get a feel for the controls by playing with it hands-on. It stores an audio buffer of live audio, the size of which is controlled by the “memory” knob in the interface. You can choose to pitch shift that audio from an octave down all the way to an octave above. Similar to Velvet Machine, that resulting texture can be sprinkled into the background as a lush bed of additional padding.
Step 4: Percussive clicks/cuts
Those who use the iPad for making music will already know that one of its most appealing aspects is the touchscreen and gestural interfaces that apps make use of. Patterning 2 is an amazing app that makes use of this immediacy as a drum machine and MIDI step sequencer.
When opening the app, you’re immediately presented with an 8-layer “onion” of circular step sequencers. Each layer can be up to 16 steps in length and assigned a drum sample of your choosing; there are hundreds of community-designed drum kits available to download for free, but you can also load your own samples directly into the app and create your own kits for use.
The beauty of this app is its flexibility. There is filtering, delay, reverb, panning, ADSR, pitch shifting (coarse and fine), sample editing/trimming, probability and randomization, control of step sequencer direction, nudging, and more available on each of the 8 tracks. You can also easily change “parts” to alternate your beats and patterns with the press of a button. The result is probably the closest example of an Elektron-style step sequencer I’ve seen on iPad so far, and allows for a huge amount of flexibility and randomization.
Patterning 2 is standalone, for now: like Samplr, you have to run it in AUM by placing it on its own track and running it as an IAA app for now, but the developer has made mention that there will be AUv3 compatibility in the next version.


Another excellent feature is how well it works with external gear and especially Ableton Live: not only can you link your tempos through MIDI or Ableton Link, you can also send a MIDI output from each track to control your drum racks in Ableton Live (with or without the track’s sample audio playing simultaneously; your choice). You can even export your samples and loops in .ALP format or single-cycle WAV loops to load into your Live sessions. Brilliant.
Anyway, in this session, I’ve got a simple beat going with samples of glitchy clicks/pops I created. Occasionally I will mute the kick drum channel to cut out the low end and for variation, but otherwise it’s not doing too much here beyond playing a standard rhythm I quickly sketched out. If I wanted to be more creative, I could’ve played around with trig probability, varying velocity, etc…all that and much more is possible. This is an app worth spending time with.
Step 5: glitch, stutter, and other effects
To inject some more obvious rhythmic, pulsing feel into the track, I’ve made use of a couple apps to chop things up:
Glitchcore by Alex Matheu
Glitchore by Alex Matheu is a grid-based glitching effect that re-arranges live audio. The app is based on a 16x16 block of cells, each containing chunks of the live buffer. When you engage the sequencer, you can set the app to distribute the live audio in random order across these cells or in a sequence you draw yourself, reverse live audio, freeze the buffer, etc. The length of each step can be set as small as 1/64 of your chosen BPM, which allows for micro-sized clicks and skips in the live audio that will always stay in time with the project tempo.
Quite frankly, I’m not sure how this magic happens at a deeper level, but I’m always able to achieve a satisfying, interesting result with it. I particularly like it when applied to static drones as a way to chop them into percussive slices, much like I do with the slice grid on the Octatrack sampler. This session uses Glitchcore on the Rhodes and the drums, adding a pulsing rhythm to the piano and unexpected variations in the drum beat.
Audio Damage Replicant 3
Audio Damage has been involved in app development since the early days of iPad music-making, and I think all of us owe them some thanks for bringing some credibility to the iPadOS music ecosystem. I dearly love all of their apps: Other Desert Cities delay, Enso looper, Continua and Quanta synths, and of course, as featured in this video, the brand new Replicant 3. Carrying on in the tradition of its previous versions, it’s a clever, intuitive glitch-and-stutter machine presented in a 16-step sequencer format. You can apply effects like ring mod, bit crush, delay, and filtering to live audio and watch as the audio in the buffer is chopped and resequenced in very pleasing, time-synced ways. I’m still exploring all of its capabilities, but in this video, I have it programmed to introduce a subtle bit of stuttering and bit crushing on the drums, which you can hear when I dial up the effect level:
Toneboosters BitJuggler
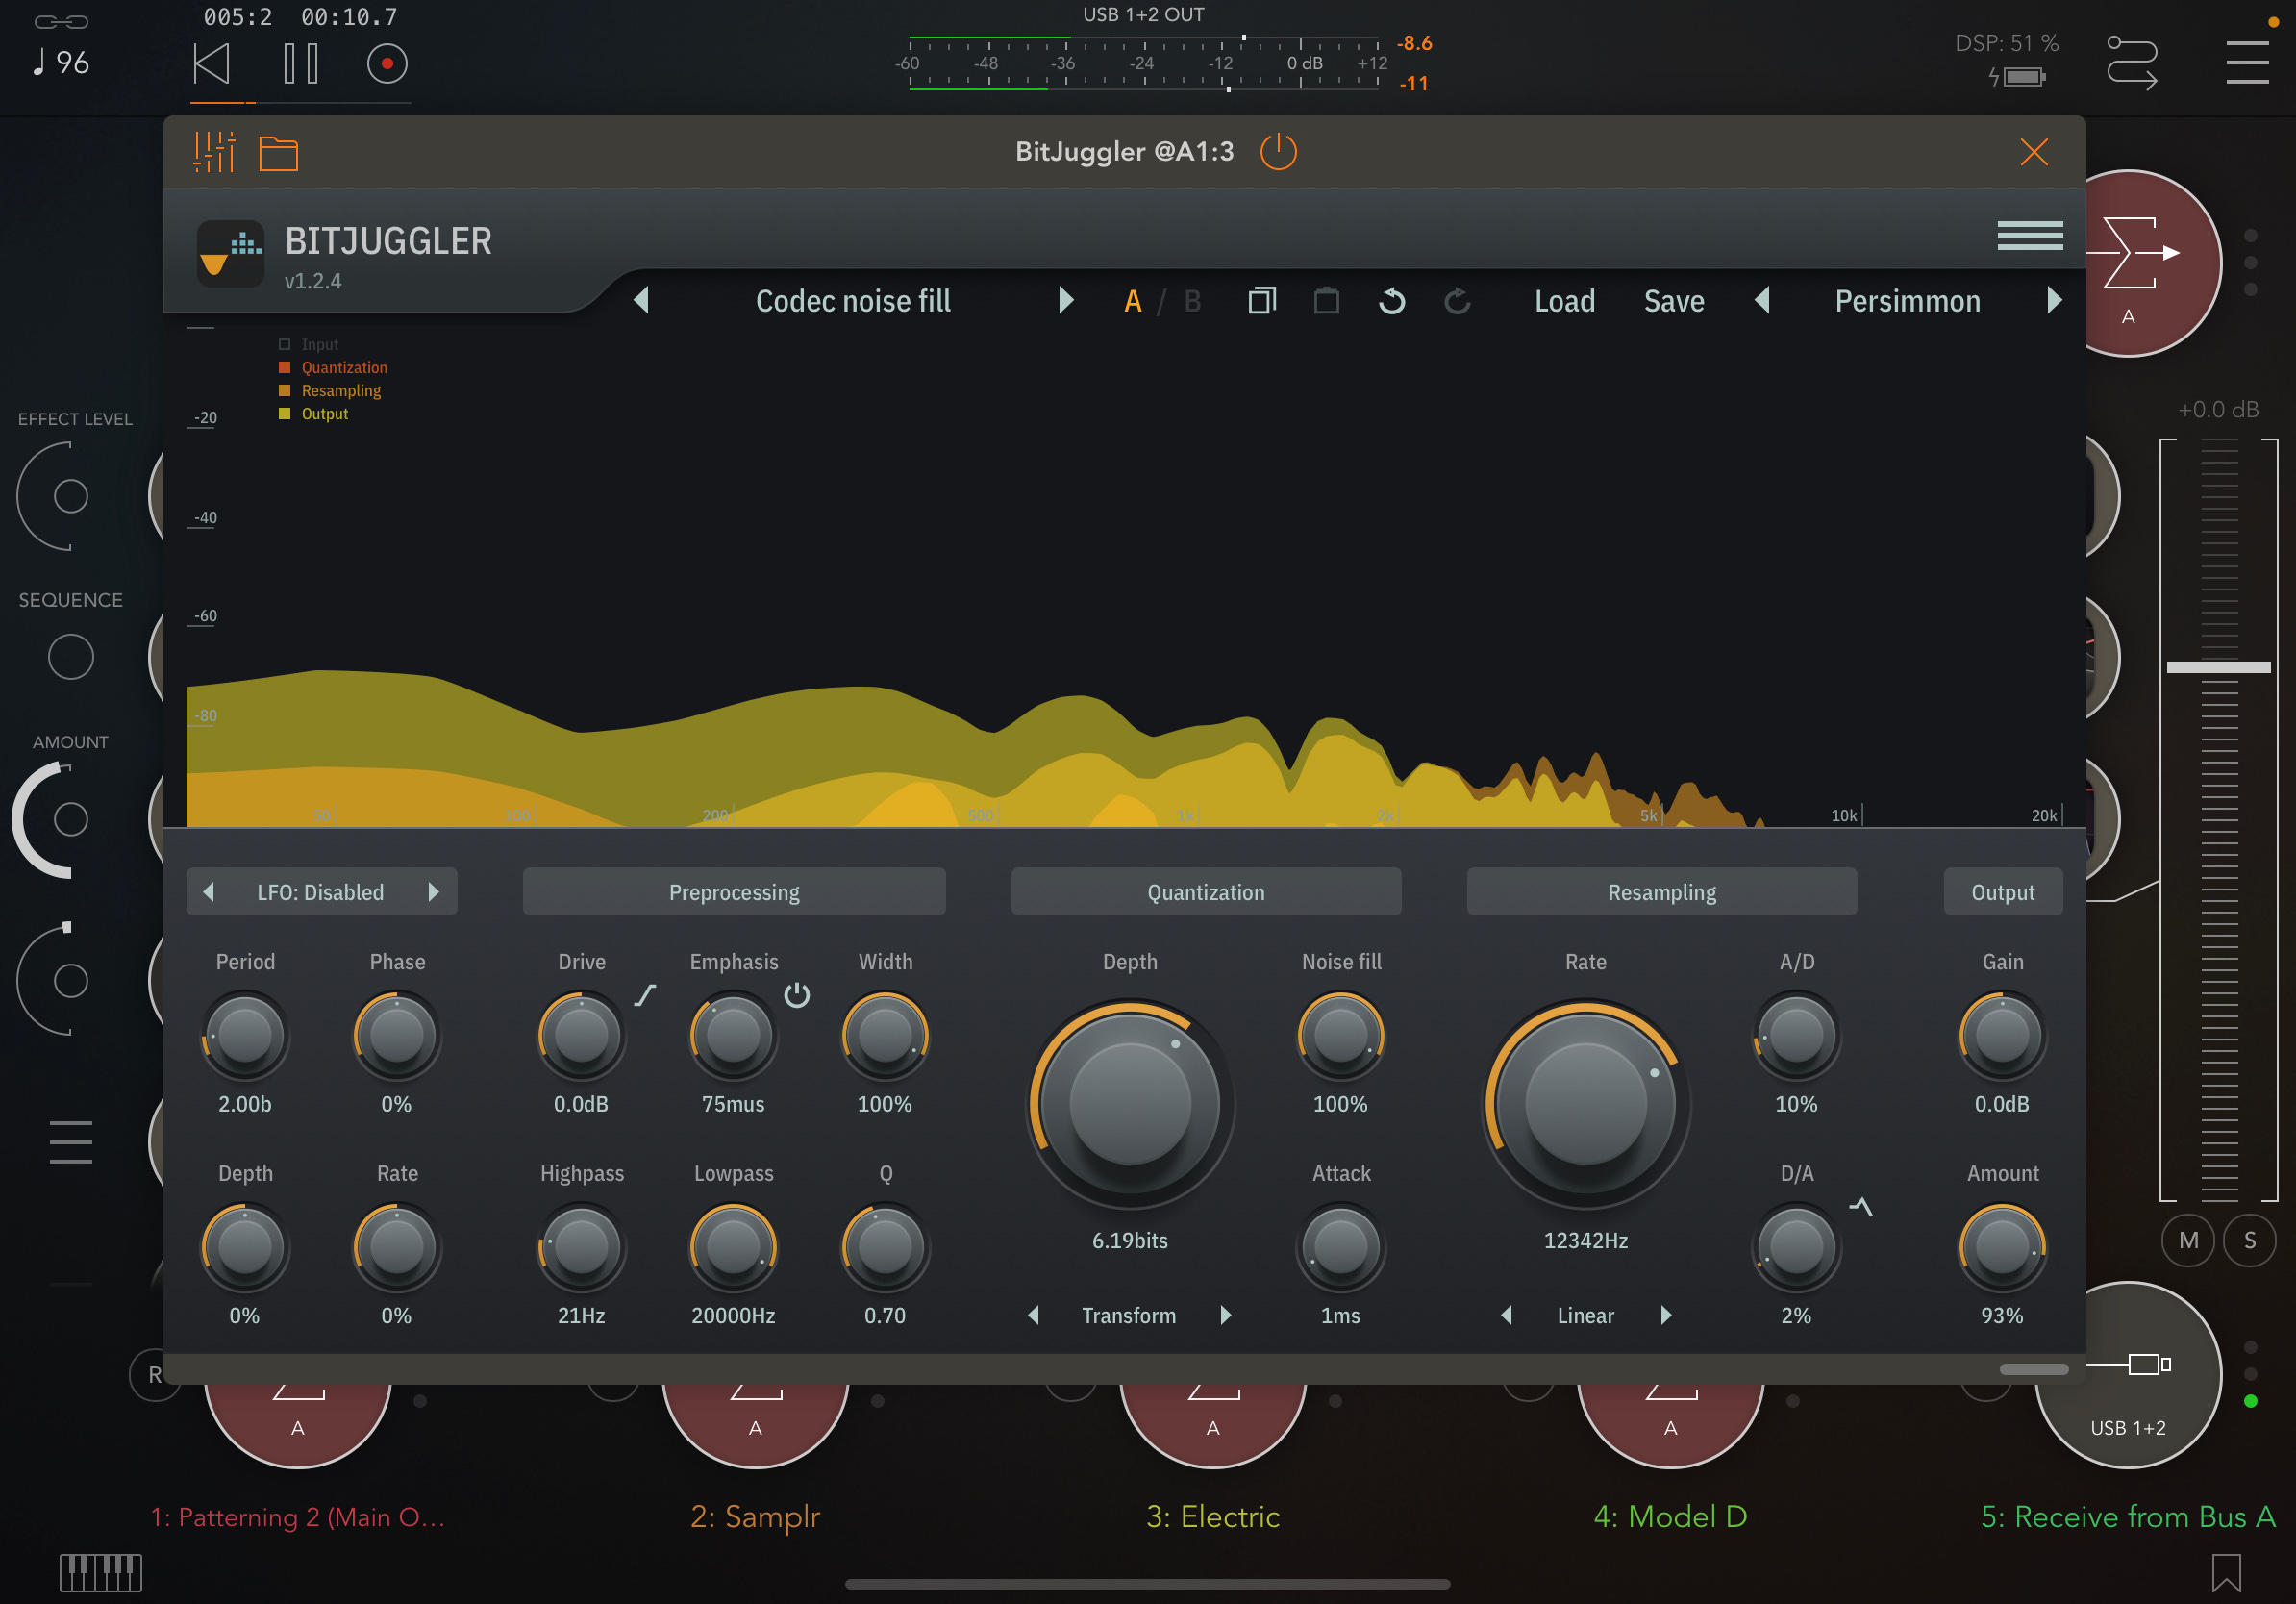
When people ask me what apps to start with for effects processing on iPads, I typically recommend a few tried-and-true classics: the Eventide family of plugins, the Fabfilter suite, Audio Damage bundles when available, and finally, the Toneboosters suite of effects. They are clean, smart, high-quality effects covering everything from utilities like spectrographs and exciters, all the way through to creative effects like tape simulation, stereo effects, and of course, the device featured in this video: BitJuggler bit crusher.
Bit crushing is typically an afterthought on most plug-ins, usually relegated to a simple 2-way control system for bit rate and sample depth. Toneboosters takes this considerably further with multiple modeling options for different codecs, A/D and D/A control, an LFO, filtering, drive, and so much more. You can dial in precise amounts of “crushing” and achieve a huge range of digitally distorted sounds, from subtle aliasing to total annihilation.
Step 6: bass from Moog Model D
Last but not least, I use the Minimoog Model D app to provide some thick, snarling bass tones underneath. I’m playing the synth with the built-in keyboard within AUM - it’s small and needs to be used delicately to avoid fat-fingered key presses, but I love having the option to tuck it away when not in use, assign it to multiple instruments without any wires or cables, and to activate the “hold” feature at the press of a button for long, sustained drones. Because the Moog only has 3 simultaneous voices and I’m focused on bass tones, I don’t really need a full keybed on an external controller.
I’ve spent so much time with the Moog apps on iPad, and recommend them to everyone I speak to about the platform. The quality is impeccable, the CPU is incredibly efficient, and there are sounds here well worth their modest entry prices. To have exact replicas of stone cold classics available on an iPad and iPhone is mind-boggling, and you’d be out of your mind not to pick them up if you haven’t already.
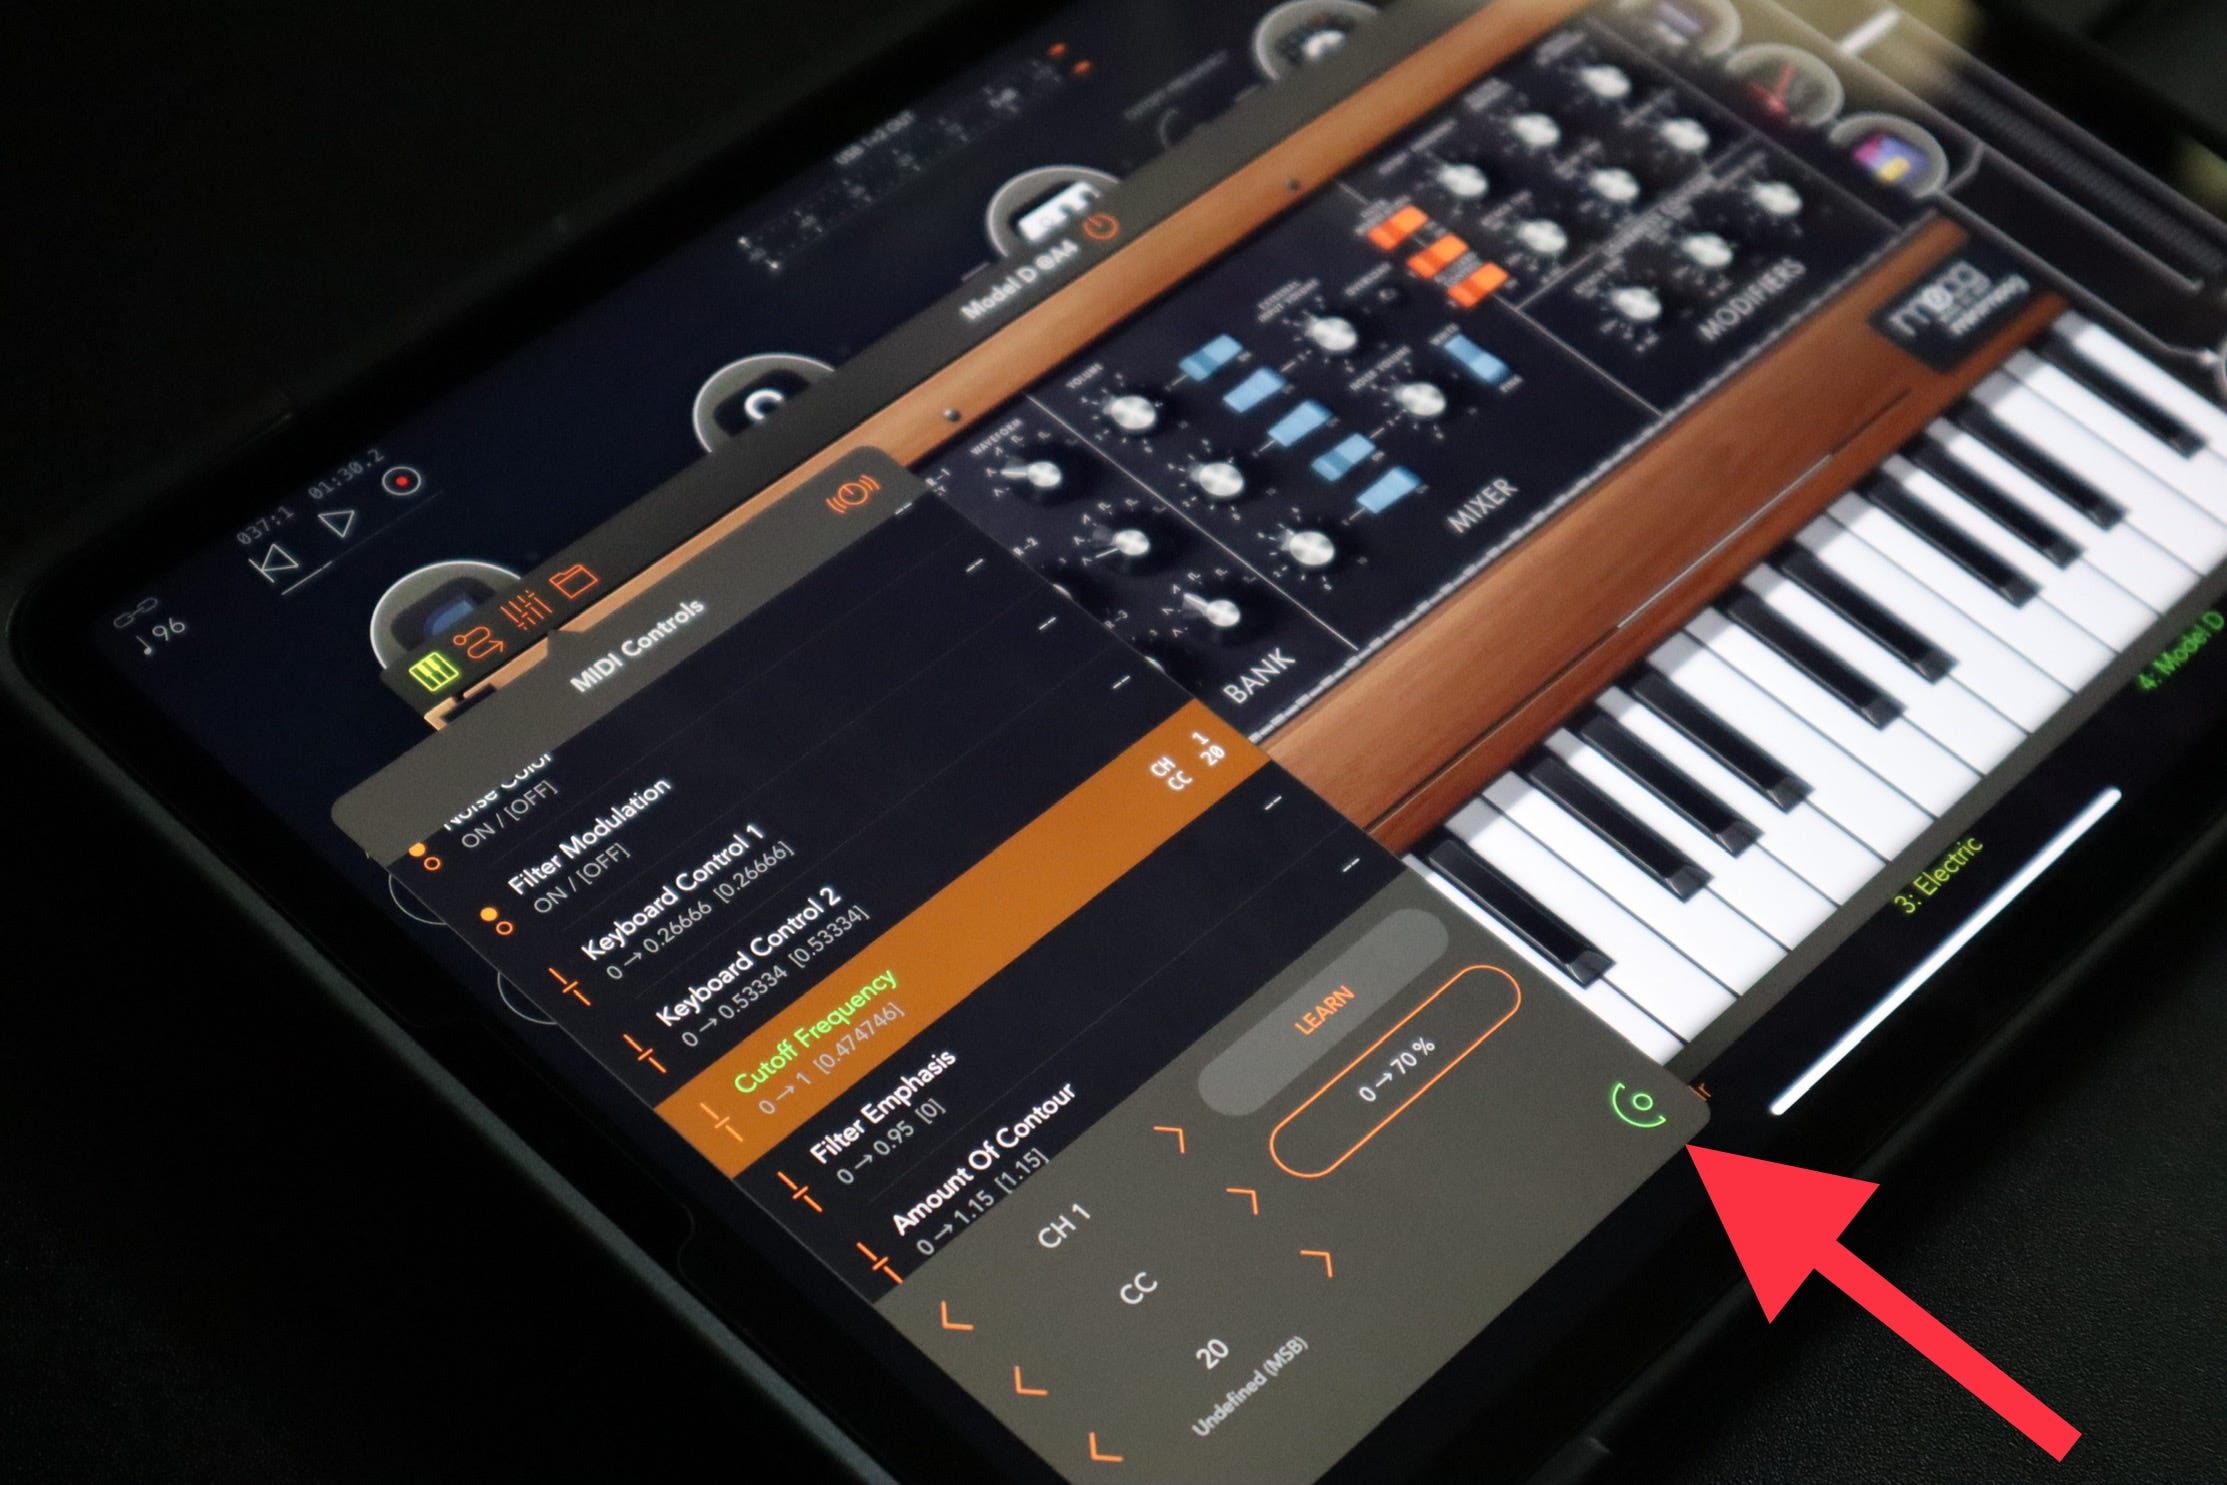
Pro tip! See that arrow right there? Head to the “MIDI Controls” section of any app in AUM, select the parameter you’d like to control, and click that half-circle icon to place the control next to the app’s icon on the main AUM mixing page. This is a great way to have easy access to the most important control on a given instrument, right from the mixer page. As an example, on my Moog synths, I always make sure that the filter cutoff control is selected here so I can control it from the mixing page in AUM.
Conclusion
Hopefully this provides some added insight to the video I shared, and it’s easier to follow along with what’s happening. Thanks so much, as always, for reading. I love sharing techniques here and I’m happy to answer any questions you might have. I’d also love to hear if there are specific apps you use for creative rhythmic processing.
Finally, if you appreciate these insights, I’d love for you to follow me on YouTube and/or spread the word about what I’m doing here. I’m hoping to grow the scope and reach of these channels and would love to continue expanding into other avenues like podcasts, interviews, and guest discussions about music-making techniques and processes. Click here to do so:
All the best to you and yours,
Andrew
This is a wonderful and generous sharing, thank you Andrew.
So much to dive into here Andrew, thanks so much for sharing!