


Studio Diary: January 25, 2025
On luck, discretion, and patience

I’m not comparing the gravity of these two activities, but sometimes, working on music can feel like being an air traffic controller. Multiple ideas in flight; multiple ways to land them…and occasionally, a lot of stress to make it happen.
It seems like 3 things are required to get it right:
Luck
Discretion
Patience
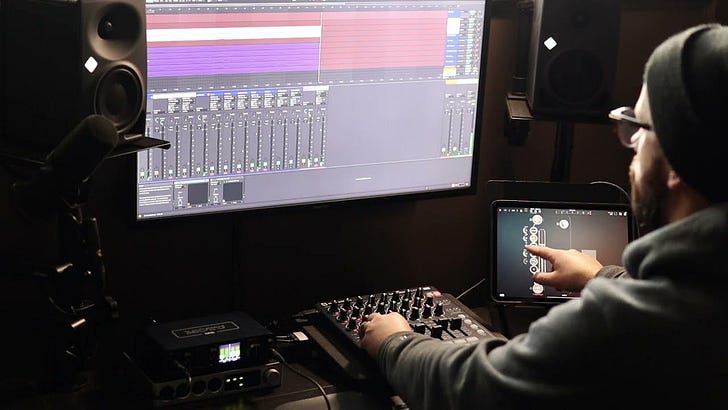
…and that’s exactly what I’ll discuss in this edition of the studio diary, which is basically a look into how I navigate the early stages of songwriting. I’m using the iPad to sequence Kontakt and other instruments in Ableton Live, manipulate a drum beat generated by Patterning 3, and blend the resulting sounds into a dense improvised session.
Luck
Reaching the point of being ready to hit “record” on this project took several hours of work play in advance - free time with no real objective, just creating a multitude of different patches that were similar but different enough to work well together. I ended up with some pretty nice sounds that I wasn’t necessarily intending to come up with.
Taking those very first steps in a track is one of the most unexplainable aspects of music-making, and why I think luck is such an outsized element in the success of a song in its early stages. I can’t say that there was any deep meaning or intention behind these sounds; I just happened to walk right into them, and I thought they worked well enough to continue.
There are plenty of times that I don’t really know what I’m looking for until I find it, and I’m very willing to admit that.
In this case, I was initially focused on a simple synth pad in Omnisphere. It had been a long time since I opened this instrument, and so recently I spent a few hours over a weekend getting reacquainted with it. By just clicking through some of the built-in sine and triangle synth engines, I ended up with a simple, thick minimoog-style pad without much effort at all. I ran with this sound as the core of the piece, to start with.

I put a high pass filter on the track to cut out some mud in the low end, then set to work tweaking a second patch to compliment it. This part came from the excellent “Colours” engine by Slate & Ash (part of their “Auras” instrument). I tweaked a preset called “soft pad” to add high pass and octave down pitch-shifting, then processed the result through a chain of EQ, multiband compression, and Soothe 2 to notch out problematic resonance. To separate it from the thicker and mid-heavy Omnisphere patch, I added Trackspacer by Wavesfactory to dynamically reduce overlapping frequencies. I love Trackspacer, and rarely mix a track these days without using it somewhere in the session to avoid clashing frequencies and phasing issues.

I grouped these two sounds into a “synths” pair, and applied Trackspacer again to receive side chain audio from my orchestral instruments group and help them get out of the way of the low strings and woodwinds, especially (which I’ll discuss in a minute). The group was sent to sends A & B for extra spaciousness from Valhalla DSP delay and reverb (as usual).
Together, the synth pair sounds like this:
Discretion
Luck gets the ball rolling, and discretion guides it: careful selection of exactly which pieces of the early brainstorms to hold on to, and which to let go.
Following the Omnisphere patch-making, I knew right away that I wanted to find a complementary pad from something more organic - and so, I set to work on patch design in Slate & Ash Landforms to develop a natural sounding pad from a realistic sound source. I probably spent 4-5 hours over the course of a few days searching for the right combination of sounds, taking care to include plenty of high end, breathy texture, and variation to distinguish it from the comparatively “flat” droning synth pads I had created previously.
Here is where the discretion comes into play. This stage of the process was a far cry from the more playful exercise beforehand that led to the “lucky” combination of sounds and chord changes in Omnisphere and Auras. It was by far the most time-consuming part of the piece, requiring a good bit of careful tweaks and edits to make sure that these strings did, in fact, sit right within the context of the synths and a few other pads I had going. I made lots of choices about where and what to cut, and what to emphasize tonally.
In the end, I came up with 3 carefully chosen tracks that combined to form a sort of orchestral ambient pad alongside the synthesizers. These instruments receive MIDI information from Audiomodern Chordjam, which is being triggered by notes received from Fugue Machine on the iPad over USB, via the iConnectivity Audio 4c. This instance of Chordjam is generating randomized chords in the key of B minor each time a note is received from the iPad.
Track 9: “Lows” - this is a combination of bowed bass and low woodwinds in Landforms. There’s an LFO gently modulating the “Expression” parameters and “Perspective” shifts within the UI for subtle changes in volume, filter cutoff, and mic positioning. I also used a small bit of “Smear” effect on the FX panel for extra space. I scooped out a good bit of low midrange to leave space for the synth pads.
Track 10: “Highs” - a combination of solo violin and high brass in Landforms, this also features modulation of Perspective and Expression. Once again, a healthy dose of mid cut to carve out space.
Track 8: Blisko Cello - a single cello from Felt Instruments, with mic position balanced between the “close” and “room” options. I absolutely love this instrument on the “Arks” setting; it has a really great thickness and extremely expressive vibrato that works wonders for adding piercing, swelling accents that cut through in a denser mix. It sounds like this in combination with the other strings:


Next up: pianos.
Amidst all the droning pads, I knew I wanted something percussive and tangible to cut through. Here, I mainly leaned on Native Instruments Noire for a felted, half-closed piano. The sub bass and deeper tones possible are particularly beautiful on this instrument, and I thought it would be nice to add some “oomph” to the lowest notes in each chord. I also had the “Particles” mode engaged for extra ambience - you can hear a trailing cloud of varying 1/4 note repeats on each chord.
I also used Felt Instruments Bardzo on the “Fragments” setting to play back 12 slices of audio in a rhythmic pattern. I find these bonus settings on Bardzo to be even more interesting than the actual Una Corda style sounds it’s built to emulate…and Fragments is an especially good means of adding staccato rhythms that sound like something I’d do on an Octatrack in slice playback mode. To push it back in the mix and add a bit more randomness/variation to avoid overcrowding the soundstage, I processed Bardzo through Ableton’s Spectral Blur device, then Audio Damage Replicant 3 (with a significant amount of panning), Wavesfactory Cassette, and Soundtoys tremolator. Ultimately, I wanted this to be a distant percussive effect that helped propel the song but didn’t remain too constant a fixture.
Just like the strings, both of these instruments were receiving MIDI information from Chordjam triggered by Fugue Machine, but on a second instance of it tailored to play back only 3-voice chords instead of the full 5 voices that are possible, and also without any timing variations. This created some extra drama and separation from the string section.
Here’s the resulting combination:


Patience
An extension of discretion is the patience required to sit with certain sounds and massage them long enough until your vision has been realized. This is usually the key to any drum sounds I’m programming, where a sound in my head may not be entirely possible to replicate right away and requires a good bit of time to shape into something useable.
The drums in this piece originated in Patterning 3 on the iPad. The pattern is a pretty simple one, with a constant 4/4 kick drum and low-probability hi-hat, snare, and low tom adding some extra elements.
Completely unprocessed, it sounds like this…pretty boring:
I say that patience was key here, because what resulted was again a multi-hour process of sticking with this pattern in hopes of transforming it into the glitchy, jittery, somewhat muffled rhythm that I wanted it to be.
Over time, I added these on the iPad:
Audiomodern Gatelab at 50-80% mix for stuttering and gating effects.
FabFilter Volcano filter for a choked bandpass effect, significantly “chopping” the beat and adding a whole lot of stutter effects.
Audiomodern Freezer at 50% mix for subtle retriggering and glitching effects.
Audio Damage Replicant 3 for bit crushing, panning, delay, and glitching.
Low pass filter to tame the hi hats
and these in Ableton Live:
Hi Pass filter to cut sub bass on the kick
Glue Compressor for thickening
Drum Buss for overdrive and “crush” effect
Roar distortion for subtle bit crushing on high end
Multiband compressor to tame the snare
Soundtoys PanMan at 50% mix to add subtle stereo spread
After hours of experimenting, tweaking, and testing new ways to shape my beat into what I wanted, I finally got there…and it sounds like this:


From this point on, and with parts in place, I was ready to film a live take and mix these tracks together to create the jam you see in the YouTube video.
Thanks for reading - I hope this was informative and interesting for you.
As always the level of detail to which you delve is ~very~ interesting and much appreciated for those of us (see: me) who are a little impatient when it comes to getting musical ideas going. The iPad is my only tool for music making now and having such an amazing resource (see: you) on hand to share knowledge and insights is a luxury rarely seen these days. Thanks, brother.
Interesting post and great to see the process step by step. Luck, discretion and patience are considerations every time I go out to make pictures. A friend of mine told me “luck is the residue of design” which to me reads as “show up for the work” - that kind of enables everything else. I’m trying to learn Ableton and my biggest challenge is getting to sit down with it every day so I progress.