

Studio Diary: January 11, 2025
Identifying textures, creating complementary sounds, and learning to bury your compositional ledes

One of the best decisions I made in 2024 was opening up my schedule for 1:1 appointments for anyone interested in instruction, tips, and insight. I’ve been able to meet so many wonderful and downright interesting people through these sessions…I’ve probably learned more from them than they’ve learned from me!
A few weeks ago, one such session (shout out to Adam E, if you’re reading) led to a conversation about how to think about arrangement and song structure in electronic “ambient” music. It was a great topic to think about, and led me to realize 2 things about my tendencies and process.
I tend to think about songwriting in terms of placing discrete, specific textures more than any single melodic choice. Adam is a far more talented musician than I am and was approaching electronic music for the first time with an extensive background in classical and jazz trumpeting, so was adjusting to the relative difficulty of structuring an ambient arrangement in an interesting way for a listener, especially when there aren’t any firm guardrails or other people to react to like there are in orchestral settings or improvisatory band environments. Thus, I explained to him that I tend to think about my songs as being based on, or inspired by, singular elements of texture or sound to expand upon, as opposed to carefully planned chord progressions or other traditional drivers of a musical arrangements. Which leads me to my next point…
When I find a texture or potential basis of a “song” to work from, I usually move immediately into thinking about how to bury that proverbial lede in the most interesting way (for me AND the audience). One of the best pieces of advice I ever received, and one which I’m still trying to implement effectively today, came from my friend Matt Kidd (who makes music as Slow Meadow): after a particularly absorbing and mesmerizing performance on our last tour together, I was chatting with him after the show and remarked how he always seems to know when to introduce a new element or move on from the last one. HIs response was simple and not the first time I’ve heard this advice, but absolutely true and something I needed to hear in that moment: “leave them wanting more.” Ever since then, I’ve been trying to do this…usually failing. I don’t have a natural sense of timing like Matt does, but I do make an intentional effort to think about how I carefully reveal the element of a song that I’m most excited about in order to maximize its impact.
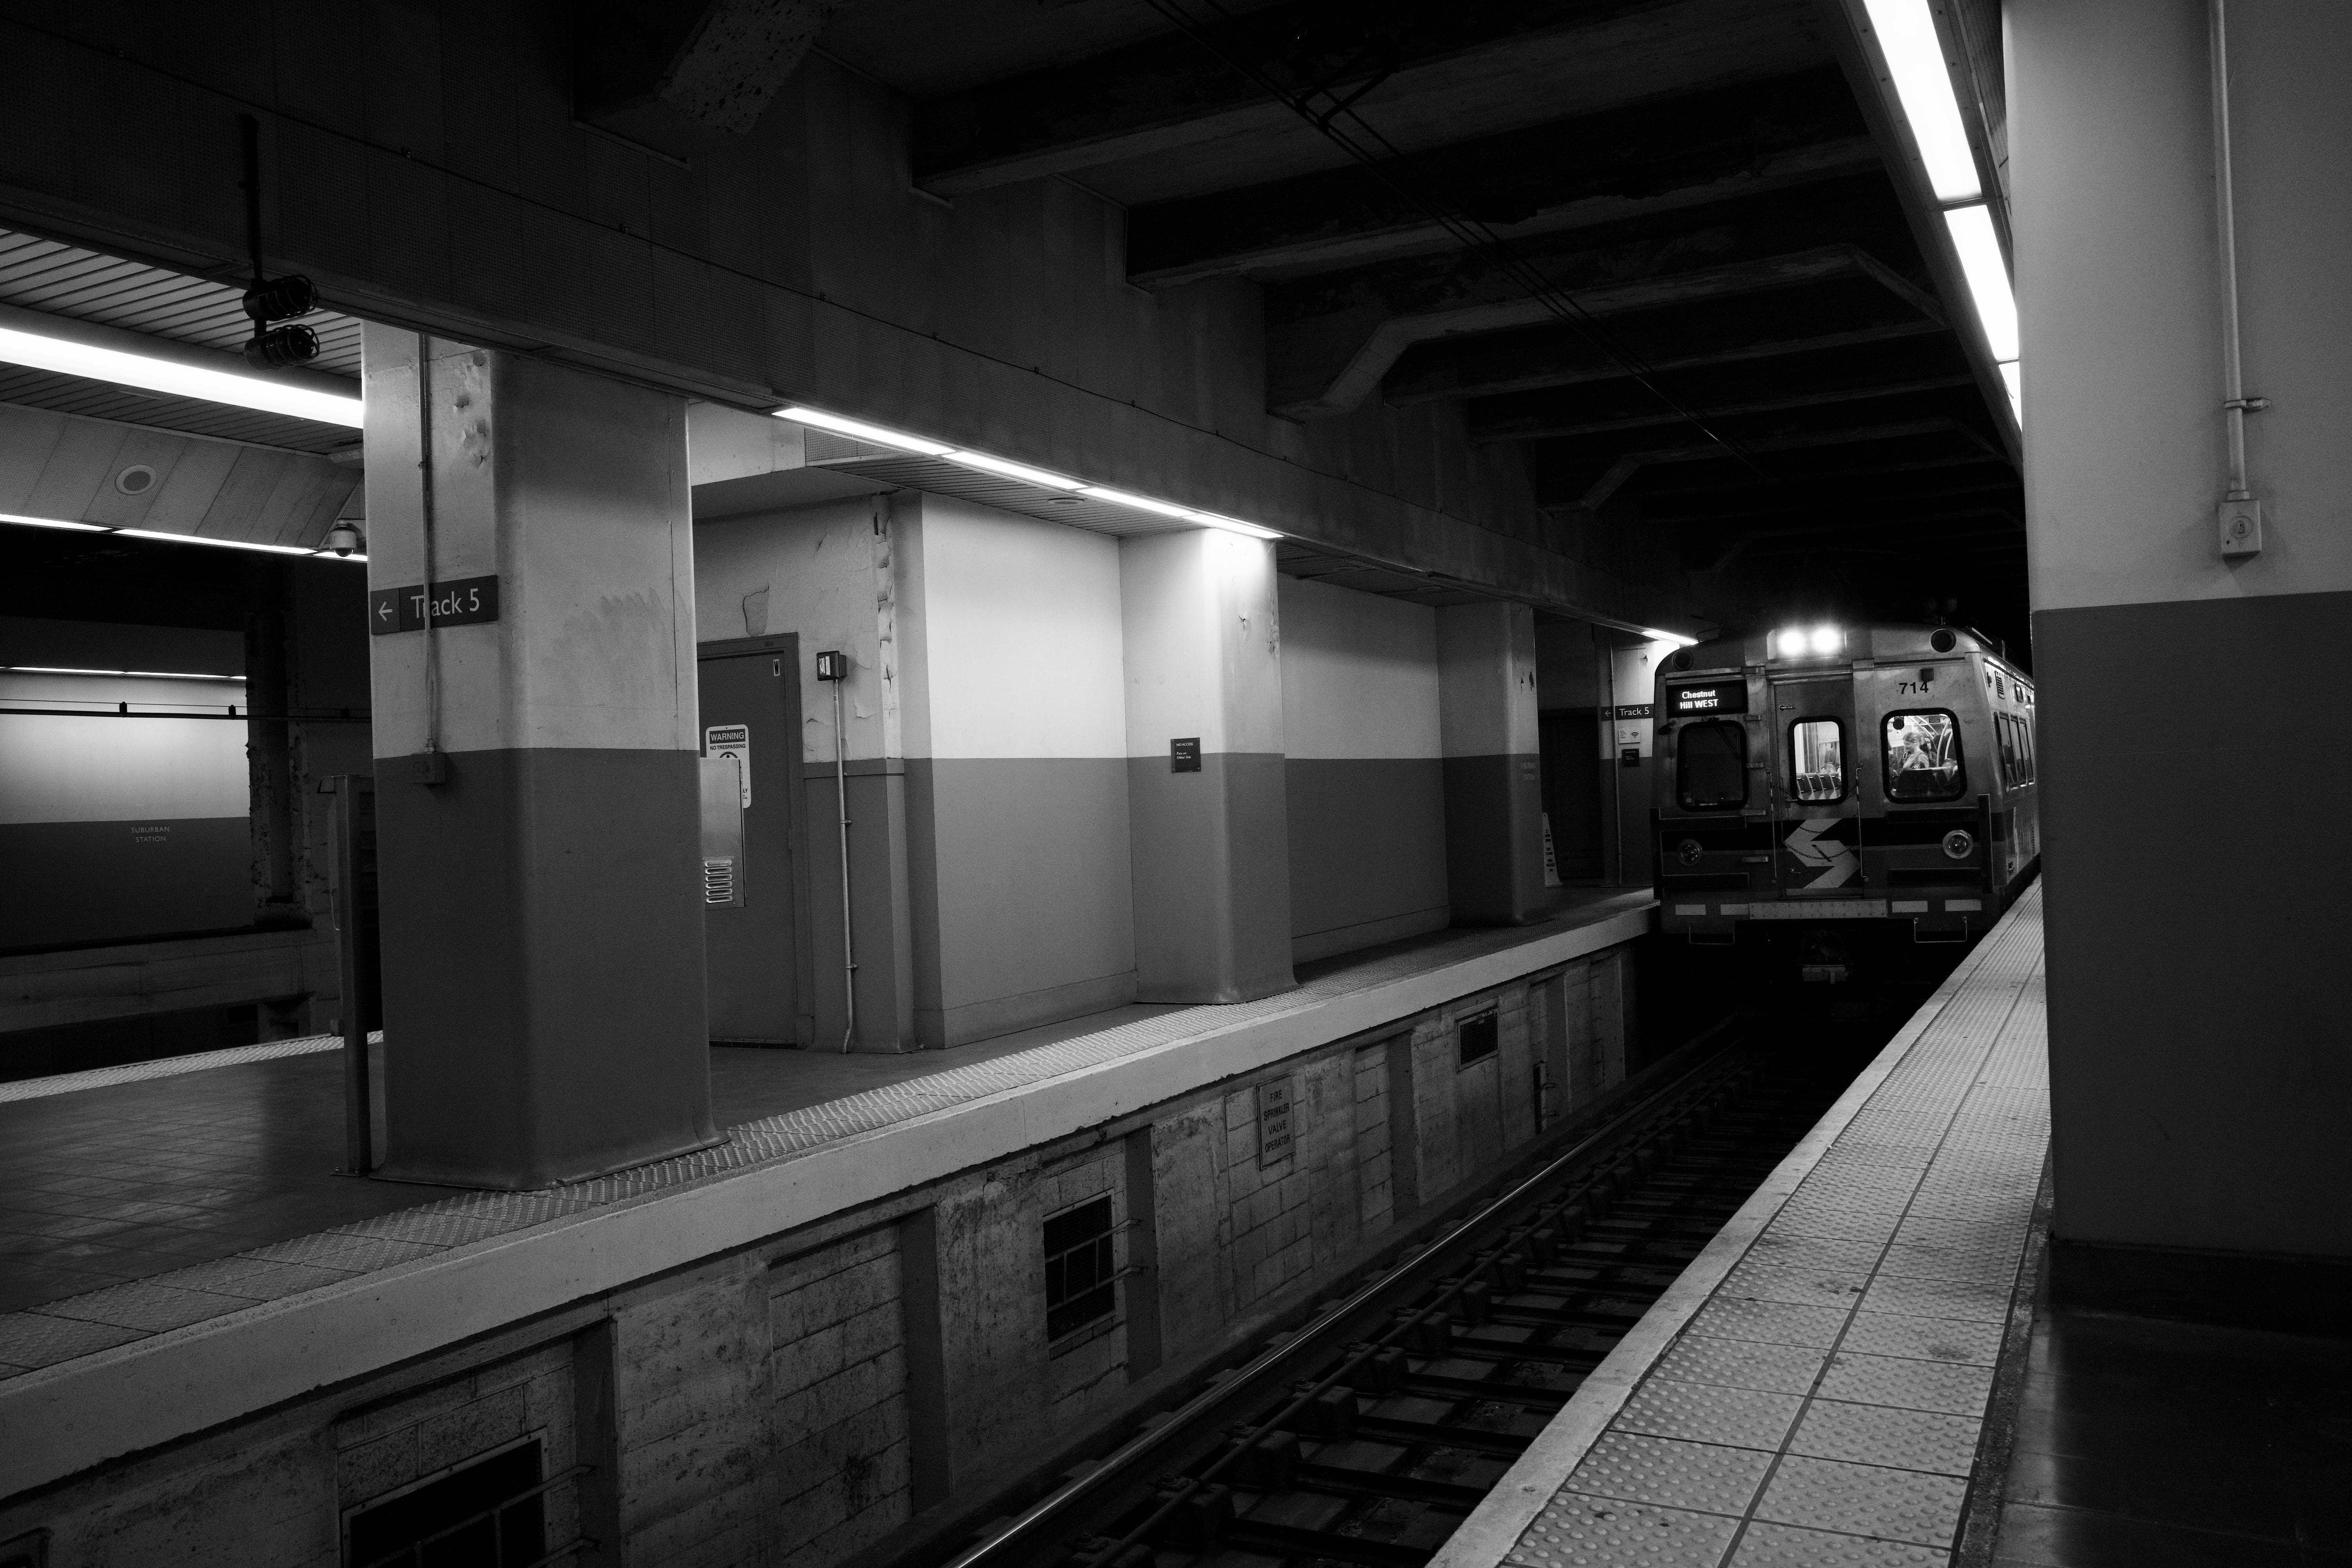
This edition of the Studio Diary is a good example of this way of thinking. The “lede” I buried here is a field recording from Philadelphia’s Suburban Station that I made on my phone recently. I just loved the low-level hum and static from the PA system that was happening that particular day. Usually this would be a loud, chaotic place at 4:30 PM on a weekday; I’m here 4 times a week and absolutely never think to capture that kind of ambience, but for whatever reason, that day’s atmosphere was significantly more interesting to listen to.
With that said, I had enough self-awareness to realize that it could be grating and fatiguing on the ear for anyone not familiar with what they were listening to, so I wanted to find a way to highlight what I found most interesting about it, then blend it effectively with other textures over time.
In addition to this recording, I leaned heavily on one of my favorite, tried-and-true, 3-part workflows:
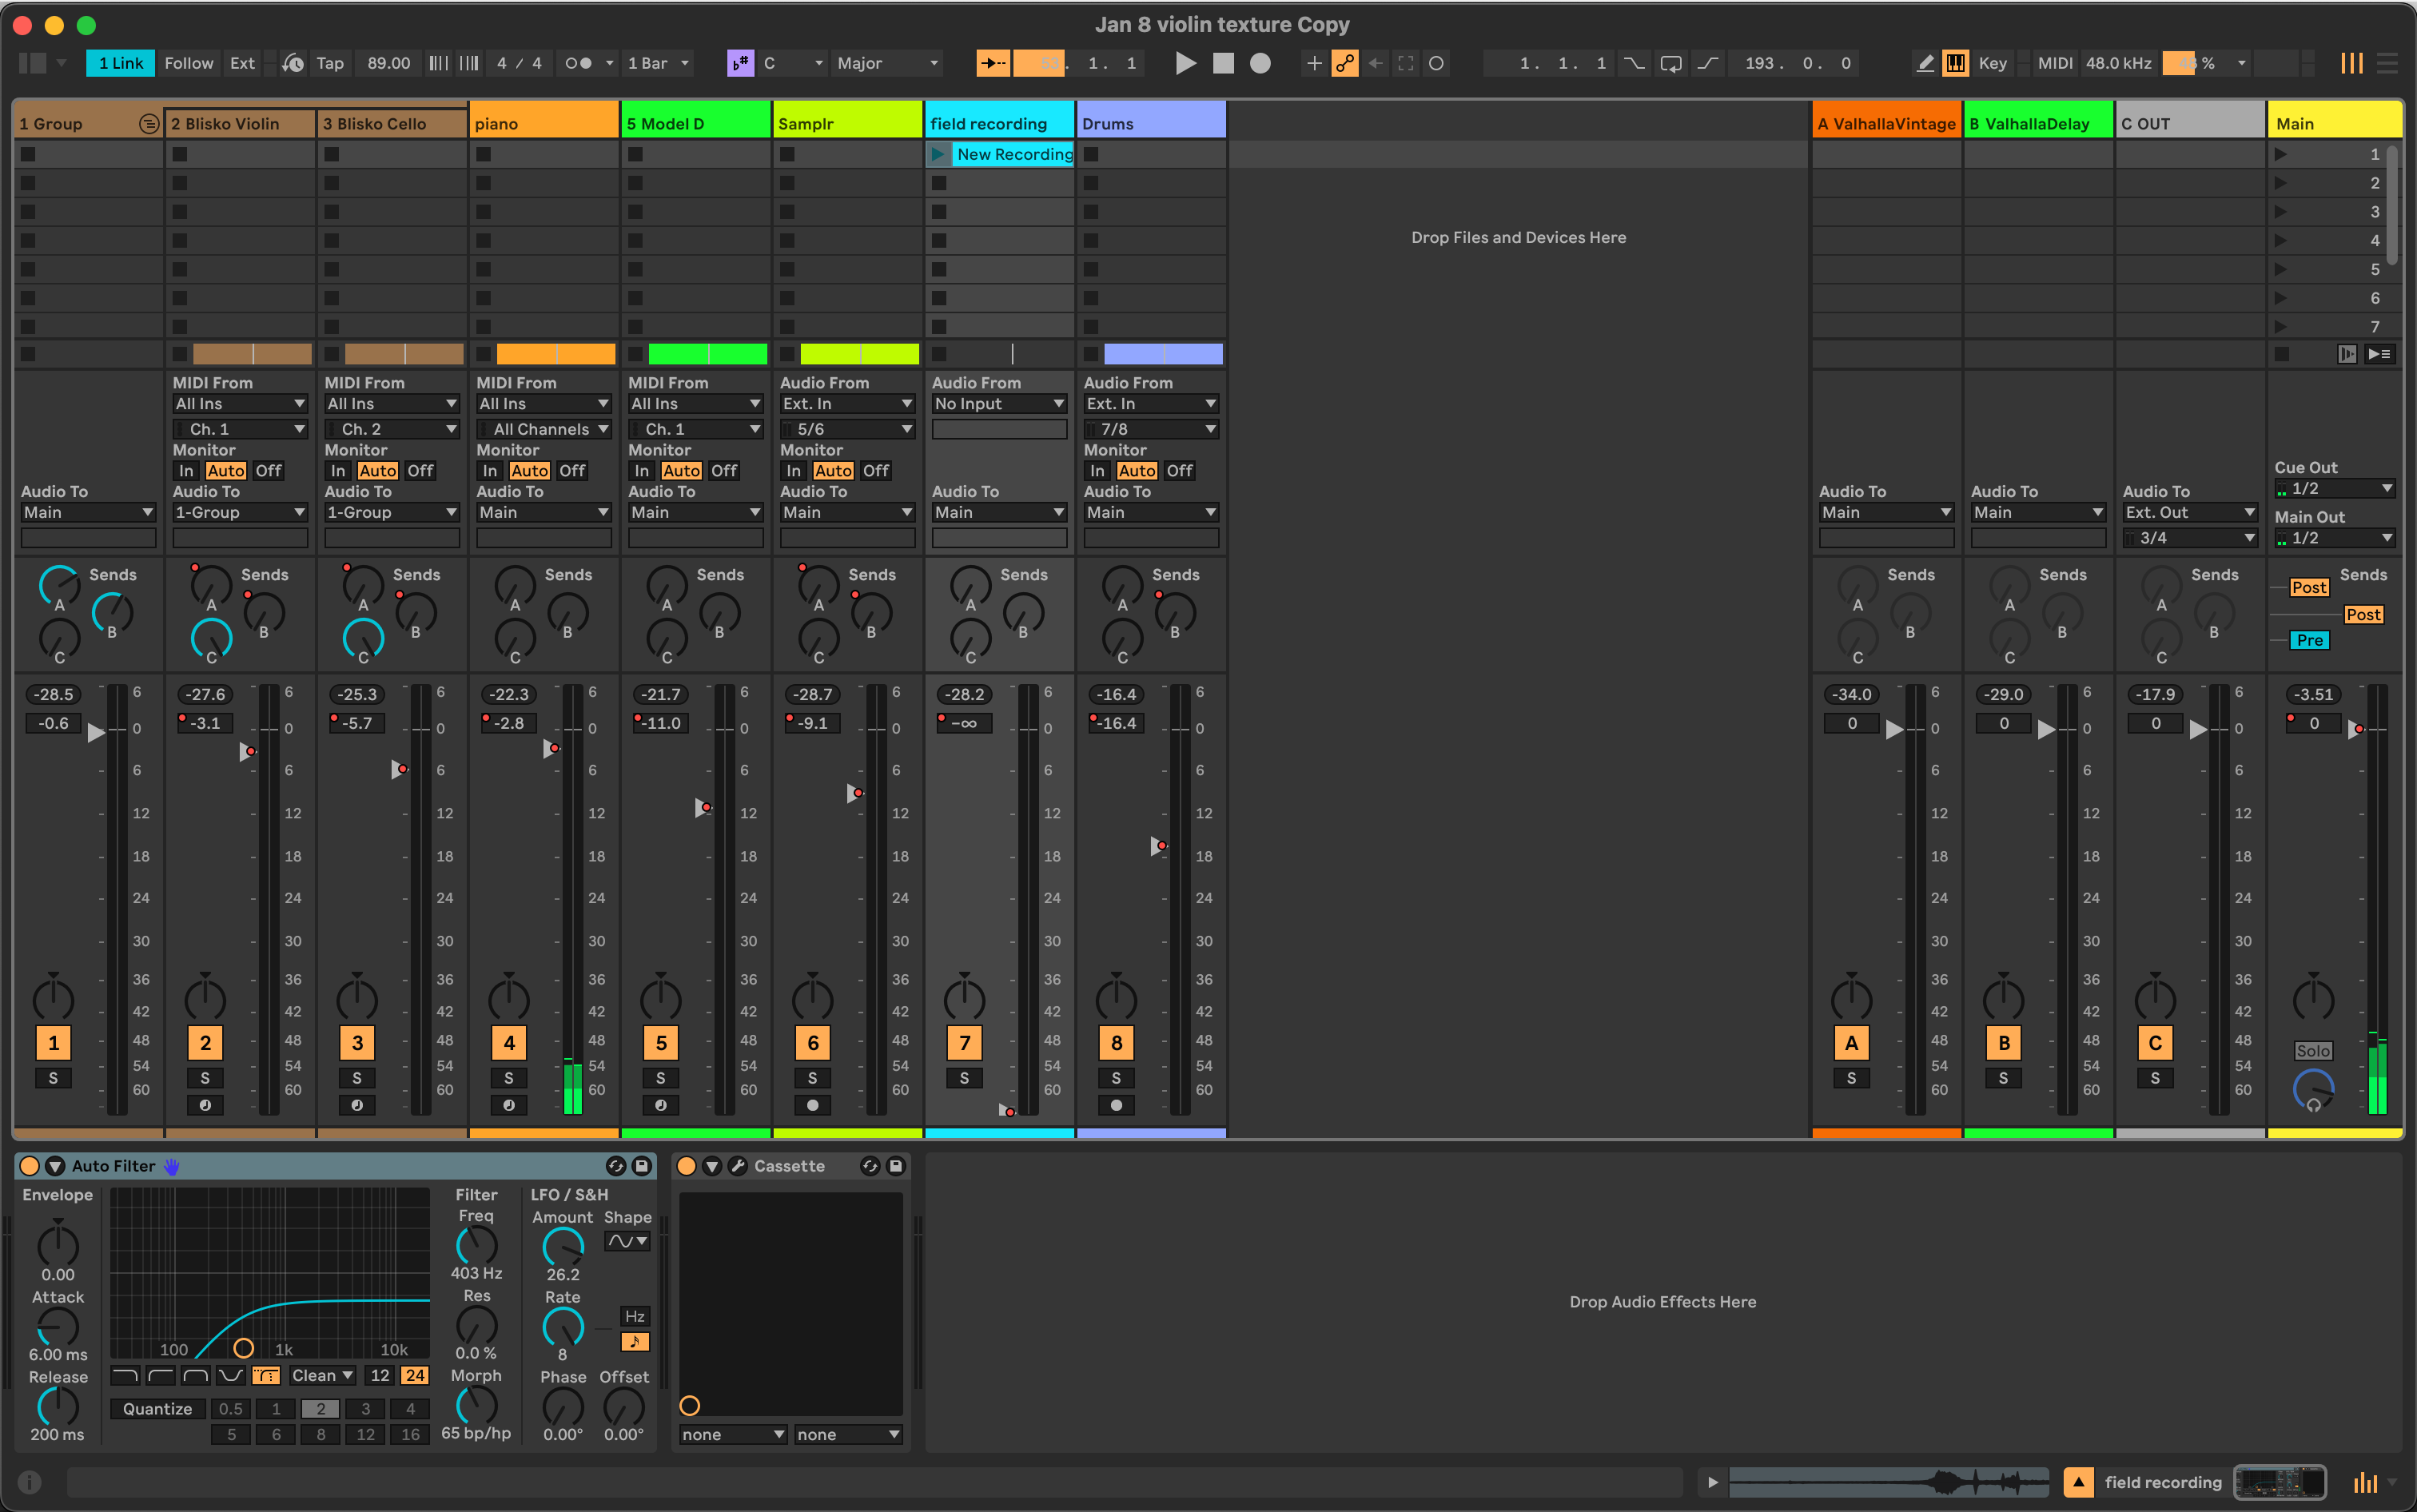
sequencing VSTs with Fugue Machine and Chordjam (in this case, Felt Instruments Blisko violin + cello, Moog Model D, and Native Instruments Noire piano), then
sending selected audio from Ableton Live to Samplr on iPad to sample and tweak, and finally
attempting to supplement it with a drum pattern in Patterning 3.
As usual, the iConnectivity Audio 4c interface is making this simple by allowing audio/MIDI pass through over 2 USB connections.
Sound Methods is a reader-supported publication. If you find value in what I do here and want to help support my work, please consider becoming a free or paid subscriber and sharing the word. Thank you!
The field recording: setting the tone
I have to be honest that I find the term “field recording” a little high-brow for my purposes. That feels too purposeful and scientific for what I’m actually doing. My typical rationale for hitting the record button outside my house is usually something like “huh, sounds interesting; maybe I can use it under a drone.” There have been exceptions to this, of course (like my more “travelogue” oriented albums Formosa and Maui), but by and large I’m just listening for textural oddities and sample fodder rather than turning the act into any kind of reverent deep listening practice.
On January 3, I made this voice memo:
The first thing that stuck out to me about this atmosphere - captured between Tracks 3 & 4 of Suburban Station in Philadelphia - was the fact that the high-pitched elements, like the distant clacking of train tracks and the static hissing of the PA system, were much more audible than they normally are. Usually, these are buried under the din of people milling throughout the station, but today, they combined in a way that I thought could be useful as a noisy layer underneath some of my more typical sound sources and in place of something like white noise or tape/vinyl artifacts.
Since I knew I wanted this sound to serve a textural purpose, I immediately went to work with a high pass filter to emphasize the noisy top end sounds…and went even further overboard by sending it through a cassette tape simulator from Wavesfactory to collapse the whole thing to mono and draw out even more static noise:
The ensuing parts I arranged - strings, piano, bass synth, and drums - were then built around this noisy, hissing field recording.
Blisko violin + cello
I knew immediately that I wanted to design sounds that would complement this recording of the train station, and set to work creating an extra raspy, close-mic’ed string duo to start the process. For this, I turned to Felt Instruments’ fantastic Blisko libraries of violin and cello, which I find are at their best when zeroing in on the closest, most intimate sounds of bows being drawn across strings.
I chose to set up both violin and cello to be played by soloists (you can blend up to 3 players), upped the percentage of close-mic sounds until I found a comfortable balance between instrument and room tone, then processed each instrument through the same chain of Ableton’s “Roar” distortion effect. I went for mild saturation using a tweaked version of the “diode treatment” preset, followed by an instance of Soundtoys Tremolator set to 80% depth over 12- and 16-bar lengths to help them fade in and out of view over time rather than being constant and overbearing. I grouped these two layers together and applied a simple EQ to scoop out low mid buildup from the reverb, and also applied Wavesfactory’s Trackspacer (receiving input from Noire) in order to keep them from clashing too much with the low-mids and deeper tones of the piano.


Sequencing and sampling on iPad
The strings were performed by midi sequencers on the iPad. Again, nothing new for any regular readers of this blog: I sent a basic sequence in Fugue Machine to Live over USB MIDI on the Audio 4c interface, using 2 playheads: Playhead 1 on MIDI Channel 1 for the violin and Playhead 2 on MIDI channel 2 for the cello. I set up a 3rd playhead that was sent only to Chordjam, so that it triggered random 3-voice chords in the C Minor key every now and then. The first 2 voices were sent to Live on Channel 1 and the 3rd voice was sent on MIDI channel 2, so each string instrument was receiving different parts of the chord every now and then. This 3rd playhead in Fugue Machine was moving the slowest of all 3 playheads, so it only triggered occasional Chordjam chords.
At the start of the video, you can see me using Samplr to sample audio from Live - specifically, it’s catching portions of the stringed instrument pair so I can resample those textures and accentuate the raspiness even further. I pitched it down an octave, then applied high-pass filtering to cut the mud and emphasize the stretched-out bowing sounds. I once again leaned on Roar for distortion and saturation, and over time I also increased the amount of this layer sent to Delay and Reverb busses in Live (using Valhalla effects, as I usually do).
That sounds like this:


Additional instrumentation
Bass: Moog Model D (Live)
Knowing that I wanted some deeper tones sitting underneath the strings, and also that I wanted to add some additional noise to harken back to that field recording and blend with its character, the first thing I thought of was a Moog Model D patch with a slight bit of white noise. The Minimoog is one of my all-time favorite instruments; I find the filtering and noise to be incredibly flexible for my purposes, and when I need bass tones I usually go here first.
Model D is on its own track in Ableton Live and is receiving the same iPad MIDI information as the violins on Channel 1.
Piano: Native Instruments Noire (Live)
Additional melody is coming from Native Instruments Noire piano. This is the “pure” setting with a closed lid and tiny bit of studio ambience dialed in using the built-in effects. I also maximized “tonal depth” and “overtones” to make it more resonant than usual, and engaged the Particle engine to add soft repeating tones on top. My thought with this instrument and its settings was to add some staccato, percussive sounds amidst all the droning strings and held bass tones of the Model D. I didn’t want every instrument to be so static.
I sent the output of the piano into Ableton’s “Spectral Blur” effect to add a reverberant halo around the piano strikes. Given that the field recording was taken in a long underground tunnel, I felt like I needed to give this instrument a little more ghostly space around it to complement the natural reverb down there. Spectral Blur is a great tool for this; I’ve been really impressed with it in my limited use so far.
Drums: Patterning 3 (iPad)
Finally, I crafted a drum pattern in Patterning 3 on the iPad to give some propulsion and movement to the piece overall. I think Patterning 3 is worth a more in-depth post all on its own…it would be difficult to summarize everything I love about this instrument, but the simple summary in this case is that I’m intentionally reducing the hold and decay times on the hats, snare, and toms, making them as “clicky” as possible and leaving room for the kick underneath. Toward the end of the video, I take advantage of the “fill” button implemented in this new version 3 to reveal an alternate pattern on demand, pulling out the kick drum entirely and introducing a tonal perc element that adds some interest to the fade out.
yeah, that description doesn’t really do justice to the intricacies of this instrument…I’ll do a better job some other time!
The iPad is processing this kit with a few select tools:
Audio Damage Replicator 3 for glitching/stutters
FabFilter C2 for thickening and squashing the dynamic range, making sure clicks and cuts don’t get out of hand
Audiomodern Gatelab at 30% mix for very subtle chops and volume fluctuations
FabFilter Saturn for distortion on the top end
LP/HP filter from AUM for simple filtering over time
Putting these 3 pieces together sounds like this inside Live…you can hear how the deeper piano hits sync up nicely with the Moog low end, and about 45 seconds in you can hear me engage the “fill” pattern on Patterning 3 to introduce the stuttering tonal percussion part I referenced during the fadeout.
Putting it together in Live
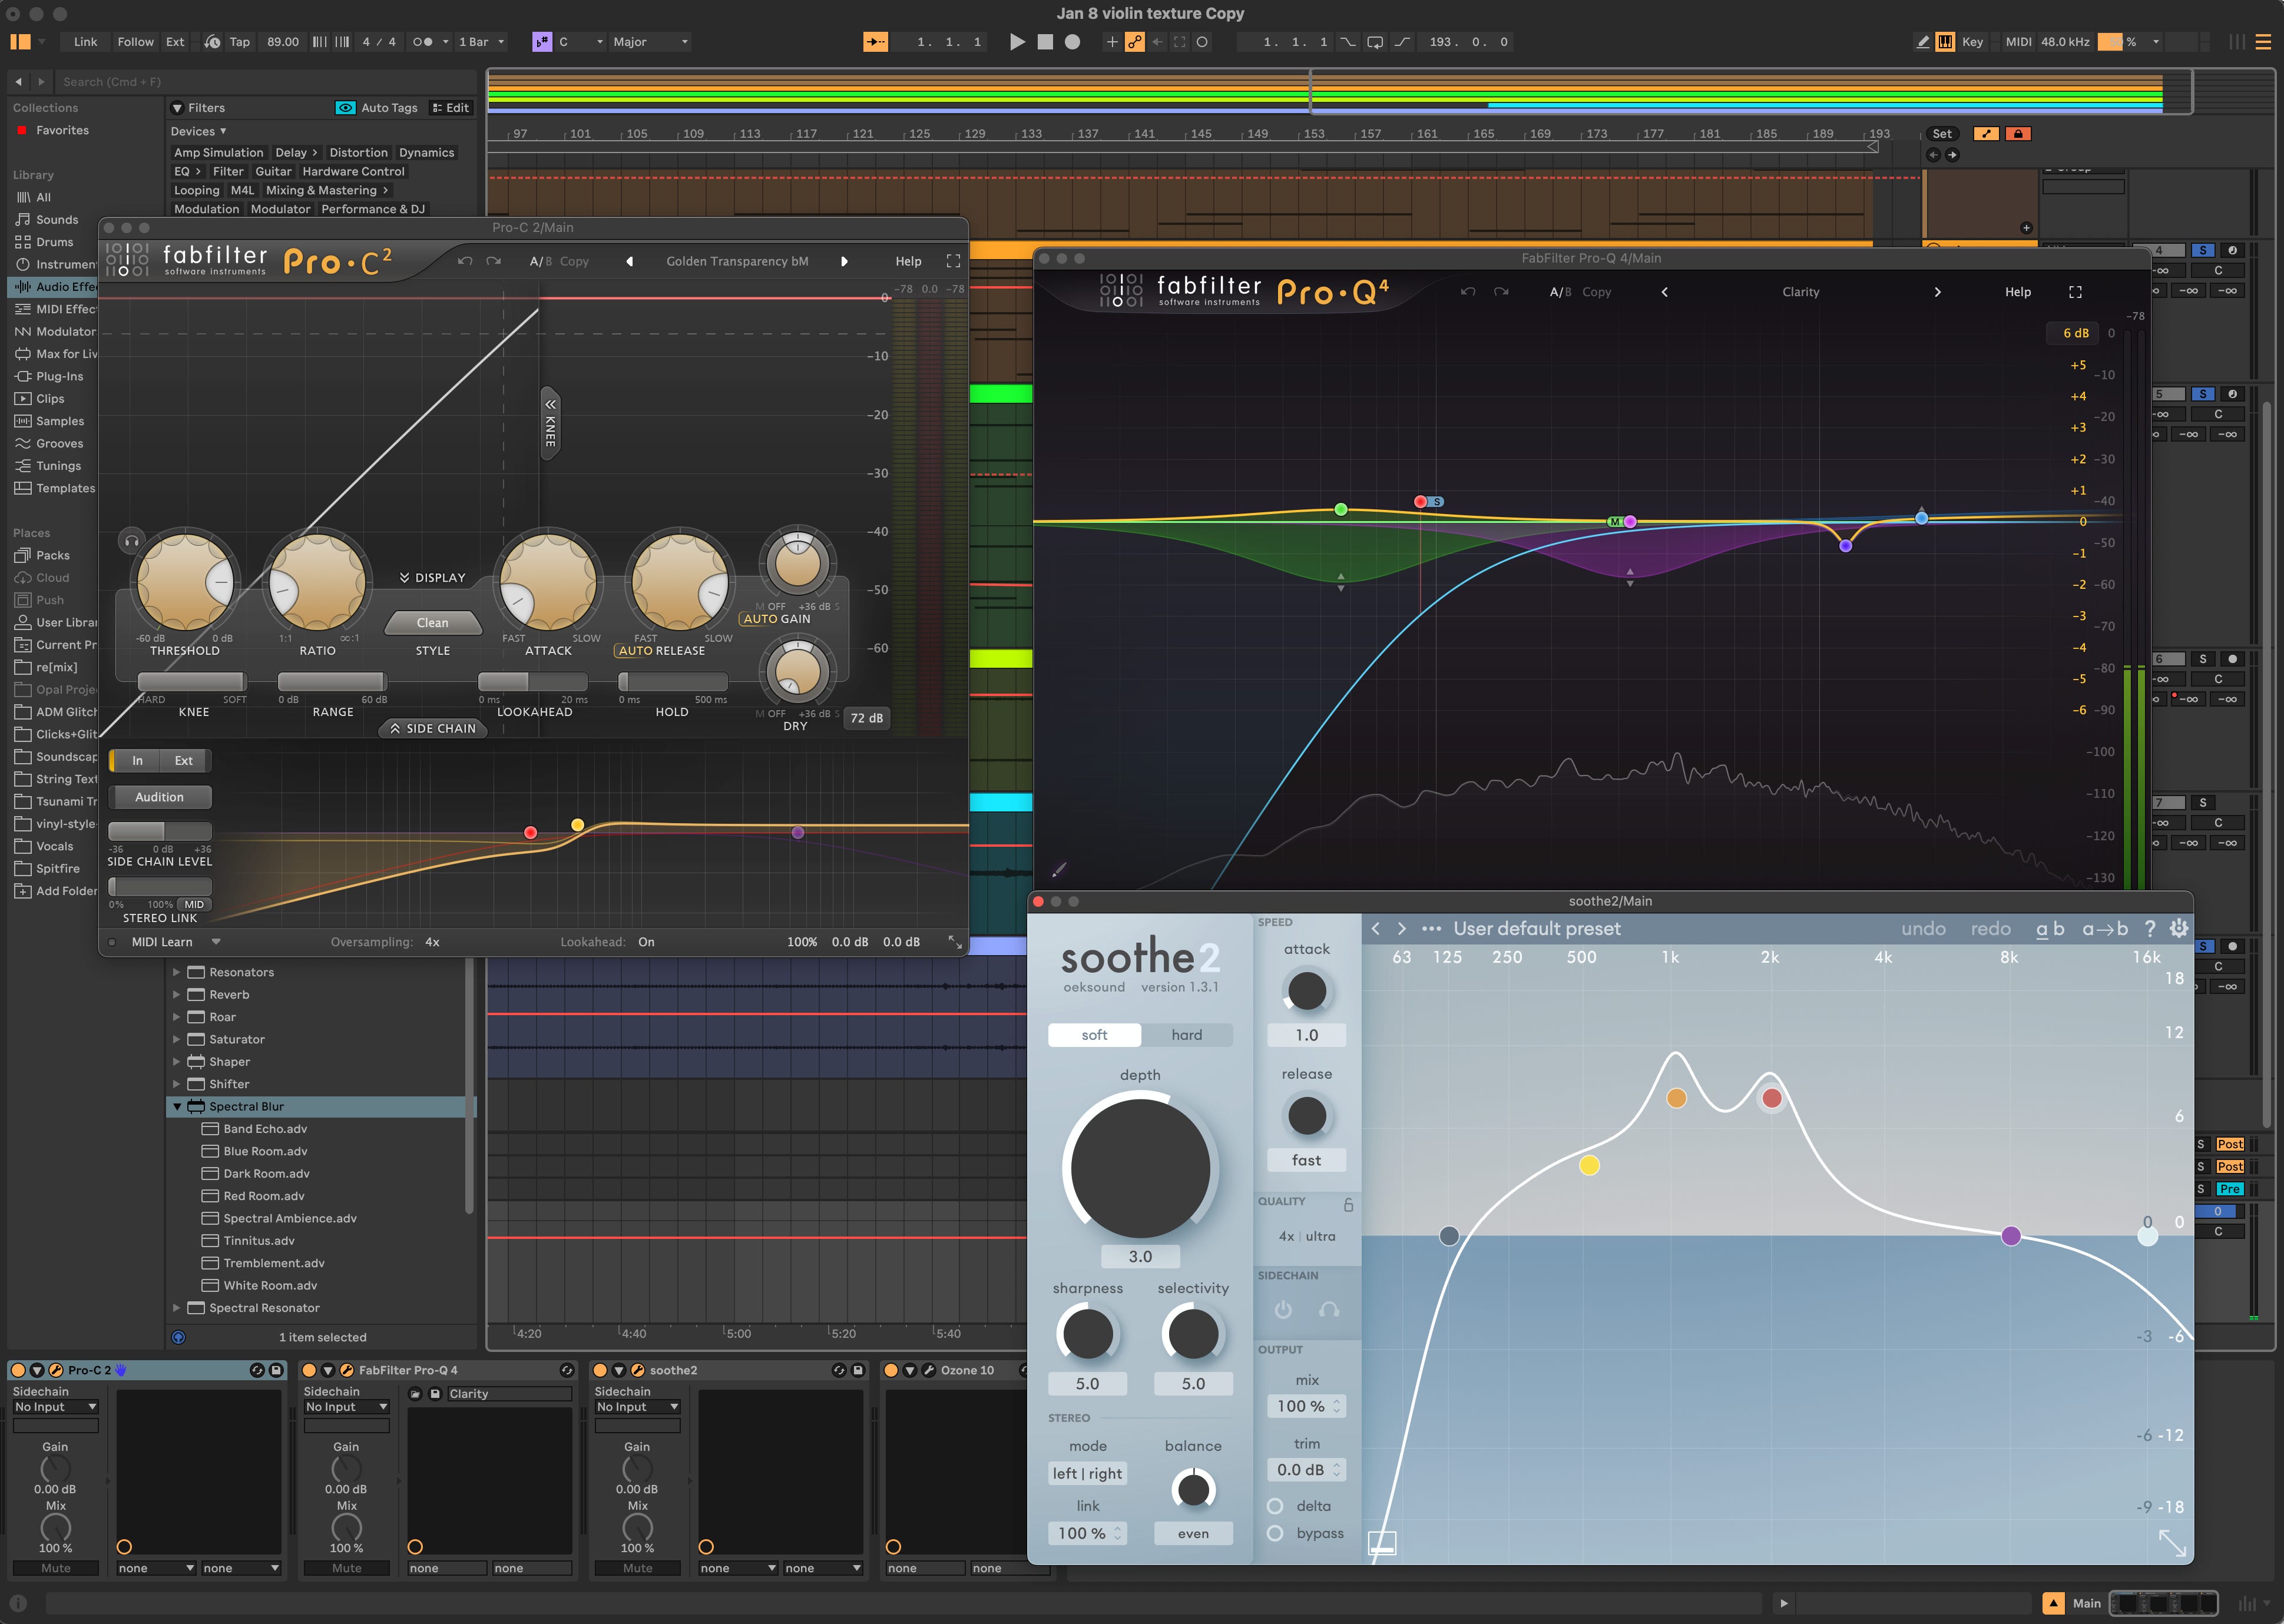
And the sum total of the session looks like this. There is some tone-shaping on the master bus from FabFilter ProQ 4, compression from C2, and loudness boost/leveling from Ozone 10. I’m controlling the whole thing with a Novation Launch Control XL.
I should mention here that I love this workflow because I can let the iPad sequencers churn in the background and do most of the work here, relying on my own manual moves on the control surface and my intuition to blend all these layers as the piece progresses, rather than automate those levels later. The whole thing feels like sitting in a cockpit, steering the session toward a destination of my own choosing. It allows me to listen for the most natural fade-in points for each part, and it’s really enjoyable to act mostly as a listener in a performance like this rather than thinking too hard as a “player” of these instruments. I was thinking about my conversation with Adam as I typed this up…developing chord progressions is not a fun process for me, but identifying interesting textures and shaping them into a cohesive whole most definitely is fun for me.
Thanks as always for reading along and taking the time to listen. Reach out any time with questions or comments!
-AT
Sound Methods is a reader-supported publication. If you find value in what I do here and want to help support my work, please consider becoming a free or paid subscriber and sharing the word. Thank you!
Nice work! Sounds really nice. Those strings sounds from Felt are very realistic sounding. Wow. What Minimoog emulation are you using? Or is that hardware?
Very insightful. Yes on Patterning 3.