


Studio Diary: August 3, 2023
Experiments with an unidentified sample

One of the inevitabilities of digital storage is that at some point, no matter how hard you try to stay on top of things, you’ll lose track of digitized stuff. I’ve been making a conscious effort to diligently organize my files lately, but it’s still a challenge to keep tabs on everything. Sometimes this results in happy accidents.
Recently, I was doing some “digital crate-digging” while cleaning up a memory card and checking out what sounds I had available. I stumbled across a sample that triggered a really fun experiment on my Octatrack and iPad, and I ended up liking it so much that it formed the basis of a new song while also planting what I think are the initial seeds for a future album I’ve been asked to do for a friend’s label.
In today’s post, I’ll share my thoughts on how I worked this sample into my latest improvised performance, and let you hear each of the parts in isolation.
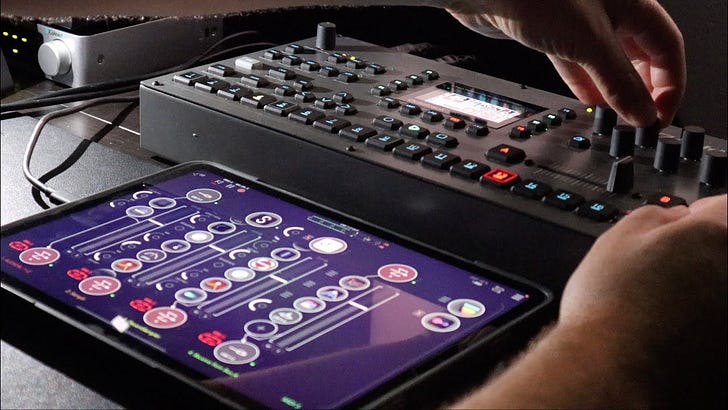
First things first: here’s the video in full.
The original sample
You may notice I’m using a gray Octatrack in this video instead of the black one featured in some recent uploads...well, this is actually a key part of the story.
Sometimes I do irrational things for minimal benefit, and this happened again recently when I was dusting off my black Octatrack for what seemed like the 10th time in an hour of use. The thing looks beautiful, but wow, it is an absolute magnet for dust and debris no matter how hard you try to keep it clean. Nothing escapes that deep matte black finish. I should also note that I was drinking an adult beverage and watching live Stimming videos…the combined effect was that I realized just how much I miss the high-contrast look of the black buttons on a lighter surface. Thus began the process of listing my Octatrack on Craigslist, securing a trade for 2 unrelated items, selling them for profit and buying an older Octatrack for way less than the new one.
Ridiculous? Yes. Worth it? Yes.
Back to the point here…while setting up this new machine and diving through the memory card I inherited, an interesting reversed synth in the sound library caught my ear:
Building blocks in Samplr
I’m not sure of the origin of this sound, or exactly what it is. There were no labels or specific details to reference. I did know I liked it, though, so I recorded it to my iPad to work with in Samplr. This is usually the easiest starting point for me to pick apart a sound and figure out where to take it.
I cued up 2 instances of the sample, one untouched and one pitched down a fifth, and looped them together at roughly 88 BPM. I didn’t feel a need to modify this too much further, other than adding a bit of reverb on the original for some extra space.
Discovering the sample was an accident to begin with, but yet another accident occurred when a subtle rhythm emerged as the two samples looped. Samplr was key to this - when you’re working in the 2nd mode (the one that lets you select 2 end points of a loop), you can click that small icon above the “reverse” button that looks like a sixteenth note between two bars, and it will automatically select loop sizes that fit in time with the BPM you’ve set. It’s a simple way to make sure your loops are timed more closely with the tempo.
Truthfully, I don’t know if this is an accurate description of what the feature is, so take my words with a grain of salt. I’ve never actually seen this little icon explained. But as far as I can tell, it’s a quantization function or “timing lock.”
They’re not perfectly synced in this example, but there’s enough overlap that they occasionally line up and seem to phase just right in a hypnotic way. Together, they sound like this, and form the basis of the jam:
I love the low-pitched humming and subtle pulsing that emerged, and thought it would be great to hone in on this even further. I caught the tail end of the humming sound in a separate sample on my Octatrack, looped it, added lo-fi distortion, and sent it back to the iPad for more work in Samplr. The resulting loop had a small “hiccup” in the middle that you can see in the waveform - this actually works out really well as a pseudo kick drum after I pitched the sample down. Here’s what that sounds like in isolation:
Together, I really liked the way these sounds were interacting. After letting these loop together for a while, I set up a session in AUM to start experimenting even further and record the results.
Shaping the sample with effects in AUM
With the Samplr session humming away in the background, I began to shape it further with filtering (Fabfilter Volcano and the built-in HP/LP filter in AUM), digital noises (Unfiltered Audio Lo Fi AF and Audio Damage Replicant 3), and a bit of extra spaciousness (Imaginando K7D tape delay).
When I choose effects, I try to stay focused on subtracting the excess and accentuating the stuff I like. In this case, this meant carving out low midrange boom with filters, and then making the pulsing and noisiness more prominent with Lo Fi AF and Replicant.
The nice thing about using an iPad for this kind of work is that it’s very intuitive and efficient to slide your fingers around and get instant feedback visually. It ends up being an extremely satisfying process to chop and shape samples. I personally like the fact that AUM presents your effects chain in a vertical stack, too: when I start to run out of room and have to slide up and down the list to navigate my effects, it’s usually a good sign that I’ve gone overboard and should either 1) stop, or 2) reorganize/remove some plugins to make space.
Here’s what the Samplr loops sound like after adding these effects.
Adding an additional melodic component with piano
At this point, I thought it would be nice to draw out some more melody to complement all the hissing and static going on. I did a bit of guesswork to figure out the key of the drone I was building up (it was G minor - I think?), then loaded a simple sequence in Fugue Machine to trigger corresponding piano chords in Audiomodern Chordjam. The piano here is a library from Dan Keen called “The King’s Upright,” and I’m using Decent Sampler to load it in AUM.
I wanted this extra sound to be as minimally invasive as possible - in my head I visualized it poking out from the periphery every now and then - so I again thought about how I could carve out most of its weight. I applied a substantial Fabfilter Volcano filter series to “notch out” the midrange, focus on the highs and lows, and make the sound as textural as possible. With additional reverb from Lunar Lander and Velvet Machine, as well as digital artifacts from Replicant 3, I eventually landed on a sound that seemed to sit nicely in context.
Here’s the piano in action:
With a bit of tape simulation from Chow Tape applied, it sounds even gnarlier and less recognizable as a piano. Mission accomplished.
Finally, some magic from the Octatrack
The last step of the experiment was to send the original sample back to where it came, the Octatrack, and layer in some additional variation of the sound.
I set up a project with 4 static machines, 3 containing a subtle drum part (kick, snare, and hi hat) and the 4th containing the original sample. I made a simple pattern from this minimal set of sounds to float underneath the drones on the iPad:
This sounded a little heavy-handed in the mix, so I didn’t use all of these parts in the final product. I focused on the clickiness of the hi hats, added some re-trigging to make them rapidly repeat, and applied LFOs to pan them around the stereo field rapidly. I kept a faint bit of filtered kick drum in there, just to accentuate the pulsing of the drones in Samplr but not completely overwhelm them with any overly-defined groove.
Next, I carved out a substantial portion of the sample’s midrange, and again focused on its most textural elements in the high end. The DJ EQ effect on the Octatrack is an excellent tool for this, as you get a wide range of frequencies to control with the shelving parameters. This sound is also heavily panned in sync with the tempo by using an LFO.
In the video, you can see that I’m un-muting pieces of the drum kit as the song develops. I’m also using the crossfader as a volume control: when I slide it to scene 9 on the right, I am increasing the volume of the hi hats and the sample.
Here’s what the Octatrack sounded like towards the middle of the piece:
Conclusion
Perhaps this explanation makes the video a little clearer, while also explaining my thought process in choosing effects in a session like this. I’m looking forward to sharing the final version of this track eventually. More on that later.
Thanks, as always, for reading!